Tip #1441: Owner is a user is a team

WARNING: Niche L400 tip ahead.

tl;dr

If you’re expect primary column name to be tablename + “id“, add an exception for systemuser and team tables – both will come back as ownerid in custom API.

L400

If custom API has an output property of type EntityReference then, for example, for account (or any other “normal”) table, the following json is returned as expected:

"Account": {
   "@odata.type": "#Microsoft.Dynamics.CRM.account",
   "accountid": "87aa5cfb-197c-ea11-a813-000d3abeef18"
 }

Save yourself a trip to metadata and use tablename + “id” for the primary column name, right? Not so fast. For either systemuser or team, you get ownerid instead of expected systemuserid or teamid

"User": {
   "@odata.type": "#Microsoft.Dynamics.CRM.systemuser",
   "ownerid": "889362cfb-22aa-eaea-abba-dead3a6a9942"
}

No one knows dev docs better than Jim Daly, his patience to express RTFM sentiment is fascinating.

In Web API ownerid is the primary key for the systemuser EntityType and the team Entitytype because both inherit this property from the principal EntityType, which enables the capability for either type to be owners of records.

— Jim Daly

The ownerid value is the same as the respective systemuserid or teamid columns.

EDIT: the same applies to any activity table, e.g. task, email, appointment, etc, because any table that is configured as an activity inherits from the activitypointer entity type. The primary key for any activity will be activityid, according to Web API EntityTypes – Power Apps | Microsoft Learn.

Tip #1440: Relative dates in sample data

We all enjoy flexing our Dataverse or Dynamics 365 skills from time to time. Many of us have meticulously crafted a demo instance from proverbial stone and blood. However, one of the challenges is keeping the data up-to-date. There’s nothing worse than displaying 20 tasks that are all overdue by four months. Fortunately, Dataverse offers a fantastic feature that allows us to modify data during import! Grab yourself a cuppa, blanket, comfortable horizontal surface and dive in: Add transformation mappings for import (Microsoft Dataverse) – Power Apps | Microsoft Learn.

Screenshot of an Excel spreadsheet. Selected cell has the following formula in it: NOW() + 14.

Alternatively, you can simply use an Excel file with formulas while following the instructions: Import or export data from Microsoft Dataverse – Power Apps | Microsoft Learn. Boing!

For fancier, more modern transformations you may want to look into Importing using a connector and Power Query.

 #"Added Two Weeks" = Table.ReplaceValue(
    #"Changed column type",
    each [Due Date], 
    each DateTime.From([Due Date]) + #duration(14,0,0,0), 
    Replacer.ReplaceValue, {"Due Date"})

Tip #1438: Turn on auto search for lookups

Today’s tip is from Amey “Anything But Code” Holden. You can drop your priceless tip into our tipping jar too, thank you very much!

I (Amey, not me – t.j.) often see users struggle with the confusing behaviour of lookups in model-driven apps. Typical sketch from an average week of consulting with model-driven apps looks like this:

UserClicks on the lookup column on a form
Lookup Column
  1. Shows nothing

or

  1. Shows a bunch of ‘recent records’ (do not get me started on the number of times I have turned this **redacted** (t.j.) feature OFF! (no tip ref but here -> Disable Recent Records from Dynamics 365 Lookup Control | Model-Driven Apps [Quick Tip] | D365 Demystified)
UserConfused – “there’s nothing there, it’s not working”
Expected behaviour Show me a list of available values to select
Actual behaviour Nothing

Me“Start typing – what are you looking for?”
UserTypes what they are looking for
Lookup ColumnDoes nothing
UserMore confused – “there’s still nothing there”
Expected behaviourFilter the list of available values that match what I am typing
Actual behaviourNothing

Me“Oh yeah ok now press ‘Enter'”
User“Where’s ‘Enter’?”
Me“On your keyboard. Return? Pointy Arrow Button? No not the delete one! Ok ok ok click on the search icon. No not that one. Aghhhh!”
**the process continues for a while until desired outcome is achieved or one of us gives up**
User“ahaaa found it”

Me“I’m sorry, lookups are confusing, **redacted** (t.j.) design, don’t worry it’s not your fault, you are still really smart” etc. etc.

How to make this go away

  1. Go to https://admin.powerplatform.microsoft.com/
  2. Select the environment you want to update
  3. Select the Settings cog in the command ribbon
  4. Expand the Product menu
  5. Select Behaviour
  6. Update the Lookup Behaviour to the minimum amount possible for each of the options
    • Minimum number of characters to trigger typeahead search: 1
    • Delay between character inputs that will trigger a search: 250ms
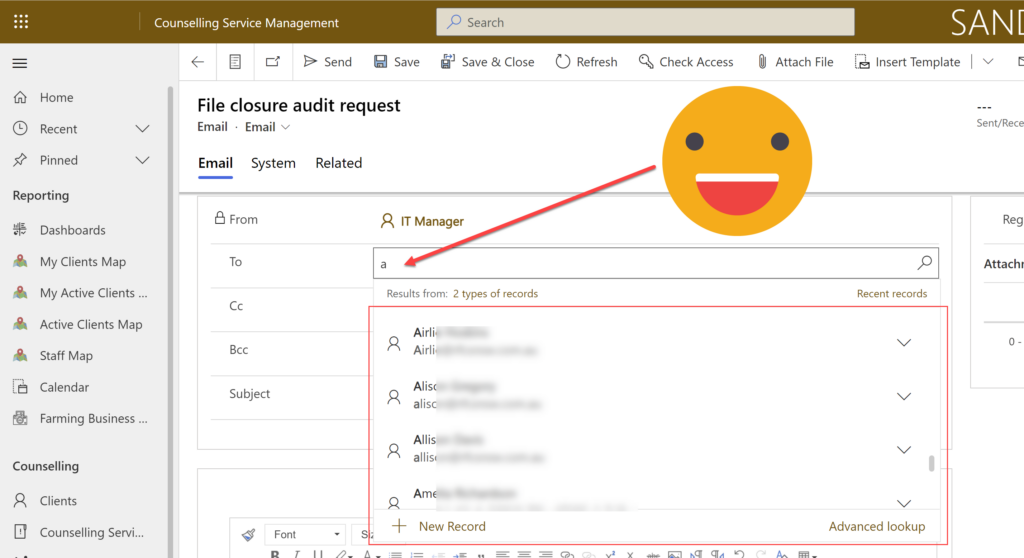
Screenshot of a lookup displaying list of matching records after typing just 1 letter

Rinse and repeat for all your customers and environments – send all thankyou gifts to **redacted personal details for Amey Holden**.

Cover image “Ben to the Rescue” by dafuriousd is licensed under CC BY-NC 2.0

Tip #1437: Duplicate property names in JSON objects in Power Automate

From time to time you may be forced to deal with JSON objects in Power Automate that contain duplicate property names. Consider this object, for example:

{
  "Id": 42,
  "Name": "Fixing the machine",
  "From": "Edison",
  "Total": 1000,
  "Items": [
    {
      "Id": 1,
      "Name": "Hammering",
      "Subtotal": 1
    },
    {
      "Id": 2,
      "Name": "Knowing Where to Hammer",
      "Subtotal": 999
    }
  ]
}

To make this object maker-friendly, the common approach is to use Parse JSON action and derive schema from the data itself.

When done, maker can use properties as dynamic values. In our data, unfortunately, some properties have identical names (Id and Name) even though their path is different.

As it turns out, object schema can be enriched with “title” and “description” annotations. For example, let’s describe Ids and Names

{
  "type": "object",
  "properties": {
      "Id": {
          "type": "integer",
          "title": "Invoice ID",
          "description": "Unique invoice identifier"
      },
      "Name": {
          "type": "string",
          "title": "Invoice name"
      },
      "From": {
          "type": "string"
      },
      "Total": {
          "type": "integer"
      },
      "Items": {
          "type": "array",
          "items": {
              "type": "object",
              "properties": {
                  "Id": {
                      "type": "integer",
                      "title": "Invoice line item ID",
                      "description": "Line item number unique within the invoice"
                  },
                  "Name": {
                      "type": "string",
                      "description": "Line item name, not to be confused with invoice name"
                  },
                  "Subtotal": {
                      "type": "integer"
                  }
              },
              "required": [
                  "Id",
                  "Name",
                  "Subtotal"
              ]
          }
      }
  }
}

The result is the game changer:

Now you can have your JSON and eat it too.

Cover photo by Natalia Yakovleva on Unsplash

Tip #1436: Change the Default Duration Value of the Time Entry in Dynamics 365 Project Operations

Love the tips from Linn because they are short and precise. Unlike me, he does not beat around the bush and goes for jugular: “if you need X do Y or go home”. Today’s tip is no exception even though I know bupkis about Project Ops.

When the new Time Entry is created in Dynamics 365 Project Operations, the default value is set to “1 hour”.

But unlike the default Duration value in the Appointment activity, the default Duration value in Time Entry can be configured.

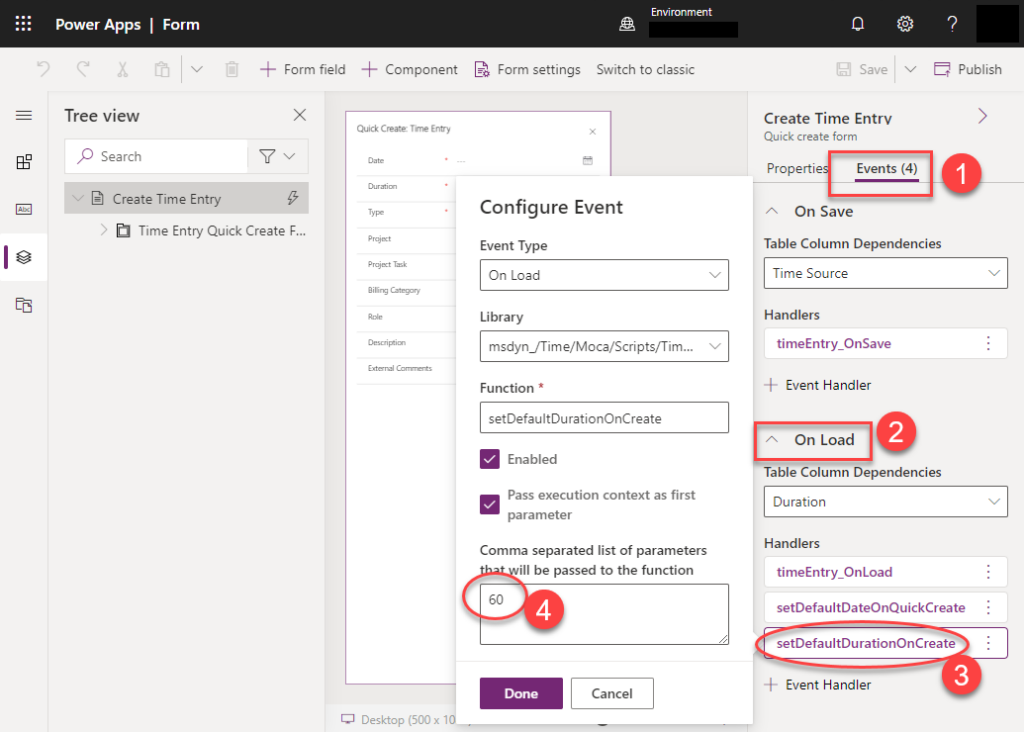
To change the default Duration value of Time Entry, edit the Quick Create form of the Time Entry table with the name “Create Time Entry”. In the form properties: 

  1. Click on the Events tab
  2. Expand the On Load section
  3. Click on “setDefaultDurationOnCreate” handler
  4. Change the parameter value from 60 to the preferred default duration (in minutes). (e.g. 480 for 8 hours default value)

No idea what just happened. I think I just billed a client 8 hours instead of 1 just by following Linn’s tip.

Cover image by anncapictures from Pixabay

Tip #1435: Update Dataverse user photo from Office 365 profile

If you think that the title looks suspiciously close to Tip #1378: Update Common Data Service user photo from Office 365 profile, you’d be absolutely right. Why? Because historically Power Platform is renowned for two traits: renaming things and changing behaviors of those things.

I’ve taken care of the former by replacing Dataflex Common Data Service with Dataverse in the title. Robert Hawke takes care of the latter because something changed, and our simply brilliant code no longer works.

I (Robert – t.j.) tried this (Tip #1378) and it didn’t work (got an error that the content was not in Base64), but I was able to fix it after some tinkering. Instead of referencing Image File Content directly I needed to reference only the body portion. Solution is to put the code below into Entity Image (when updating Dataverse user record – t.j.): 

body(‘Get_user_photo_(V2)’)?[‘$content’]


In short, when you get an error that the content is not Base64, try using $content property. All the other steps from Tip #1378 are fine.

Cover photo is still Female Avatar by Tucia / CC BY

Tip #1434: Can you count OR how to add index to array in Power Automate

When developers like Mike! start their sentence with “this is probably really simple”, you know that it rarely is. (No idea why he’s so excited about his name though, I suspect there is some math flex in here).

This is probably really simple, but anyone know how I would add an index to an array of objects in flow e.g. (– thank you Tîpp Jäår, for nice formatting; -you’re welcome, Mike! – t.j.).

Initial Array (returned from a connector):
[
   {“Name”: “Foo”},
   {“Name”: “Bar”}
]

Output Array:
[
   {“Order”: 1, “Name”: “Foo”},
   {“Order”: 2, “Name”: “Bar”}
]

Mike!!!

Honestly, I was waiting for Linn to produce some json > xml > xpath > json magic but the best he could come up with was, and I quote, “🤣 “(true story). Lo and behold as Damien Bird flexes some Scottish voodoo.

Hey Mike (! – t.j.), you can use a select.  Create a range from 1 to length of the array, then simply add the new key into the array as follows:

screenshot of two steps in Power Automate flow:
1. Compose that contains the expression [{"Name": "Foo"}, {"Name": "Bar"}]
2. Select step with the following information:
From: range(1, length(outputs('Compose')))
Map > Order: item()
Map > Order: outputs('Compose')?[item()]?['Name']

If we ignore the first step that simply defines the input array, the solution is a one-step magic of Select action with the following parameters:

  • From: range(1, length(outputs(‘Compose’)))
    (that creates an array- remember the looping exercise? – t.j.)
  • Map > Order: item()
    (array index! – t.j.)
  • Map > Order: outputs(‘Compose’)?[item()]?[‘Name’]
    (just repeating the property value – t.j.)

The output as expected:

[
   {“Order”: 0, “Name”: “Foo”},
   {“Order”: 1, “Name”: “Bar”}
]

Yes, it is zero-based and Damien has apologized for that and said that “You can still start your index from 1 with sum(item(),1)“. After this unwarranted and unreserved apology I now suspect Damien is actually a Canadian and not a Scot.

Cover image is by Gerd Altmann

Tip #1433: How to list all Dataverse tables in style

Is there any way to export automatically or with a script a list of all the Dataverse tables in an organisation?

From our good friend Shan McArthur came a multilayer answer (narrated and illustrated by The Enabler):

One: We have a virtual entity called entities that will give you a list of all entities in the database. 

  1. Open https://make.powerapps.com, ensure the correct environment.
  2. Expand Data, select Tables.
  3. Locate and select table Entity. If you can’t find it, make sure to switch the view from Default to All.
  4. Select Data tab, optionally change the view to All columns.
Screenshot illustrating the steps just described

Two: You can also use our OData endpoint (/api/data/v9.2/entities).

  1. Sign in into https://adgaf.crm.dynamics.com
  2. Copypasta this URL: https://adgaf.crm.dynamics.com/api/data/v9.2/entities
  3. Optionally do sort – something you can’t do in the first method: https://adgaf.crm.dynamics.com/api/data/v9.2/entities?$orderby=versionnumber
  4. If the solutionid is fd140aae-4df4-11dd-bd17-0019b9312238, this is the Active layer and represents an unmanaged customization: https://adgaf.crm.dynamics.com/api/data/v9.2/entities?$filter=solutionid%20eq%20fd140aae-4df4-11dd-bd17-0019b9312238&$orderby=logicalname

Three: Otherwise, you can join to the solutions table and see what solutions each of these entities/tables are brought in from.

  1. I wish we could just $expand=solutionid in OData but solutionid is not a foreign key, i.e. not a navigation property. Joining in FetchXml works just fine though.
  2. You can use usual FetchXml manoeuvres like filtering and grouping to work out what table is in what solution.
<fetch top="50" >
  <entity name="entity" >
    <attribute name="name" />
    <link-entity name="solution"
     from="solutionid"
      to="solutionid" >
      <attribute name="uniquename" />
    </link-entity>
  </entity>
</fetch>

Cover photo by Dimitra Peppa on Unsplash

Tip #1432: Create records in Power Automate without mandatory fields

I really like mini truck stops when two or more MVPs brainstorm a random problem, usually because they are bored 😈.

Help me understand scenarios where one would use a guid() expression in flow when creating new rows.

Antti Pajunen

What Antti left out was (reasonably) common wisdom that explicitly setting identifiers for new records is possible but frowned upon due to the performance implications. (Cue long discussion about sequential guids.)

This section was intentionally left blank because it would have been otherwise filled with the intense discussion where do guids sit in the order of the universe, are they truly unique, and whether it’s OK to use hexadecimal “beef” in guids when creating a Power Platform solution for Beyond Meat, Inc (NASDAQ: BYND).

Solution looking for a problem

It didn’t take long for the kumbaya to climax at this brilliant suggestion:

You can create records in flow and bypass required fields by using an Update statement action and generating a new ID using the guid() expression.

Aiden Kaskela

Problem looking for a solution

Topic is a required column in the lead table. Who would put a Topic: input textbox in a contact us online form? That’s right, nobody. But if we trigger Power Automate with the form submission, how do we create a lead record?

Technically, we can put some default text in like “Created from online enquiry form”. But that would simply cement this meaningless text across the entire lead table. What if you could create a lead record without a Topic? The first user to open the lead in a model-driven app would be forced to put something in the Topic column before saving the record – more chances of having something relevant recorded.

Solution ❤️🫶🫀 Problem

Use Update a row action and set Row ID to guid() expression. This action does not have any required columns and behaves like an upsert operation: if ID is found then it’s an update otherwise it’s an insert. Using a freshly baked guid guarantees nothing will be found and forces a new record.

The end result? Lead with the name and perhaps some other information but without a topic!

Cover image by jette55 | Pixabay.