Tip #1459: How to bypass Dataverse plug-ins and flows in Power Automate actions

When you need to insert, update, or delete a large number of records in Dataverse, synchronous plug-ins can get in the way. Asynchronous plug-ins and Power Automate flows are triggered independently (out of process) but can be overwhelming for the system and can be throttled down. Did you know you can bypass either? Did you know you can do it in Power Automate?

Continue reading

Tip #1458: How to copy files between Dataverse tables

No names in this story have been changed to protect the innocent—or was it to protect the guilty? Or to expose the innocent? Anyway, read on.

When Megan V. Walker (her real name) asks a question, others listen because it’s often a non-trivial challenge.

I have two tables, both with a file column. I want to use Power Automate to move the file from TABLE A to the corresponding field on TABLE B.

(Easy, right? Not so fast! – g.d.)

Continue reading

Tip #1457: Format JSON for human consumption

It’s not a secret that these days, data float around in automation using the JSON format. Submit a form, get JSON back. It is not human- (or any other carbon-based life form-) friendly.

{ "First Name": "Nancy", "Last Name": "Davolio", 
"Age": 42, "Influencer": true, "Customer": 
"Balderdash Primary School",  "CustomerPONo": 
"PO100042810",  "SalesOrderNo": "sy039978" }

My fellow Power Automate Gymnast, Amey “CI-J” Holden, asked if a code-only connector can be created to help produce nicely formatted emails containing form submission results. And it occurred to me that the JSON Extractor CoC can be used to accomplish the task in three steps:

Continue reading

Tip #1455: Experiment with parallel branches

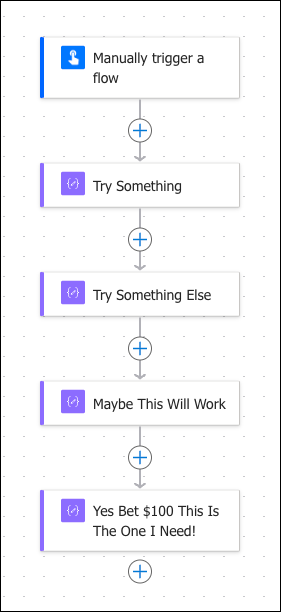
While experimenting in a flow trying to find that elusive expression or action, I often catch myself doing this:

A partial screenshot of a Microsoft Power Automate flow, displaying a sequence of actions in a vertical layout. The process begins with a 'Manually trigger a flow' step at the top, denoted by a play button icon. Below it are four subsequent actions, each with a gear icon and labeled sequentially as 'Try Something', 'Try Something Else', 'Maybe This Will Work', and 'Yes Bet $100 This Is The One I Need!'. Each action is connected by a vertical line with a plus symbol, indicating potential insertion points for additional steps. The flow suggests a troubleshooting or iterative problem-solving approach within the automation.

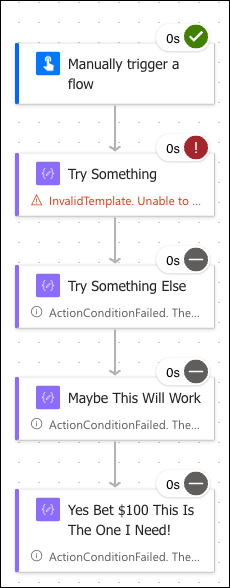
The problem is, of course, I don’t bother setting Run After conditions and the result often looks like this:

Screenshot of a Microsoft Power Automate flow run, with a vertical sequence of steps. The first step, 'Manually trigger a flow,' is marked with a green checkmark, indicating it ran successfully. The second step, 'Try Something,' shows a red exclamation mark, signifying a failure in the flow. The subsequent steps, 'Try Something Else,' 'Maybe This Will Work,' and 'Yes Bet $100 This Is The One I Need!' are each marked with a no-entry symbol, indicating they were skipped due to the failure of the preceding action.

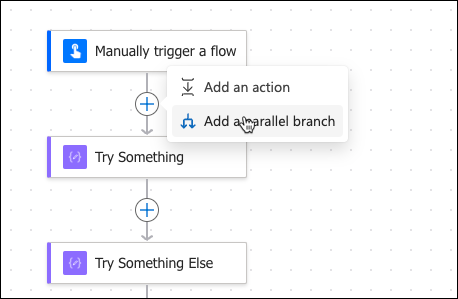
Now I have to edit, figure out what’s wrong, run again and again as I didn’t get to even try three other steps. If you find yourself doing the same mind-numbing experimental activities, make it a habit to use parallel branches!

Screenshot displaying a portion of a Microsoft Power Automate flow with options to modify the workflow. At the top, there's a 'Manually trigger a flow' step, depicted with a blue rectangle and a play icon. Below this step, there are two icons: a plus sign for 'Add an action' and a branching arrow for 'Add a parallel branch'. To the left, the first action in the workflow titled 'Try Something' is shown with a purple rectangle. Below, indicated by a plus sign, is a placeholder for another action, and further down is a second purple rectangle labeled 'Try Something Else', suggesting these actions are part of a sequence.

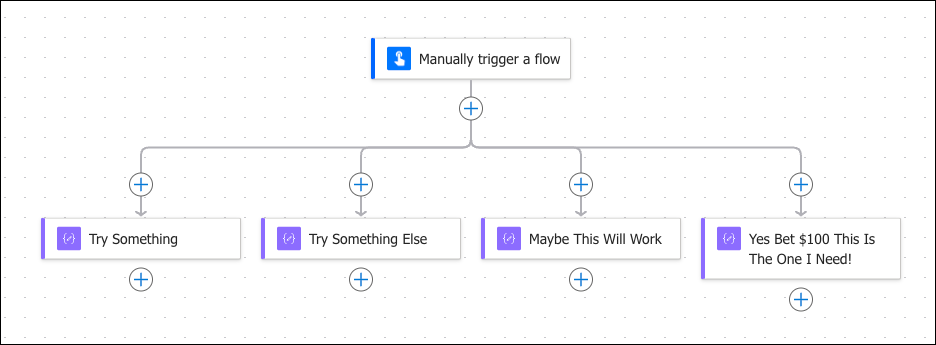
Add a parallel branch or two and rearrange the existing flow.

Screenshot of a Microsoft Power Automate flow diagram with parallel branches. The process starts at the top with a 'Manually trigger a flow' step, represented by a blue rectangle with a play button icon. From this initial step, four parallel branches extend horizontally. Each branch has its own action step: 'Try Something,' 'Try Something Else,' 'Maybe This Will Work,' and 'Yes Bet $100 This Is The One I Need!,' indicated by purple rectangles with corresponding gear icons. Plus signs are present between the steps and at the end of each branch, indicating potential points to add more actions or conditions to the flow.

The execution nails one of the actions as a solution in a single run!

Screenshot of a Microsoft Power Automate flow with four parallel actions following a successful 'Manually trigger a flow' step. The first and second actions, 'Try Something' and 'Try Something Else', are marked with red exclamation marks indicating failures. The third action, 'Maybe This Will Work', is marked with a green checkmark, signifying successful execution. The final action, 'Yes Bet $100 This Is The One I Need!', is again marked with a red exclamation mark, denoting a failure.

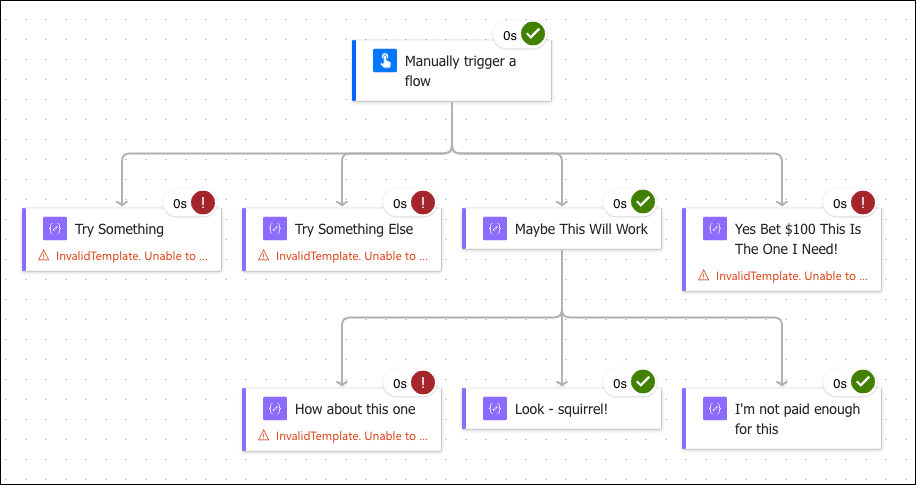
You can continue branching out, of course, on any level:

Screenshot depicting a complex Microsoft Power Automate flow with multiple levels of parallel branches. The flow is initiated by a 'Manually trigger a flow' step at the top. This leads to a first level of four parallel branches, each containing a single action. Beneath the third action, a second level of branching occurs, with two more actions that branch out further. In total, there are six actions in a two-tiered parallel structure, demonstrating the flow's capability to run multiple actions simultaneously at various stages.

PS. Credit where credit’s due: juggling parallel branches is much easier in the new Power Automate editor.

PPS. Use parallel branches for production runs as well. Don’t tell anyone but executing things in parallel is usually faster.

Tip #1453: Open the tools like a pro

Today’s tip is from Eric Regnier. (Have a tip of your own? Send it to jar@crmtipoftheday.com)

Ever wondered if you had the latest and greatest version of the Plugin Registration Tool (PRT) or Configuration Migration Tool (CMT)? And always had to Google Bing Copilot it to find and download the tool? You can now just pac it!

From any console like VS Code or PowerShell, just type pac tool prt for PRT and pac tool cmt for CMT.

You can also launch Power Platform Admin Center (PPAC) and the Marker portal from pac, run pac tool admin and pac tool maker, respectively.

For more info on pac CLI and how to install it: https://learn.microsoft.com/power-platform/developer/cli/introduction. Happy Power Platforming!

Tîpp Jäår $0.02 + GST

Sad child gif
Mac users in the meantime

Tip #1452: Compare dates in Power Automate

tl;dr

Always use formatDateTime(), substring(), convertFromUtc(), convertTimeZone() to drop the time part and ensure the dates are in the same timezone.

!tl;dr

The datetime isn’t of any special type in Power Automate; it’s just a string representation of a timestamp in an ISO format. Yes, the format is sortable, so in theory, you could compare just the values. However, if you have a date input parameter in your flow, it comes as a date without any time part, so you might miss that birthday when comparing it to utcNow()!

To further complicate matters, datetime values include both the time portion and a timezone indicator. What is today for you can be yesterday or tomorrow for other people. Time difference can be up to 25 hours (don’t get me started on that Samoa vs American Samoa trip again). And do you really want to compare seconds if you’re after just the date?

Life becomes much easier if you follow two rules:

  1. Bring timestamps into the same timezone.
  2. Extract and compare just the date portion.

The following functions come to the rescue (yes, I am aware there are actions doing the same thing).

  • formatDateTime(date, 'yyyy-MM-dd') – just the date portion
  • substring(datetime, 0, 10) – just the date portion
  • convertFromUtc(datetime, 'Samoa Standard Time‘, ‘yyyy-MM-dd’) – if your user in +13 timezone
  • convertTimeZone(datetime, 'UTC-11', 'Samoa Standard Time', 'yyyy-MM-dd') – convert American Samoa date prior to comparing to the date in Samoa (be very surprised)

Timezones always do my head in (would it be so hard to make them an enumeration?!). Here’s the current list: Default Time Zones | Microsoft Learn. Perhaps I should create a Code only Connector (CoC) for it, so I don’t have to remember the list?