Tip #1208: More entities now work from Unified Interface

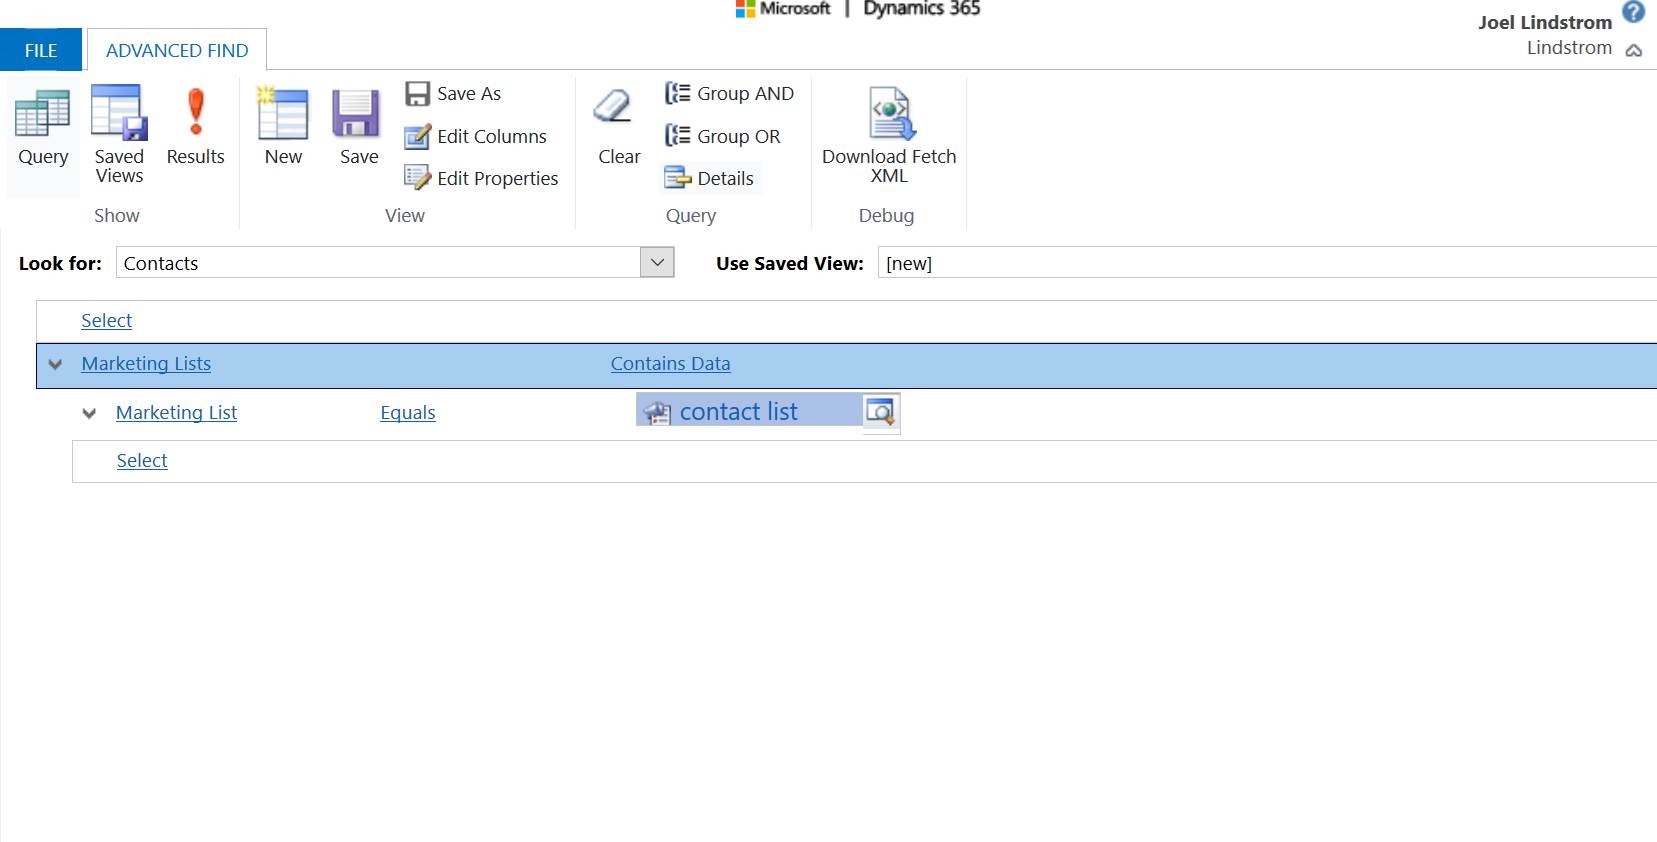
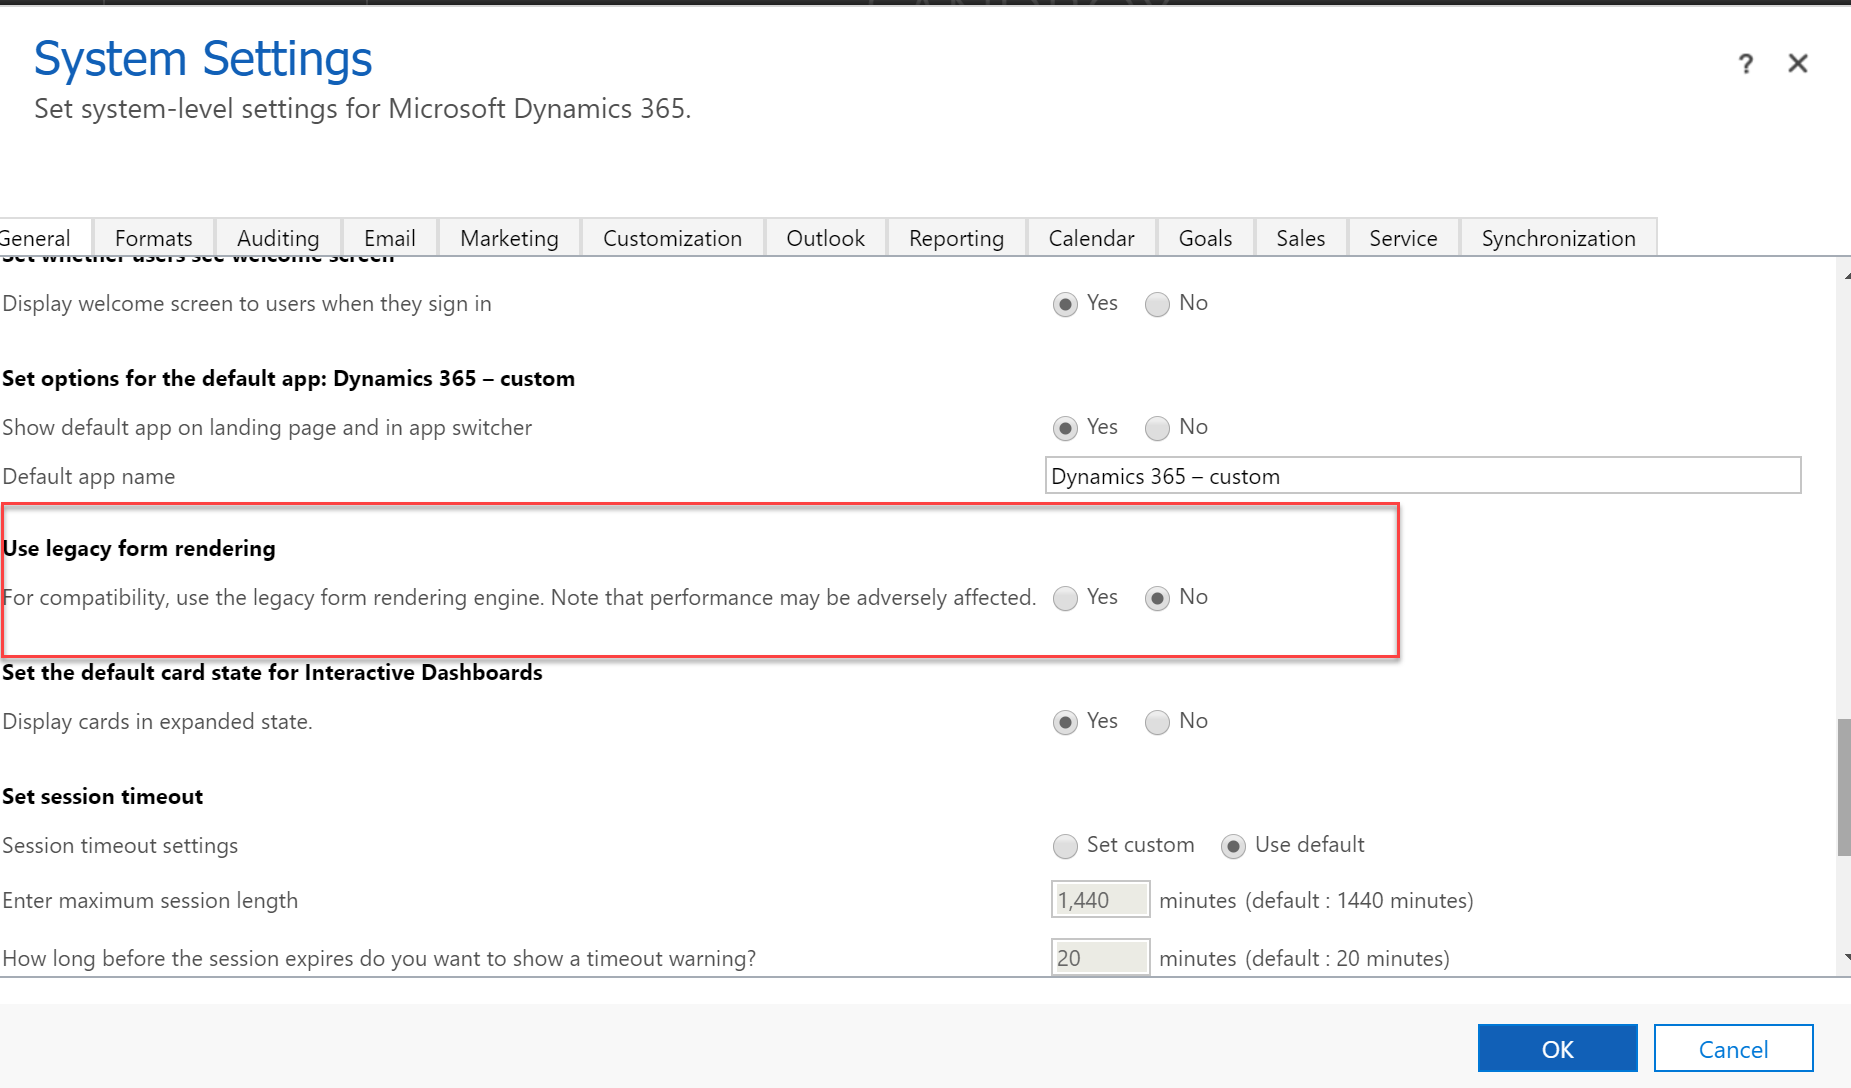
Until recently the list of entities that didn’t work on unified interface included goals, connections, campaigns, and marketing lists. With recent updates, these entities can now be accessed from unified interface model driven apps.

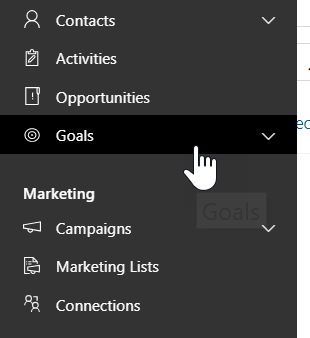
This is great news if you use one of these entities–I’m especially excited about marketing lists, as there are many great alternate uses for lists.

With this update, unified interface and classic UI are now almost at full parity, so there should be no practical limitation holding you back from making the switch.

Tip #1207: Check applied entity permissions in portals

Liquid is a great templating language adding flexibility to your Dynamics 365 Portal templates. However, as any abstraction, it hides some of the things happening under the hood, including some security filtering. Consider this fragment running on authenticated page:

{% fetchxml my_contacts %}
<fetch mapping="logical" version="1.0" 
       returntotalrecordcount="true">
  <entity name="contact">
    <attribute name="firstname"></attribute>
    <attribute name="lastname"></attribute>
    <attribute name="contactid"></attribute>
    <order descending="false" attribute="lastname">
    </order>
  </entity>
</fetch>
{% endfetchxml %}

<h2>Record count: 
  {{ my_contacts.results.total_record_count }}
</h2>

And… the count is 2 while expected to be the total number of contacts in this sample environment (around 20 or so) . Er?

This is because the portal engine applies entity permissions to all constructs retrieving the data including fetchxml. To see where did the things go wrong (or right – depending whether it’s your point of view or of your system administrator), use xml property of the fetchxml object. That will tell you what’s actually being executed.

<div style="white-space: pre-wrap;">
  <code>
    {{ my_contacts.xml | escape }}
  </code>
</div>

In my case resulting fetchxml looks like this

<fetch mapping="logical" version="1.0" 
  distinct="true" returntotalrecordcount="true">
  <entity name="contact">
    <attribute name="firstname" />
    <attribute name="lastname" />
    <attribute name="contactid" />
    <order attribute="lastname" descending="false" />
    <filter type="and">
      <filter type="or" hint="union">
        <condition attribute="parentcustomerid" 
        operator="eq" 
        value="deadbeef-38c9-e711-a844-000d3ad1181d" />
        <condition attribute="contactid" 
        operator="eq" 
        value="deadbeef-38c9-e711-a844-000d3ad1181d" />
      </filter>
    </filter>
  </entity>
</fetch>

highlighted lines (injected by the portal engine) explain why I’m seeing only two records (my portal is based on Customer Service):

  • deadbeef-38c9-e711-a844-000d3ad1181d is my contact id (after I logged in)
  • condition on contactid is a result of the “self” OOB Customer Service – Contact of the User entity permission that gives portal users permissions to access their own profile
  • condition on parentcustomerid is a result of the OOB Customer Service – Contact of the Contact entity permission giving portal users access to the contacts where they are the parent customer

Tip #1206: View any Dynamics 365 record on a calendar

I want to see a calendar of my opportunities based on estimated close date (or other date field on the opportunity record). Can I do that, or do I need to license a third party add-on?

Sales Manager

If you use unified interface, you can display any record in a calendar view via the calendar control.

  1. Go to Settings->Customization->Customize the System
  2. Open the configuration for the entity that you want to use the calendar control (Opportunities in our example)
  3. Click the View tab
  4. Click “Add Control” and select the calendar control.
  5. Click the dot for every interface from which you want the calendar control to be available.

You will then need to map the calendar fields to the desired values. For example, if you want the date to be based on estimated close date, you would select estimatedclosedate for the Start date.

The view for opportunities in unified interface will now show a calendar based on the selected view.

How do I switch to the normal list view?

To switch back to the list of records, click the “…” button on the command bar, and select read only or editable grid (if enabled) to toggle to the normal list view.

I have multiple date fields that I would like to display on the calendar–can I do that?

The calendar control properties allow you to specify two different date fields–start date and end date. If you have two dates that are sequentially related, such as schedule date and installation date, you can map both of these values, and that will determine the time block duration of the item on the calendar view. If you have multiple unrelated dates or want to have different views displaying different dates, the calendar control is not designed to work that way.

Tip #1205: Local time in Flow using Common Data Service

Remember the times when you wake up and struggle to figure out where you are or what time it is? Of course, you don’t. I personally can’t recall those because lack of space and time awareness goes hand in hand with the selective amnesia. We did create a flow to help you on those occasions.

That flow worked using trigger tokens (and Bing Maps API) that work when you actually push the button on a mobile device. Sometimes you don’t have a button to push, or time is unrelated to the flow itself. I am talking about datetime fields in Common Data Service, of course. Those are UTC as well so how do we convert the values into the realm of a user? It could be the user who pushed another button, or user who invoked a flow from their model-driven app, or simply the user who created the record in the first place.

Why does it matter, apart from the reasons we described in tip #1141? Imagine sitting on a beach in Hawaii, doing the numbers and, bingo!, you close that elusive sale in the evening on September 30, just in time to make your quota for the quarter. Except that you didn’t because it was already October 1 in the UTC timezone so here goes your quarterly bonus.

Since we don’t have the user location, we’d have to use user options that actually exist precisely for the purpose of localizing datetime values:

image

Getting from a user to the timezone in the format we need is not a one-step operation so these are the steps: (and remember I promised to cut down on the screenshots so here we are):

  1. Manually trigger a flow. Self-explanatory. Could be When Record is Selected CDS trigger, could be something else.
  2. Get my profile action. Gets O365 profile of the current user running the Instant Flow (i.e. triggered manually).
  3. List Records action on Users (systemuser) entity to get the list of user records for the current user (i.e. list of exactly 1 record). We could filter records by email provided by the manual trigger but that will fail miserably for B2B guest users.
  4. Initialize variable action to declare ExecutingSystemUserID variable and set it to the current system user id. Keep your flow tidy.
    Note: step 2-4 are courtesy of my bad masterclass crony, David “Xrm.Tools” Yack. They apply to Instant Flows when you have the executing user. For automatic flows you would use createdby or ownerid , or some other field containing the target user id.
  5. List Records action on User Settings (usersettings) entity to get user settings include mysterious timezonecode.
  6. List Records action on TimeZone Definitions (timezonedefinition) entity to get the name of the timezone.
  7. Initialize variable action to declare User Timezone variable. Again, keep your flow tidy. Now we are ready!
  8. List Records on account entity. Completely optional action extracting first active account owned by the user just to demonstrate the technique.
  9. Convert date time action to get the local value for createdon.

Result:

image

Since we have limited number of pictures, you can download, import, and dissect the flow in your own environment. You’ll need to provide your own Office 365 Users and Common Data Service connections.

(Cover photo by Heather Zabriskie on Unsplash)

Tip #1204: Export marketing lists with more information

Is there a way to export a marketing list and include email addresses and other information? When I export a marketing list, I just get the lead or contact’s name.

Reader

Yes — you can get email address, phone number, address, and any other information from the contacts or leads who are members of the list. This is a common request when people want to build a list in Dynamics and then do something with it — mail merge in Microsoft Office, or export to a third party non integrated marketing platform like Constant Contact or Mail Chimp.

If you want to include details from contacts or leads associated with a marketing list, you need to do it from the contact or lead level. Do an advanced find for contacts and filter by the related marketing list entity. You can then include any field you want from the contact or lead, including fields from parental relationships like parent customer.

In this example we are filtering contacts by the related marketing list called “contact list.” This search returns all members of the marketing list.

Tip #1203: When and where you pushed that button

There is a time in life of every developer when they have to clench their fists and… start learning Flow. Today’s topic – localized date time.

Flows run on a… in a …. wherever Flows run. Time is UTC in that world. So how does one bring the concept of a time, local to the user, into that world?

Let’s start with a simple case of a manual flow, a.k.a. push a button on your mobile device. Here’s the challenge – whatever button passes to the flow, including a timestamp, is in UTC. Challenge accepted.

  1. Read about trigger tokens, all device goodness is there but, as I said, timestamp is UTC.
  2. Latitude and longitude are also among trigger tokens and available when you run a button flow
    image
    Note: if you are using these values, your phone mobile device must have location services enabled otherwise:
    image
    Ok, now that we have latitude and longitude, we need to convert them into the time zone information.
  3. In your Azure account, add Bing Maps API for Enterprise (don’t worry, it’s free up to 10,000 transactions per month). Don’t have Azure account and really don’t want one? You can still use https://www.bingmapsportal.com/ for a time being to register an account and get yourself an API key. Check the usage rights because copyright message is very explicit:

    This API cannot be accessed and the content and any results may not be used, reproduced or transmitted in any manner without express written permission from Microsoft Corporation.

  4. The API we are after is Find Time Zone and the call looks like this:
    image
  5. Use Postman to get a sample response and then use Parse JSON action to extract values from the API response. The coveted value is
    body('parse_json_action')['resourceSets'][0]['resources'][0].timeZone.genericName
    (Don’t ask)
  6. Convert time zone action will give us the conversion we are after (button is kind to give us the timestamp when it was pushed)
    image
  7. Finally, we can call a location API to get the place or neighborhood (full address is available as a trigger token) and then send a notification to ourselves telling us what was the time and where we pushed that button
    image

The results are awesome:

image

Afterthoughts

I noticed that all posts about Flow are full of images. I fell into that trap too, it seems, but for the last time. Instead, download the flow (sans the keys) here and import into your environment to play with it.

(Cover photo by Ehimetalor Unuabona on Unsplash)

Tip #1202: Editable grid control not working in subgrids

I enabled the editable grid control on a subgrid, but after publishing, I still see the read-only grid in the subgrid in classic UI. The grid is editable in unified interface. What’s up?

Gridless reader

Chances are you have legacy form rendering enabled in your environment system settings. Disable legacy form rendering and your subgrid will be editable.

(Cover photo by Ricardo Gomez Angel on Unsplash)

Tip #1201: Working with integer variables in Microsoft Flow

In tip 1199, Leon Tribe talked about the power of using variables in Microsoft Flow. Leon astutely pointed out that using variables can simplify process development by allowing reuse of values between steps in Flow, and they can also be used for calculation purposes and building strings.

One challenge with working with integer type variables in Flow from a CDS/Dynamics 365 perspective is that you cannot directly write the value from an integer variable into a Dynamics 365 field.

Recently I created a Flow to calculate a contact score based on data quality–more about this in a future tip. As part of this flow, I created an integer variable called “score” to be used to calculate the data quality score.

Integer variable in Microsoft Flow

At the end of the Flow when I wanted to update the contact with the data quality score, I tried the three types of number fields in Dynamics 365/CDS–whole number, floating point, and decimal. The variable was being calculated, but I could not get the flow to update any standard number field (or text field) with the value of the integer variable.

The solution was to use the int() transformation expression. By using the expression int(variables(‘score’)), I was able to update a decimal number field in Dynamics 365 with the value of my integer variable.

(Cover photo by Nick Hillier on Unsplash)

Tip #1200: Placeholders, colors & lorem ipsum

To celebrate 1,200 tips I picked up a topic completely unrelated to Dynamics 365/CDS, as one cwshould. Well, sort of. I was working on some
materials related to Dynamics 365 Portals and, lo and behold, I needed some placeholders besides qwerty asdf.

Text

As a placeholder text, you can’t go past lorem ipsum and the original https://lipsum.com. But wouldn’t you rather have fun? Thanks to the ingenious Any Ipsum WordPress plugin, we now have literally dozens generators on a topic of your liking. Some of my favorites:

GenWhatSample
Bacon LipsumAdd some meat to your text, literally. My favorite by a long streak of bacon.Pancetta filet mignon shoulder ham, flank cow sirloin short ribs buffalo andouille brisket t-bone venison leberkas spare ribs.
Hipster IpsumArtisanal filler text for your project.Chillwave portland ullamco cliche pop-up. Occupy pork belly fixie af raw denim quinoa duis drinking vinegar.
Samuel L. IpsumA NSFW tribute to Samuel L. Jackson (and not using the plugin as far as I can tell)The path of the righteous man is beset on all sides by the iniquities of the selfish and the tyranny of evil men.

Image

But what is the web site without those proverbial 1,000 words? As regular readers probably have noticed, my goto site for images is https://unsplash.com/ and has been for a long time. Just do the right thing and attribute when you can.

Sometimes you don’t need a fancy image of a “woman looking thoughtfully at a microchip schemata”, you just need a placeholder of a specific size. https://placeholder.com/ to the rescue. Need 128×64, green, and with the word w00t? Here you go (https://via.placeholder.com/128×64/00ff00/?text=w00t):

Green background w00t

Color

Again, tons to choose from. Couple that I use

  • Coolors – nice and easy
  • Adobe Color CC – can match uploaded images
  • Canva – less options than Adobe but seems to pick the colors from an image better
  • COLOURLovers – community site to get some inspiration from others


Tip #1199: Embrace Variables in your Flows

As you begin to use Flow as part of your Business Applications projects, you will discover that it pays dividends to adopt some of the good habits of our coding brethren. This is what I refer to as ‘disciplined development’. The tool adopted may be different but the habits are the same.

Embracing good developer habits will make your life easier in the long term. One such habit is the use of variables. Variables may be unfamiliar to old-school Dynamics consultants used to Workflows as we never had variables to play with. We did with Actions but, like many features of the platform, Actions were not widely adopted. Certainly not as much as Workflows, which is a pity, but I digress…

For Flow, Variables are particularly useful both for bookkeeping and also for debugging. You create a variable with an ‘Initialize variable’ step. This is simply a placeholder for a piece of information. You can also set the initial value, if desired.

Then, as your Flow progresses, you can refer to the variable’s value or update it with the ‘Set variable’ step.

So why is this so useful? Well, rather than having to define a complex value multiple times throughout a Flow (and updating it multiple times as you modify your Flow), you do it once and from then on just refer to the variable. Easy stuff.

For debugging, variables make life easy by showing exactly what value the variable has been set to.

In this case the TweetAuthor variable has been set to our favourite kiwi explorer nz365guy aka Mark Smith. Not buggy at all.

If you are not using variables in your Flow to hold and carry values, you should. Not only will the coders appreciate your ‘l33t skillz’ but it will make working with Flows a whole lot easier.

(Cover photo by Adi Goldstein on Unsplash)