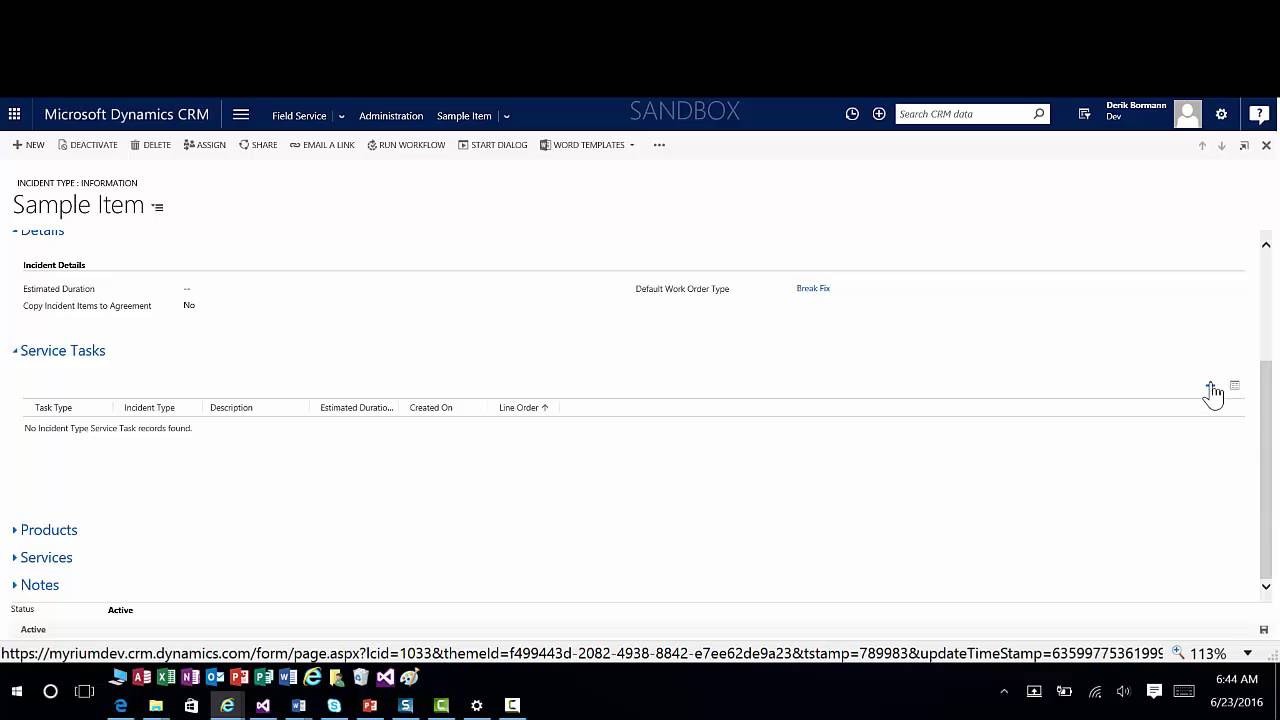
Tip #671: Azure AD is your best friend even if you are on premises

Use backdoorYour CRM deployment is on premises, as is the rest of your IT infrastructure and services, and your bosses cannot be persuaded to consider Office 365, CRM Online or Windows Azure even for a second.

That means you know the pain of discovering that some of the on-premises services, like AD FS, are lagging behind in their capabilities. For example, AD FS 3.0 (Windows Server 2012) does not support OpenID Connect, OAuth password authentication for confidential clients (aka web sites), to name a few. And if you ever tried to configure multi-factor authentication, you know the real pain.

One of the scenarios you may want to consider: while maintaining your preccccious infrastructure, provision Azure AD and federate it with your on-premises domain. The result? Magically, you now have support for OpenID Connect (so you can try approaches previously unavailable to you), and MFA is an absolute breeze.

Tip #670: If activities disappear, take this pill

Magic disappearanceWe’ve had one of the users reporting a really bizarre issue – all his activities have simply disappeared from CRM. The user was synchronizing with Outlook and activities are still present in the mailbox with Regarding field empty.

Thanks to Adam “Human Bing” Vero, the behavior is no longer a mystery but rather an annoying bug. After being reported by a number of people, Microsoft support stepped up and delivered a summary. Workaround is reproduced below just in case left button on your mouse does not work.

  1. Instead of creating the activities in CRM, create them in Outlook and track them in CRM. I don’t know if this is a silver bullet. I know in my testing I did not experience the same behavior if I created the object in Outlook first and tracked it. My customer saw similar results as well.
  2. Downgrade to Outlook 2013. This specific issue does not occur in Outlook 2013. I know we have other issues with Outlook 2013 that we need to further investigate but this specific issue does not repro in Outlook 2013.
  3. Remove the delete permission on activities. Obviously this is the most intrusive as it would prevent users from being able to delete activity records. This will prevent data loss from occurring in CRM.
  4. With 1 being too risky and 2 not being an option, I opted for 3. It’s not a bad practice anyway.

Tip #669: Organizing Unified Service Desk development environment

Disorganized desktopThis is for folks who write code as part of their jobs and for whom USD stands for Unified Service Desk and not United States Dollar.

If you’re developing custom hosted controls, the easiest way to ensure that the version is correct and all dependencies are included is to set up USD program folder as the output for your build process.

It works but sooner than you know, the folder is a mess, versions of dependent assemblies are out of sync with production which makes it real fun to troubleshoot, and the real issues begin when you have more than one control to develop or when you need to reproduce a production issue.

Unless you simply create a copy of your USD program folder because USD really does not care where does it run from and has no location dependencies.

  1. Copy the entire USD program folder (default C:\Program Files\Microsoft Dynamics CRM USD\USD) into another location on your disk (e.g. c:\dev\usd).
  2. Set this folder as the destination for your program output and set UnifiedServiceDesk.exe as the start program.
  3. Set the breakpoints in your hosted control code and fire away.
  4. Compare this folder with the original one to build a baseline for what needs to be included for your control to work. That will help you to build the customization file for your distribution.
  5. Need quickly to test something or develop completely independent control? Just create another copy of the USD folder!

Tip #668: ADFS and CRM on the same server

Overflowing bagThere are reasons to do the unspeakable, ignore all recommendations and install all components of on-premises CRM deployment on a single machine. Running CRM on my laptop, for example, as I don’t have room for 3 server deployment.

tl;dr

If CRM and AD FS are on the same server, change port used by AD FS.

Boring technical details

Browser works fine but attempt to access organization in code generates “The authentication endpoint Username was not found on the configured Secure Token Service” error.

Our fellow MVP 罗勇 to the rescue:

When installing Microsoft Dynamics CRM on the same server as Windows Server 2012 R2 AD FS (not a recommended scenario), you may need to change the port used by AD FS to a port other than TCP 808. Sandbox Processing Service listens on Port 808, Microsoft Dynamics CRM Asynchronous Service and Web Application Server services communicates with the Sandbox Processing Service on Port 808. A port conflict could also cause issues for Microsoft Dynamics CRM Email Router, Microsoft Dynamics CRM for Outlook, and the Plug-in Registration Tool.

Check your AD FS event log for EventID 102 and the following in Exception details: “System.ServiceModel.AddressAlreadyInUseException: There is already a listener on IP endpoint 0.0.0.0:808.” If this exists, you need to change your AD FS port.

To change the port used by AD FS to another port such as 809, use the following PowerShell command:

Set-ADFSProperties -nettcpport 809 

Restart AD FS Windows service.

Tip #667: Return from the Land of No Return

Wherein we learn to disable the Notes, Activities, Connections, Feedback, Queues, And/Or change the “Ownership” model option on a Custom Entity.

Why do I Care?

Recently I received a solution file where EVERY custom entity had been created with ALL the default options enabled. Even entitles that serve only as simple “lookup” lists had Notes/Activities/Connections/Feedback enabled on them – before putting those entities into production, I needed to ‘unselect’ these options – this tip explains shares how I accomplished this.

SNAGHTML3cc0c68fMy perspective on why to /not/ enable these options by default is that the more places people can create records, the more places someone would have to go look in order to find those records and more importantly, when they go to create a new Note/Activity/Connection, etc. the list of potential targets is large and harder to quickly spot the “Big 4” – Accounts, Contacts, Opportunities, Cases.

It wasn’t long ago that a certain beautiful, slick-headed man named George  presented an excellent roadmap to The Land of No Return – wherein if the entity creator either set the security model to ‘organization’ or forgets to disable any of the irreversible default options when creating a new entity, CRM does not offer the opportunity to change these options.

Avoiding the Land of No Return

It’s important to point out that the easiest way to avoid this, is to just uncheck the options before creating the custom entity. – If you *just now* accidentally created a new entity and you haven’t really started configuring it – or if it’s a really simple entity, just delete it and re-create it. (I have heard of sr. architects just assigning the task to a junior consultant as a way to give them experience – or help them learn from their mistakes – which is also far more human-resources department friendly than Spießrutenlaufen.)

In my situation, the entity had already been created by the vendor – with all the forms, fields, views, charts etc. – I didn’t want to go through the process of re-creating all of that by hand, so I leveraged CRM 2016’s “Solution Segmentation” feature to move the entity’s components without those options. The advantages of the vastly improved solution segmentation in CRM 2016 and later makes this possible in a way that was never possible in a supported manner before.

Prerequisites for the Solution

1) This requires CRM 2016 and later – Earlier versions of CRM had significantly less flexibility when it came to configuring solutions.

2) This is absolutely easiest if you don’t already have production data in the entity. (If there is already production data in the entity, you’ll need backups all around because at one point you’ll need to delete and recreate this entity – and then repopulate it if needed. – If this entity has custom 1:N relationships and many of those are already populated, please carefully weigh the effort of backing up and restoring this data, specially in related ‘child’ entities – vs. the challenge of just learning to live with the entity as-is.)

3) You’ll need a temporary location to publish this entity to – if the target entity has lots of relationships to other custom entities, those will need to exist in the temporary location as well. – In my case the entities I wanted to re-create all pointed to either Accounts or Contacts or each other.

4) This solution is designed with only unmanaged custom entities in mind.

5) Since you’ll need to be able to delete and re-create this entity, you will temporarily remove it from any sub-grids and also note where it is listed in the Sitemap.

The Solution

1) For each entity you want to clear of these options, manually create a new entity in the TEMP environment with the EXACT same schema name (including prefix) as the existing entity – and be absolutely sure to clear all the unwanted checkboxes and set the ownership appropriately before hitting ‘save’.

2) Create a new solution in the SOURCE environment and include the entity (or entities) you wish to modify-

3) UNcheck the option to include “all assets” and “entity metadata”
image

4) Check and select all the Forms, Views, Charts, Keys, Business Rules and Hierarchy Settings on those tabs.

5) On the ‘Fields’ tab and the three relationships tabs (1:N, N:1, NN) – change the filter to “Custom” and select all.

6) Save and Export the solution as Unmanaged and then Import it into the TEMP environment.

7) TEST TEST TEST in the new environment and make adjustments as needed.

8) Delete the entity in your SOURCE environment (you backed up all needed data right?)

9) Create a new, unmanaged, solution in the TEMP environment and export WITH the all assets and entity metadata options checked.

10) Import the new solution back into the SOURCE environment, configure the entity’s custom icons if needed, add it back to any subgrids if needed, and publish (and then re-import data if applicable.)

See, that wasn’t so bad, but it’s still easier to remember to uncheck those boxes to begin with, amiright?

Tip #666: Don’t break the law with the portals

Don't be evil by sending promotional SMSI rarely read terms of service but something jumped at me when trying to install the portal solution:

The license terms for the Online Service apply to your use of this supplement, except as follows:

Customer is explicitly prohibited from using the supplement to design and transmit promotional SMS messages either via the Twilio integration feature or as otherwise may be possible.

Why is transmission of promotional SMS messages explicitly prohibited?

One of the portal modules is SMS messaging included to support two factor authentication. And the supplied out-of-the-box provider is Twilio (don’t get too excited – you still need to supply paid account). Twilio has restrictions against using their service for promotional/spam messages to comply with the relevant anti-spam laws. And so does every other reputable SMS provider.

Twilio or not, but the license terms reinforce that the team doesn’t want to be enabling customers to use their product to break the law.

Tip #665: Email signatures revisited

In Tip 224 we gave a solution for using email templates for signatures in emails sent from the CRM web interface. While this works, it is not automatic, and it has some limitations around logos and other formatting options.

Well you don’t need 224 anymore! CRM 2016 update 1 (aka spring wave) introduces email signature capabilities as a standard feature.

Click the gear icon in the upper right hand corner and click options. Then select the Email signatures tab and create your email signature.

Then, when composing an email in web client, your signature will appear by default.

Thanks to the MSCRMSHOP blog for alerting us to this little-known feature.


Tip #664: Tablet App Search – Don’t Get Confused

Tablet SearchEarlier this week a client called and said they were baffled by the searching on the tablet app. They had a custom entity published to the mobile app and when they search on the phone and the desktop for data, matching custom entity records would appear. However, when they are on the tablet nothing showed up.

It took me a minute to figure this out myself, I actually had to open the tablet app to see it. But as soon as I had the screen in front of me it was obvious. The magnifying search icon in the grid view on the tablet app takes you to the Cross Entity Search, where the corresponding magnifier on the phone app performs the desktop style search.

Once we confirmed the issue the solution was simply add the custom entity to the cross entity search.

Cross Entity Search

Cross Entity Search

Then you get taken to this screen which is not the desktop search equivalent, it is searching across all entities listed in the filter option.

Search across Entities

Search across Entities

Tip #663: Turbocharge your CRM to Power BI Connection!

Turbo-Snail-iconTurbocharge your PowerBI Connectivity to CRM – Amaze your friends and strangers!

Working in a hardened bunker deep on the mysterious island of “Advanta”, the Microsoft CRM team’s top scientists have unleashed a powerful new API for connecting to CRM. It’s known only by the secret codename “Instance Web API” and today your semi-humble tipster is here to help you unleash it in Power BI!

Based on the OData v4 specification, this API allows, among other things, PowerBI to read data from CRM 5-10x faster than before! (That said, it’s still not as fast as direct SQL access, but that’s a tip for another day.)

How do you as a CRM Online user take advantage of this within PowerBI?

First, you must promise to use it for good and not for evil (unless absolutely necessary).
Second, you must have CRM 2016 Online, preferably the spring update.
Third, Within CRM Settings, under Customizations / Developer Resource find the Instance Web API Service Root URL for your organization.

2016-06-07_16-22-20

Fourth, having memorized – or at least copied – the service root URL from your organization, in Power BI, choose to “Get Data” from “Microsoft Dynamics CRM Online”

Now unleash that “Instance Web API Service Root URL” as the URL for connecting to CRM.

2016-06-07_16-22-52

Once you connect, the Navigator will display the entities from your environment and you can select as needed.

That’s all there is too it!

Note: There are still best practices to keep in mind for optimum performance – Typically limit your download for a given report dataset to 5 entities (stay focused on a specific purpose for that dashboard) – Filter your datasets to typically 50K records or fewer. – Only include the minimum attributes that you absolutely need. Build related tables for lookup items and link based on the “_attributename_value” field rather than ‘expanding’ the attributes within the record (especially for repeated lookups like ‘systemuser’ or ‘territory’) –
We’ll explore these and more in future ‘CRM Tip(s) of the Day’.

Tip #662: USD 2.1 supports Interactive Service Hub but may stumble over popups

Sparkling new Unified Service Desk 2.1 is available for download.

USD 2.1 Interactive Service Hub

Good news: available solutions have been redone, renamed, improved and now make much more sense. Choose between vanilla, upgrade, CRM Web Client and Interactive Service Desk versions. That’s right, version 2.1 added a hosted control for ISH forms and the entire sample solution is built around those.

Even better news: this version no longer requires ubiquitous file copy operation to install the required assemblies. All done with the help of customization files, and USD client will automatically download required assemblies.

Not so good news: you may find that, after the installation, client would sporadically pop up browser windows with the address beginning with http://event/ and, if you happen to install ISH solution, will display a never-ending “Please stay on this screen while we’re doing something…” message on any attempt to navigate between the entities.

This is a known issue related to the way IE process hosting works and you have to do one of the following:

  • Select the Enable Protected Mode check box for the Local Intranet security zone in Internet Explorer
  • Add the http://close, http://event, and http://uii URLs to the Restricted Sites security zone in Internet Explorer
  • Run USD client as administrator

After that, everything is silky smooth and looks awesome.