Tip #691: Extract an existing Word Template from CRM 2016

Tooth Extraction
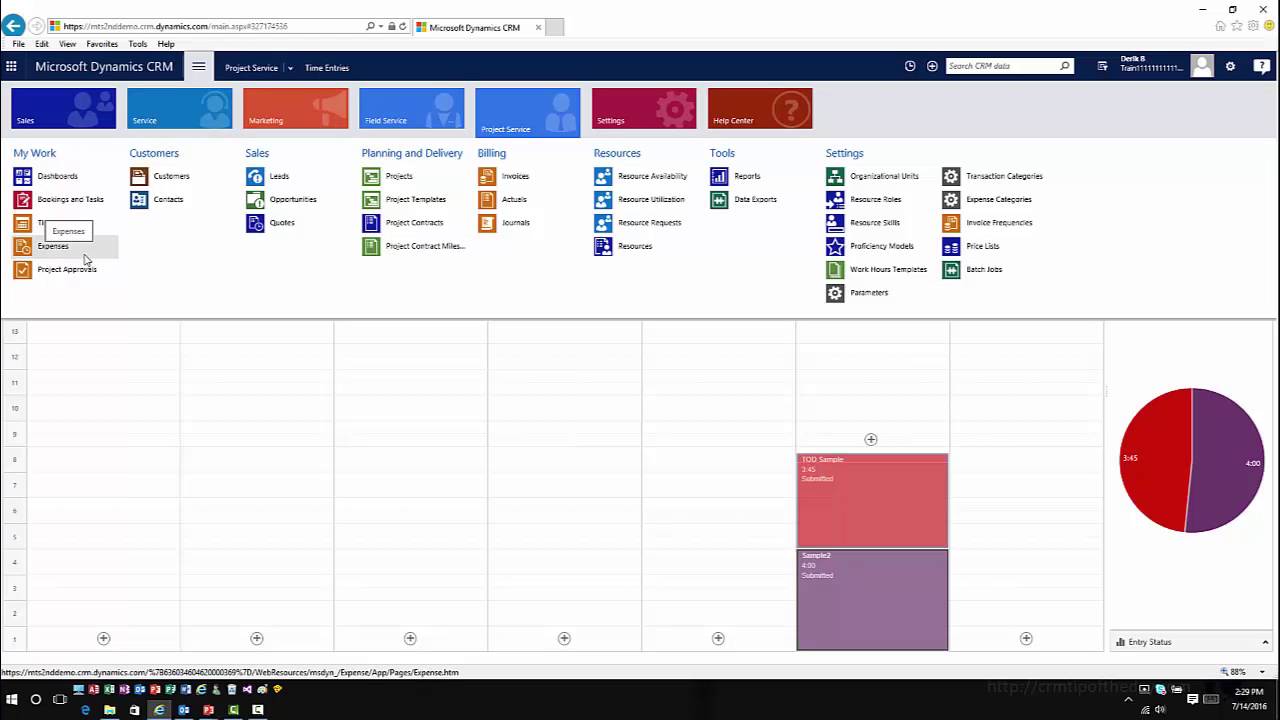
In CRM 2016 we have the fantastic Word Templates feature with which users can generate finished documents in just a few clicks. Far easier than the old mail merge options, and no need to have locally installed versions of Word, the Outlook client and so on.

But one annoying limitation of the feature for many is that there is no obvious way to download or export an existing template. So you can’t get the OOB Account Summary report, make a few minor changes and upload it – you have to start from scratch every time. Or if your colleague built a template and uploaded it to UAT then goes on vacation without sharing the original to your shared source area, you can’t upload that to production when the client signs it off.

Sarah “definitely a cat in a previous life (or the next)” Critchley is a regular contributor to CRMUG in the UK, and draws some great infographics to explain various CRM topics, or as a way to collate her notes from other people’s presentations. She wrote an article about how to auto-generate Word templates using a Workflow and the OOB Action SetWordTemplate. Buried in the article is a little nugget of information mentioned almost in passing as a bit of a “gotcha” to avoid if you choose a template for the wrong entity.

Adam “you say gotcha, I say undocumented feature” Vero spotted this and realised the potential: you can download any existing template by creating an on-demand workflow that is (purposefully) badly written. You create a new, on-demand Workflow for any entity except the one the template is for as long as it supports Notes*. Contact would be a good example here. In the Workflow you add a step to perform a SetWordTemplate Action, set the properties and select the Word template you want to export and the current entity record such  as {Contact(Contact)}.

Activate the Workflow, go find a Contact record and run the Workflow against it. The template you selected does not “work” for this entity, so the Note that is created will have the original template attached with all the raw XML content controls you need, instead of a finished document. Simply download this attachment, delete the note, and deactivate your Workflow. Next time you need to do this, simply edit your Workflow to select a different document template, re-activate and run it again.

*you can use the entity the template is for, as long as it has at least one parent entity that supports Notes. So if you have built a Workflow for Contact and later want to use this to extract a template for the Contact entity, just select the template you want and make the target something other than the Contact, such as {Company Name(Contact)}. When you run the workflow, the template will be attached to a Note on the parent Account record (in this example).

All we have to hope now is that Microsoft don’t decide this is a bug that needs fixing in a later version…

Tip #690: No field level security for alternate keys

Bunch of alternate keysThere were many people taking part in this discussion but I’m just going to take all the credit for providing the summary here. Contributors can claim the free drink from me when we meet.


If you are planning to use alternate keys to access CRM data, keep in mind that the fields with field level security applied are not available for selection as a part of a key.

If you have an existing key and try to apply FLS to one of the attributes, you will be knocked back:

The field Foobar is not securable as it is part of entity keys ( Barbaz_key ). Please remove the field from all entity keys to make it securable.

It all makes sense if the field is secured for creates and updates, it’s a pity that the rule is a blanket one and covers read permissions as well – it would make perfect sense to secure the key attributes as read-only for majority of users and only enable create/update for a selected group.

Tip #689: The quickest way to create CRM Online demo

Quick demo (tape)Daryl “New MVP on the block” LaBar certainly is pulling his tipping share and is back with another quick tip.

If you are part of the Microsoft Partner ecosystem, and are in the need of a well designed demo with the scripted scenarios to walk through, then the quickest way to get there is not CRM Online trial path but http://demos.microsoft.com. Once you are logged in, and created a tenant, it will take less than a minute to provision a fully functional CRM Online + SharePoint Online demo with the full demo script available.

These demos are a selling tool and are unsuitable as a true trial of the product as you won’t be able to convert them to a paid subscription. This aside, the demos have 90 days expiration which beats 30 standard days hands down.

Tip #688: Tipster Guide to Dynamics CRM Project Services – Overview Part II

TitanicContinuing where part I left off, we look more at the management options available with Project Services. We show you how to add and assign Tasks, manage work, submit and approve time sheets and expenses, and perform basic reporting.

YouTube player

Give us your feedback, all of it: good, bad, and ugly, I’m sure we can take it. Suggest new topics either in comments or by sending your ideas to jar@crmtipoftheday.com.

Don’t forget to subscribe to http://youtube.com/crmtipoftheday.

Tip #687: OptionSets in Power BI

OptionSetIf you’ve been playing working with the Dynamics CRM content packs for Power BI, you probably know that for custom OptionSets attributes you get only the numeric value and not the associated label.

If you read our tip #684, you know it’s probably because Power BI does not send annotation preferences to CRM. The team does recognize this gap and is working with the Power BI team to provide a long-term solution.

In the meantime, the workaround is to use temp tables for OptionSets and merge your CRM data with these tables:

let 
  Source = #table(
    {"Value","Option"},
    {
      {0, "No Committed Budget"},
      {1, "May Buy"},
      {2, "Can Buy"},
      {3, "Will Buy"}
    })
in
  Source

How do we know what to enter, and how to define and use these temp tables? Content Pack PBIX file has all the answers and David “Xrm.Tools” Yack has a nice post about PBIX content and internals.

Tip #686: Quote products do not like auto save

Autosave essentialsGuido “Trekkie not Star Wars fan” Preite is on a roll this week. His customer was facing an annoying bug on the Quote Product subgrid inside the Quote entity. When he creates a new Write-in product, then proceeds to change the price or the quantity, and the autosave kicks in, the value is restored to the previous one or the input is added at the end. For example, if there is a quantity of 3 and he writes 4, the value reverts to 3 or he ends up with 3,004 (depending on when the value is entered).

This issue does look like a problem with the focus and the autosave, luckily there is a workaround of enabling the legacy form rendering.

In case you missed the deprecation announcement, legacy form rendering will be going away so it’s not a sustainable solution. Let’s hope that this bug (and some others) is fixed by the time this option is removed.

Tip #685: Support requests for your CRM Online customers

When the wheels are falling offIf your CRM Online customer is experiencing a problem, one of the options is to create a support request in O365 portal (hopefully before the wheels start falling off). As it turns out, there are customers and then there are customers.

“Normal” accounts

MSOLP accounts provisioned via O365, would have an option to create a support request directly, i.e. go to Support > Service Requests > + > Dynamics CRM Online and then fire away.

Not for profit

Some of the customers, provisioned with the help of Microsoft support (NFP accounts fall into this category), do not have an option to create a support request directly but instead are invited to leave the details for a callback.
Support options for Not For Profit
Tried and tested, works quite well, though I’m still unsure why does the human being need to be involved for NFP organizations – are they perceived as disadvantaged in some way?!

Unfortunate ones

The customers that historically been provisioned in Australia with the help of infamous Telstra Business Productivity Suite (shortned as BPOS and doing rounds on the internets as an abbreviation for a big pile of …).
Telstra support options
Good luck calling that number as you’ll be bounced between two supports like a ping-pong ball. Consider it to be a lifestyle tax in Australia.

CSP customers

Guido “Trekkie not Star Wars fan” Preite mentions another scenario where he only gets “Contact your partner for support”, with multiple partners listed. There were even speculations that Microsoft will no longer provide first line support for CRM online.
Support for multiple partners and CSP
The truth turns out to be much simpler – answer below is a paraphrased quote:

Dynamics CRM online customers see this experience if they purchased from a CSP (Cloud Solution Provider). This is not specific to CRM, other business online services such as Office 365 suite and standalone workloads have the same experience.

As you may know, for the CSP channel, customer billing and support relationship is directly with the CSP. The reason for this, is that the CSP may have sold the customer other services and solutions they charge and support differently than Microsoft.

Having said that, CSP partners can escalate to Microsoft if needed. Also Microsoft will provide support to CSP customers if they reach directly to us. Although, the normal customer support should be with the CSP as defined in the CSP program.

Anything else

Have a different experience raising the support requests? Share with us either in comments or by emailing jar@crmtipoftheday.com.

Tip #684: Annotate your OData

Annotate colorsOne of the advantages of the Web API is its ability to fine-tune and annotate the returned data thus avoiding excessive round trips and generally relying on the server to do the heavy lifting. Even Daryl “New MVP on the block” LaBar admits in his tip that he was not aware that it is possible to include OptionSet formatted (a.k.a. text) values in the query.

As documented on MSDN, the trick is to add a odata.include-annotations preference with the value of OData.Community.Display.V1.FormattedValue in the Prefer request header:

Prefer: odata.include-annotations=
   "OData.Community.Display.V1.FormattedValue"

to get both value and its formatted equivalent:

{ 
...
"donotcall@OData.Community.Display.V1.FormattedValue": 
  "Allow",
"donotcall": false,
"revenue@OData.Community.Display.V1.FormattedValue": 
  "$100,000.00",
"revenue": 100000,
...
}

If you need information about lookup properties, you can simply specify

Prefer: odata.include-annotations="*"

to include all available annotations and figure out if you’re looking at the customer record who is a contact or an account without a roundtrip.

Tip #683: Tipster Guide to Dynamics CRM Project Services – Overview Part I

Project Service Automation FailIn this video we take our first look at the new Project Service Automation feature for Dynamics CRM Online 2016. We look at how the project works and discuss some of the key concepts.

YouTube player

Give us your feedback, all of it: good, bad, and ugly, I’m sure we can take it. Suggest new topics either in comments or by sending your ideas to jar@crmtipoftheday.com.

Don’t forget to subscribe to http://youtube.com/crmtipoftheday.

Tip #682: Resetting CRM Online production instance

Sandbox ClubWho in their mind would want to reset a CRM Online production instance?!

How about a trial you have provisioned for a customer, then pushed CRM to the limits by trying out different combinations of the solutions and then accidentally acquired dependencies on 3rd party solutions that are now difficult to remove? Trial that has been demented by quick hacks, “new_” prefix, and abominable entity names? Customer is now ready to subscribe so all we want is to start afresh, right?

In CRM Online Administration Center:

  1. Switch instance type to Sandbox: select the instance, click Edit and change the Instance Type
    Changing CRM Online instance type
  2. Apply changes and go back to the instance list
  3. You now have the options to Reset, Admin (enable administration mode) and even Delete the instance
  4. Once done, repeat the first step and switch instance back to production

If you don’t have a sandbox license available, production license will continue to be consumed by the switched instance – cannot have a cake and eat it too. More details and licensing permutations are on Technet: Switch an instance.