Tip #873: Can’t open records after Dynamics 365 upgrade

After your CRM online environment is upgraded to Dynamics 365, some users are seeing the following message when trying to open records after the upgrade:

As referenced in this Microsoft support article, the answer is to clear your browser cache. In Internet Explorer, the typical process to do this is to click Tools–Internet Options–under Browsing History click “Delete.” However, for some users, this does not fix the problem.

If this describes you, follow the following steps to manually clear your Internet Explorer temporary files:

  1. Navigate to Internet Explorer Options > Settings > Click on View Files> Clear the folder
  2. Go to Run > %temp% > Clear the folder and empty recycle bin and try accessing CRM

Restart your browser, and you should be good to go.

Tip #872: Video Guide to Dynamics 365 Relationship Insights

Marriage breakupIn this video we look at the Dynamics 365 new Relationship Insights feature. We walk you through how to setup and configure several of the feature, including the Relationship Assistant, and the Auto Capture feature.

YouTube player

Give us your feedback, all of it: good, bad, and ugly, I’m sure we can take it. Suggest new topics either in comments or by sending your ideas to jar@crmtipoftheday.com.

Don’t forget to subscribe to http://youtube.com/crmtipoftheday!

Tip #871: Switch from Dynamics CRM Online to Dynamics 365

Starting July 1, 2017 subscriptions to Dynamics 365 licenses will be mandatory for renewing clients.

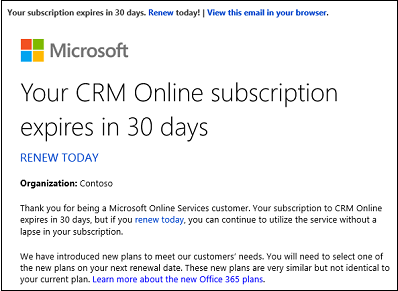
Sometime after June 1, 2017 you will received an email that looks like the following.

It’s time to start talking with your partner on selecting the correct Dynamics 365 license type.

You can read more about the transition process at the technet site.

Subscription notification

Tip #870: How to set an optionset value in the workflow

Sometimes Dynamics 365 plays a cruel déjà vu game.

I swear I was able to do that just last week

and Dynamics 365 like:

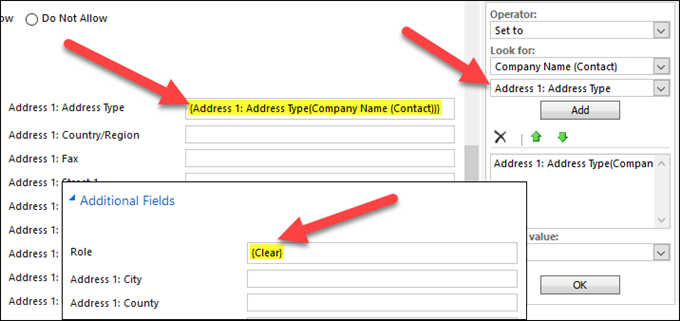
Since version 8.2.1.173 Dynamics 365 Online refuses to allow setting up or clearing optionset values in the workflow editor. Yes, you can set it to a fixed value but not to a value from another compatible optionset. In fact, it’s not possible to select an optionset field at all. Note that existing workflows are not affected until you remove the value (crafted previously) from the optionset.

The team is aware of the problem and fix is in the pipeline. Until the fix arrives, the workaround is quite straightforward:

  • Create blank solution; create a publisher in the process if you don’t have one (why not?).
  • Add the workflow you need to fix to this solution. Keep it draft, no need to activate. If you use custom entities or attributes, add those too.
  • Export the solution. No need to publish anything. You may need to use 8.1 or earlier version during the export (see next step).
  • Import solution to either Dynamics 365 On-premises or to an online organization Dynamics CRM 2016 Update 1 or earlier (use sandbox reset feature to get specific version going).
  • Set your optionsets as you see fit.
    Optionset in workflow
  • Save the workflow, export the solution, import it back to Dynamics 365 Online.

Optionsets should be good now (but don’t touch them!).

Tip #869: Beware of minimal copy side effects

Minimal copyAbility to copy organizations in Dynamics 365 is invaluable. Ability to perform a minimal copy is a great space-saver. But, as reported by Evan Watson and our own Joel “Silence is also a good a podcast topic” Lindstrom, beware of the deficiencies of a minimal copy. Entities that are copied are listed but what is not mentioned are the side-effects of not copying some other entries.

  1. Themes are not copied. Not only that but any attempt to create a new theme after performing a minimal copy will generate an error. The only fix at this point in time is to raise a support ticket to recreate required entries in the theme database table.
  2. Minimal copy doesn’t include Outlook sync filters so sync to Exchange won’t work because the sync filter templates don’t get created.

There could be more, of course – let us know in the comments.

Tip #868: Avoid changing the organization version during the reset

Who moved my cheeseIf you do a reset of a Dynamics 365 sandbox organization (for a good reason reset is not available for production organizations), you may receive the following message:

To improve your experience with Dynamics 365, your organization has been moved to another set of servers. When this move was made, the cross-reference that points your organization’s Web address to the new server was updated. For some subscribers, their Internet Service Providers update cross-references only one time every 24 hours. Until then, you may be unable to sign in to your organization. For more information about Domain Name System (DNS) service entries, read this Knowledge Base article: article

What [most likely] has happened here is that you changed the version of the organization and, as a result, it’s been moved to a different scaling group with a different IP address. Unless it’s intentional, try to avoid changing the org version – that will minimize chances of your cheese being moved.

The KB article suggests waiting it out but sometimes these simple steps can get you out of trouble: close the browser, open command prompt, run ipconfig /flushdns command, start the browser.

Thanks to David “Xrm.Tools” Yack for the tip!

Tip #867: Video Guide to Dynamics 365 Unified Scheduling

Schedule boardIn this video we look at how to use Dynamics 365 Unified Scheduling feature to setup and schedule other entities (such as Cases, Opportunities, Custom Entities, etc.) using the Schedule Board that is apart of either the Field Service or Project Service Automation Solutions.

YouTube player

Give us your feedback, all of it: good, bad, and ugly, I’m sure we can take it. Suggest new topics either in comments or by sending your ideas to jar@crmtipoftheday.com.

Don’t forget to subscribe to http://youtube.com/crmtipoftheday!

Tip #866: Invite others into your Dynamics 365 instance

Gone are the days when every tenant was sitting in their own little room with multiple instances being the best offer we could hope for. With Azure AD B2B generally available (yay!) we can now all invite Damian “Unleashed” Sinay to poke around our Dynamics 365 instances. Why Damian? Because he was the one asking the question couple days ago so I decided to test it.

Setup

I have a trial instance of Dynamics 365 and I would like to grant my production Office 365 account access to that instance. Yep, worked on a trial and without Azure subscription.

Steps

  1. Open https://portal.azure.com. Documentation and videos send you to the old “classic” portal but it all works just fine in the new one.
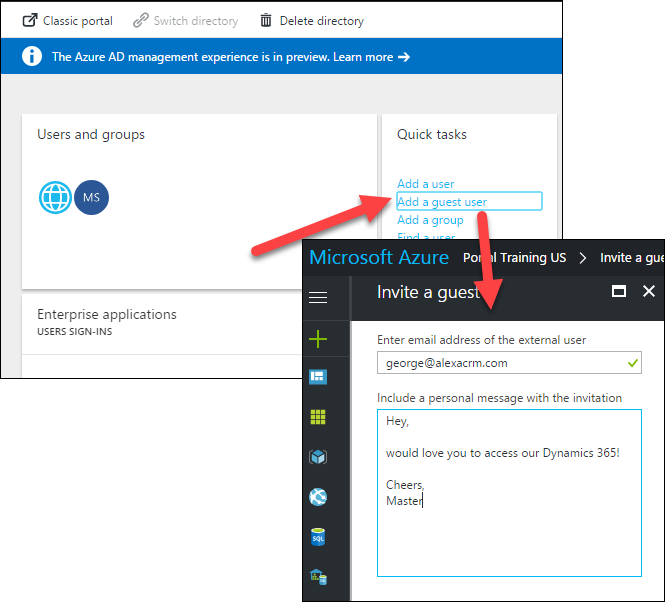
  2. Select Active Active Directory on the left, click Add a guest user, enter the email, say something encouraging and press Invite
    Invite guest user
  3. Invited user will receive an email with the link to redeem the invitation.
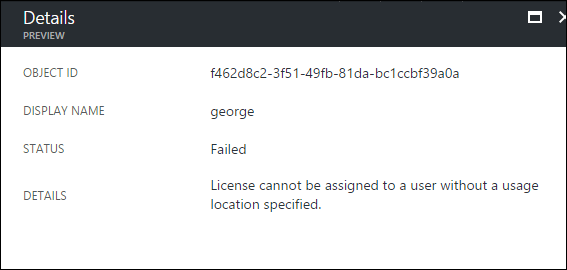
  4. Follow the invitation link and login as the invited user. After the invitation is accepted and concent given, a new user will appear in the original directory. You’d need to enter first and last names (only the email is passed through from the other end) and usage location. Latter is important if you want the next step to succeed.
    No license without location
  5. Assign the license required. I’m very generous when running a trial so Dynamics 365 Plan 1 Enterprise Edition it was.
  6. Open Dynamics 365 and assign a security role to the fresh user.
  7. Now you can login into the instance as a user from the external directory. B2B FTW!

Detailed instructions are available; among other things, the article lists the limitations of the external account, e.g. no Unified Service Desk, no Dynamics 365 App for Outlook, etc. The biggest uncleared hurdle is the requirement to assign a valid license in the destination directory even though the user might already have a suitable license through their own subscription.

If you’d rather do things in bulk, follow Azure AD documentation.

Tip #865: Watch your language with App Designer

US vs UK muffinUsually we don’t publish short-lived bugs tips but when Steven “:D 🙂 😐 :/ :(” Foster is in trouble, we all are.

tl;dr

When App Designer does not save the changes, watch your language. Set it to one of the 45 languages supported by Dynamics 365, that is.

#@$*&^$%!(

Has anyone been using the App Designer in anger? I am trying to create a nice new app for a demo, I have configured all of my forms, views, charts, processes etc but when I try and create a sitemap it just does not save any of the components. I click Save after each change but when I click off and click back on my titles have not saved, very frustrating, am I missing anything, has anyone else experienced this?

!!happy

To paraphrase the semi-official reply:

All the 45 languages that are supported for CRM, are supported for Sitemap Designer as well. for quick reference, you can look up the list of languages available for installation at Microsoft Dynamics CRM 2016 Language Packs.

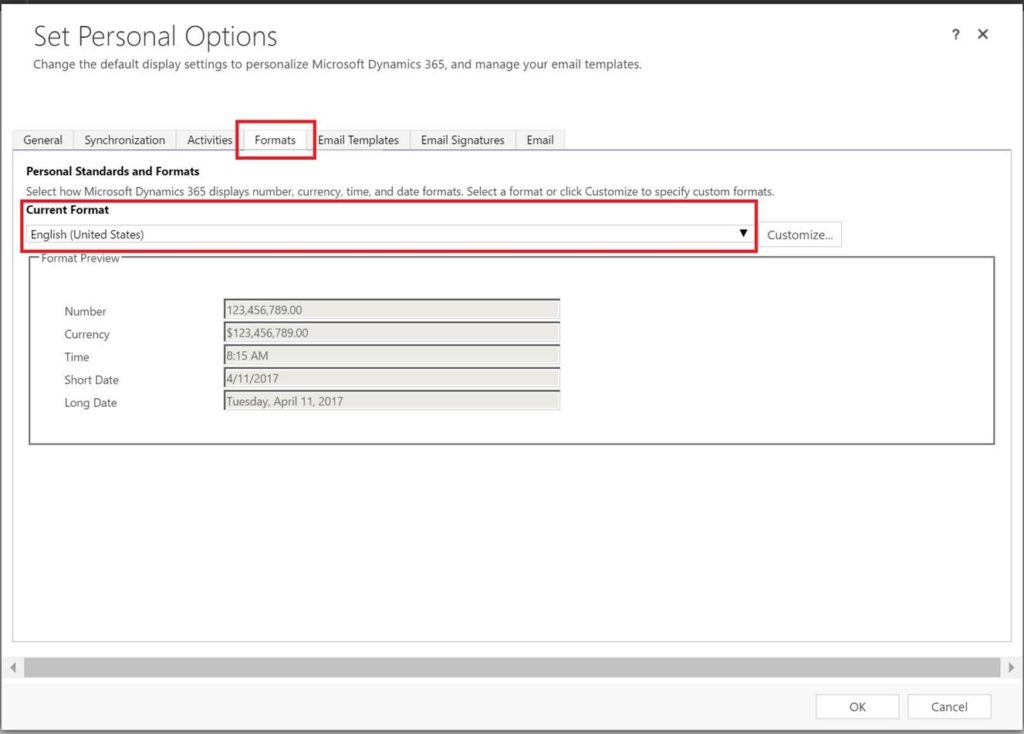
The issue occurs with Sitemap designers in 8.2 when you set a particular language format that is outside these 45 languages, and in that case the default language is not set correctly. (And in our case Steven decided that US English ain’t no good no more and switched to Kiwi English)

Language personal options

The fix is in the works but in the meantime, for those facing this issue, the temporary workaround is to ensure that your format is set to one of the 45 supported languages while you are using the sitemap designer.

Tip #864: Use multiple personas in Chrome

MasksRemember our ancient tip on using InPrivate mode in Internet Explorer? Your experience may vary but I found that sooner or later the private environments start stepping on each other toes. There are other shortcomings, like lost history, no bookmarks, no Ctrl-Shift-T a.k.a. “bring back that tab I just accidentally closed”.

Andre “I’ve got 88 in my handle” Margono, in his own words, “just got an enlightenment of a nifty feature for Google Chrome: Supervised Chrome Profile.


EDIT: To avoid prolonged and costly lawsuit, we’ve decided to dethrone Andre and award the Christopher Columbus (or simply CC) prize to Guido “Trekkie not Star Wars fan” Preite for his past contributions into the subject.


I’ll keep quiet while Andre explains the feature:

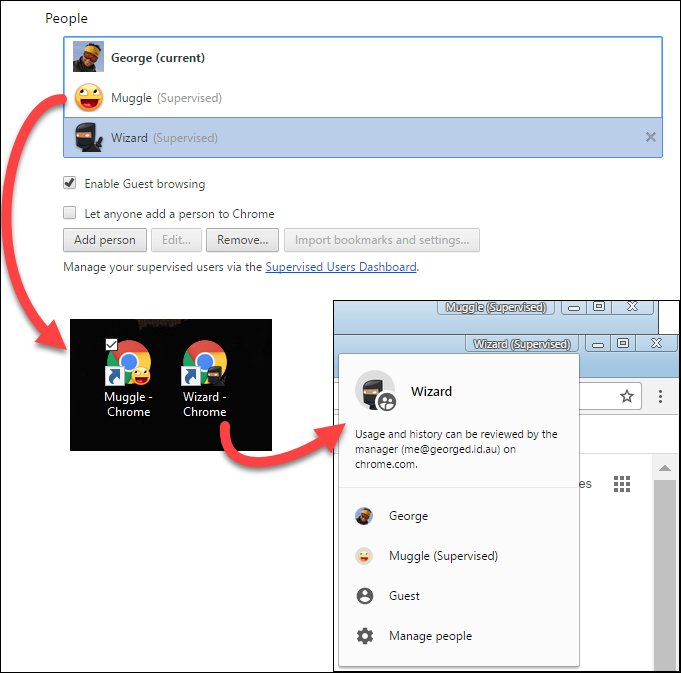
As a consultant, I work with multiple clients and sometimes for a single client I need to login with multiple persona. Now with this Chrome profile, I can set up the login user to Office/Dynamics 365 (which is authenticated via Azure AD) based on the persona that I would like to login. To me, this is a productivity tool compared to the other workarounds: 1. Open multiple browsers, 2. Open Inprivate/Incognito window all the time.

Tipp Jaar’s $0.02 + tax

The documentation is not entirely correct as there is no Manage People button anywhere near the account in Google Chrome. Instead, click on a control “shevron” in the top-right and select Settings, then scroll to People section:

Supervise Users

This. Is. Absolute. Gold (and a strong Tip of the Month contender, if you ask me).

The masks are creations of Junior Fritz Jacquet, made out of the toilet paper rolls. o__O