Tip #1043: The Easy Way To Find The Fields Workflows Depend On

If you have a field on a form which is used to trigger a workflow, you probably do not want to mess with it too much. You certainly do not want to be rapidly changing its value or having Dynamics 365 think the value has changed because, for example, a Flow is updating the entity and marking the entire record as updated.

Therefore it may be handy to identify which fields are being used to trigger workflows. You could exhaustively open up every workflow and check or you could click on every field in every entity and Check Dependencies but, thankfully, there is an easier way.

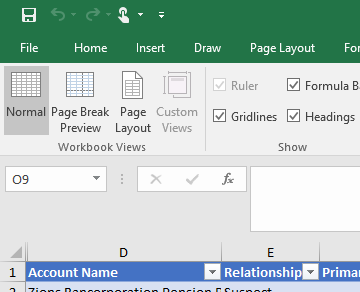
If you do an Advanced Find on the Process entity, there is a field called “Trigger on Update Attribute List”. Add this as a column and for every Process in your system it will show a comma separated list of the fields used to trigger the Process. Unfortunately, in v8.2 it is not possible to export the Advanced Find results to Excel but you can in v9 (and, one would hope all later versions).

Tip #1042: New trial sign up options for Customer Engagement

We are one whining bunch. We said that 30-days trials are not long enough. Then we said that 30-days trials are not short enough. Microsoft did listen and now we have some new sign up options.

Today Microsoft has released a new Customer Engagement trial sign up service for Microsoft Employees and Partners. You can now sign in using your Microsoft Partner or Microsoft employee credentials to access personalization options. This includes specifying the purpose and preferred duration of your trial. You can add the trial to any tenant you have access to.

What’s New?

  • Choose the preferred duration of your trial – 2 days, 30 days, or 90 days.
    • Depending on the trial purpose you select, Microsoft will recommend a trial duration period based on the partners feedback.
  • Tell Microsoft which tenant you want your viral trial activated on.
    • Sign in with your Partner or Employee credentials, and then during personalization you can specify the demo account you want to use.
    • Need a new demo tenant? Create one at demos.microsoft.com.

What are you waiting for? Go ahead and try:

  1. Navigate to http://trials.dynamics.com and select the option “Are you signing up on behalf of a customer or for development purposes?” You will get a prompt to enter your credentials and proceed to the personalization experience.
  2. Personalize
    Personalise trial
    Note a small information icon with a little disclaimer hiding behind it: You may add and manage multiple trials within the same tenant. Bring your own demo tenant or add a trial to your organization’s tenant. Note, you may not be a global administrator for your organization’s tenant. Please visit demos.Microsoft.com to obtain a demo tenant with global administrator permissions.
  3. Make some choices (and be aware of the 25 trials limit)Trial limit

Looks like you need to be a global admin in your tenant which is what I expected anyway but would have been nice to have it in a big bright letters to stop the disappointment of rejection.

Cover photo by Nathan Dumlao on Unsplash


Tip #1041: Make Dynamics 365 data import less rigid

Kevin Altman emailed jar@crmtipoftheday.com with the following question about data import in Dynamics 365:

Users want to perform updates to existing data in CRM but the export for update/re-import process is too rigid as data often changes between the export and re-import, blocking the import (I guess CRM forces you to have no changes to re-import). Are there any workarounds?

First, a few details about how the data import works. When you export to Excel, you will notice that columns A-C are hidden.

Unhide columns A-C, and you will see three columns where the header name begins with (Do not modify). If you have read tip of the day for long, you know that we like to dare greatly, so we are going to modify the do not modify columns (we also removed the tags from our mattresses).

So what are these hidden columns?

A: The GUID of the record:this is how CRM knows what record to update. If it used the record name, it would potentially hit duplicates and not know what to do. By using the unique identifier for the record, it precisely matches to the correct record. This is also how import utility and immersive Excel know when a line is an update vs. a new record to create–if there is no value in column A, it will create a new record. This is also a field that you can use to trick import to updating records that are not included in the export.

B: Row checksum: a hash that Dynamics 365 uses to see if the record has changed. That way it only updates the records that have changed, while ignoring the rest.

C: ModifiedOn: This is the important one for our example. This is the modified on date of the record in CRM. When importing, Dynamics 365 compares the date in column C with the modified on date of the record. If they are different, the import will fail for that row. This is there for a reason–if you export and wait 3 months to import, and users have subsequently made changes to the record in CRM, if it didn’t compare the dates, newer data could get overwritten by older data from the import file.

Let’s say you have a busy CRM environment where system processes and data integrations are frequently updating records. You want to do a data cleanup of your contact data. You export out your active contacts to Excel, and you have your worker bees start cleaning up the data.

If your environment is active, chances are that at least some of the records will fail to import because their modified on has changed in CRM before your data cleansers have finished their cleanup. Modified On changes if anything with the record changes, sometimes if someone saves a record without changing anything, or if someone walks in the vicinity of the record and sneezes. So even if none of the fields in the export file have changed, the record will not update because the modified on date of the record in CRM is different than the date in column C of the spreadsheet.

So how can we get around this?

Note–the following solution is not supported (as Microsoft has told you not to modify these columns) but it works and has been tested by the author of this post. He is not responsible if you mess your data up though).

So we exported our contact data out, cleaned it up, and now we want to reimport it. Here is one approach to avoid the date restriction

  1. Export a second copy of the data to be imported. In my example I called my second export export2.xlsx. Unhide columns A-C.
  2. To the right of the data table in the original spreadsheet,add a new column and format to the format that matches column C
  3. Click in row 2 of the new column and add a vlookup formula.

    =VLOOKUP(A2,export2.xlsx!Table1[#Data],3, FALSE)

    This is saying find the value in column A in the table in spreadsheet 2 and return the value from column C. This will get us the current modified on for the record. Copy this to every line of the table in the original spreadsheet (making sure the row number references are correct).

  4. Copy the values in the new column and paste (values only) to column C, overwriting the existing modified on date values.
  5. Remove the new column and hide columns A-C, then save.

You should now be able to import the file and update the records.

Photo by Sam Mgrdichian on Unsplash

Tip #1040: Why Can We Stack Values in Workflow?

Back in the days when George Doubinski used configuration, he talked about using constants in workflows.However, this is only the tip of the configuration iceberg. Just above our Default Value box we can stack values for insertion into our field.

What does it mean to stack the values and what happens when we do?

When we update a record in a workflow and select a field to update, we see a box like the one on the right. In this scenario, I have selected the Send Email step in the workflow and clicked into the To field on the Form.

By adding a series of values into my Set To box, I create a simple form of branching logic which goes like this:

If the Student/Customer field has a value use this Else
If the Reported By field has a value use this Else
If the Owning User field has a value use this Else
Send it to Leon Tribe

A lot simpler than trying to explicitly set up If-Then statements using Workflow steps.

Tip #1039: Give your customers access to e-learning

Microsoft Dynamics customers and partners are eligible to access E-Learning courses. It’s a reasonably well-known fact that Microsoft Dynamics partners are entitled to access Dynamics Learning Portal (DLP). Lesser known is the one that Microsoft Dynamics Customers are entitled to access E-Learning courses through the Microsoft Imagine Academy. Perhaps there is a small confusion caused by the fact that Imagine Academy pitches itself as provider of (highlight is mine):

industry-recognised technology skills, education and certifications students need to succeed.

Besides that, some discovered that they are unable to login into the Imagine Academy when going directly with O365 credentials, even when clearly entitled. If this is your scenario, try the instructions put together by our good friend Salim Adamon:

  • Ideally, start that with an InPrivate browser or clear your credentials cache
  • Go to Customer Source
  • Top Right => Sign In with Office 365 Organization account credentials
  • If asked, select the Customer Profile, not Partner
  • Click on Microsoft Dynamics CRM (left nav)
  • Click on Learning (left nav)
  • Click on E-Learning (left nav) => This takes you to Imagine Academy and lets you in.

Also, there is a specific help page for Dynamics channel – make sure you read it before reaching out for help.

Featured image by Ben White on Unsplash

Tip #1038: Keep frequent notifications to the business hours

Nagging is a very effective way to get urgent things done. For example, if signature is required, keep sending email reminders every hour until it’s acquired.

One of the customers successfully mastered the technique of a recurring self-calling workflow and has been successfully firing emails left and right reminding good people of the outstanding work to be done. The challenge, as it turned out, was dealing with nights and weekends. If a task cropped up on Friday at 4:59PM, for example, by Monday the inbox would have had 64 identical emails. In other words, the workflow should send emails hourly until a certain condition is met (the proverbial signature is acquired) but only during the business hours.

There were number of suggestions from my good community friends, all effectively suggesting somehow checking calendar in a custom workflow activity. Which meant dealing with calendar and calendarrules (shudder). I even got some sample code that allows counting business hours.

Then, of course, none other than Joel has appeared in his shiny Dynamics armor.

What about leveraging SLA? Business hours can be associated with SLA. Could that be used to send your reminders but not do it in business hours?

SLAs do exactly that: they keep the clock ticking, can have actions associated with the failure and success, and they can observe business hours! The only challenge is making the process recurring. SLAs are smart, as it turned out. If you have a field that denotes the starting point for your KPI, and that field is reset, the KPI clock is reset too, making the process recurrent!

The process in a nutshell:

  1. Enable target entity for SLAs, if it’s not already
  2. Create Start Timer On datetime field (needs to be updateable, e.g. createdon won’t do a good job)
  3. Create 1:N relationship with SLA KPI Instance entity – that will allow keep the timers and conditions going
  4. Create a field that can record the success, e.g. Signature acquired (boolean)
  5. Create business hours calendar and SLA for your process observing that calendar. Add details along these lines:
    • Warning on 30 minutes: send email
    • Failure at one hour. Action should include setting the Start Timer On field to the execution time of the process (now, that is). That will reset the SLA countdown – that’s the trick!
  6. Optionally add timer control, do the other good stuff… This article is a good start. Activate the SLA.
  7. Create a workflow to apply that SLA, e.g. changing the status reason to Signature required or similar. In the workflow set SLA and Start Time On fields on the record. The system will take care of the rest.

And now set the calendar to weekends only – that will show them how to leave unfinished urgent tasks on Friday night!


Tip #1037: Modify data source for Word templates like a boss

Word templates are not the most flexible templating solution for Dynamics 365 but for the simplistic scenarios it does work well, and is quite fast.

Built-in templates are used to be notoriously difficult to modify. Not anymore, thanks to the Document Template Manager from Jim Novak. Now that we can modify the content itself, how about refreshing the data source, e.g. when new fields were added to the entity? Good news is that it’s possible without the need to recreate the template:

  1. Download the template using XrmToolbox
  2. Change file extension from docx to zip. Yes, Word file in the new format is a zip file under the hood.
  3. Open zip using Explorer, and extract the customXml\item1.xml file.
  4. Open item1.xml using your favorite editor.
  5. Insert new fields at the beginning (or wherever) using the format <field_name>field_name</field_name>. In fact, element name can be anything, it’s only used to show the element in the list:
    Xml edit
  6. Add the fields as required:
    Word template
  7. Replace file in the archive (copy in Explorer, open zip file, navigate to customXml folder, paste, say yes to replace).
  8. Rename file back from zip to docx.
  9. Use XrmToolbox to upload the template back, replacing the existing one.
  10. And enjoy the results
    Org document


Tip #1036: Organization Insights Is The Administrator’s Best Friend

Dynamics now has AppSource where you can download trials and various other goodies for your Dynamics 365 instance. To access it, click on the chevron (down arrow) at the top level of your Dynamics 365 Ribbon, then click “Get more apps”.

One which is invaluable for any Dynamics instance is Organization Insights from Microsoft. This is not to be confused with the Organization Insights dashboard which comes standard with Dynamics 365 but rather a much more comprehensive set of administration tools available from the Settings area. Hit the ‘Get it now” button on the App and it will be installed into the instance of your choice. (Or just go directly – Tîpp Jäår)

The dashboards cover:

  • User management
  • System Job management
  • Plug-In management
  • API call management
  • Mailbox management
  • Storage management

If you are managing a Dynamics 365 instance and are wondering where your storage is going, why the system is slowing down, or who is and who is not using the system, the Organization Insights App is for you.

Tip #1035: HTML codes in Voice of the Customer

Today’s tip comes from Jeff Weresch. Got a tip? Send it to jar@crmtipoftheday.com.

Want to have more control over the formatting or spacing of your questions in Dynamics 365 Voice of the Customer? You can use html codes to control how the text will be rendered.

For example, we want “Highly Dissatisfied” to appear over the 1 in a NPS question and “Highly Satisfied” to appear over the 5. If you enter “Highly Dissatisfied 1” as the column header, the 1 will be in the same line as Dissatisfied and look unsightly.

By adding a <br> code, the question column header displays as desired.

Tip #1034: Set Yourself Up For Efficient Importing

Prepare for importImporting into Dynamics 365 can be concerning to even the most hardened of CRM consultants. Often, if we are importing into a production system, we have tight schedules to get in and out before the users log in.

If we are still importing data when the users come online, the system can be unacceptably slow and hinder business.

Here are some things to consider before setting the import free:

  • Workflows and plugins:In the case of synchronous jobs, if it fires on the import of every single record, it will slow down importing while the next record waits for the job to finish. In the case of asynchronous jobs, they can stack up and still be executing well after the last record comes into the system and, in the worst case scenario, a record will be viewed before all jobs have run on it.
  • Duplicate Detection: This is easy to turn on or off if you are using the Import Wizard but if you are using another import mechanism, do you need to adjust the settings so the records come in, as desired?
  • Alternate Keys: If you have these defined, make sure your new records are compliant with the rules.
  • Audit Logs: The creation of lots of records can man lots of audit entries and lots of additional storage consumed (which usually cannot be deleted for three months). Set the audit settings as you require.

By reviewing what will run, disabling processes and settings for the import where it makes sense, with the intention of re-enabling and potentially running them at the end of the import, we can save ourselves literally hours of import time and make for a much better experience for all stakeholders involved with the system.

Of course, if you want a rough indication of how long the import will take, you can always run a few test imports and vary the record totals to get an estimate.