Tip #1053: Convert emails to knowledge articles

The biggest challenge to knowledge management is content creation–somebody has to create the knowledge base articles. Emails can be a good source of knowledge base content. You are emailing your contacts and answering their questions, giving users a good way to quickly create knowledge articles from emails can be a good idea.

There isn’t a standard “convert to knowledge article” option for Dynamics 365 email records. Also, once an email is tracked, you can’t edit it, so adding a button to the form is not an option.

But that is why we have workflows.

  1. Create an on-demand workflow on email entity to create knowledge article. Map the subject to the Title field and the email description to the content field. Scroll down on the Knowledge Article form to populate required fields for major version and minor version.

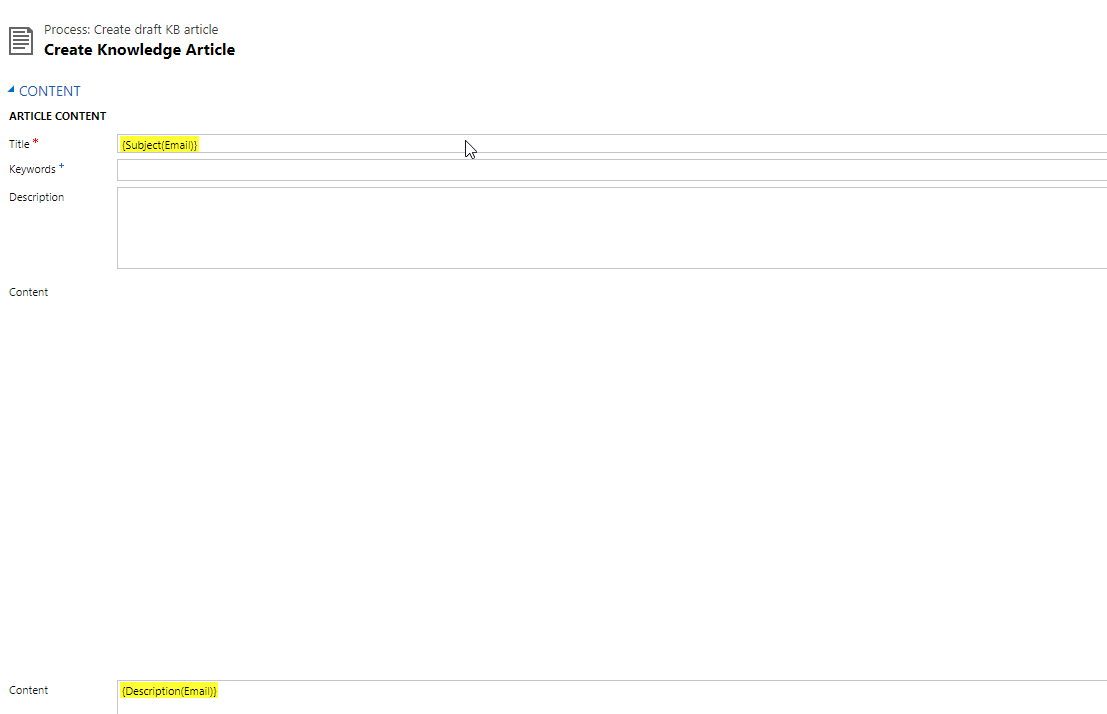
2. From email, run on demand workflow

3. Draft KB article is created in Dynamics 365, ready to be revised and published. The content field renders the HTML from the email.

Tip #1052: Recurring tasks in Dynamics 365

How can I do recurring tasks in Dynamics 365?

While Dynamics 365 does not include an official “recurring” task like it does with appointments, it can still be done. Here is one approach to creating a weekly recurring task:

  1. Create an entity called “Task Schedule.” Include the relevant fields like owner/assigned to, next scheduled, subject, description, end date. Populate next scheduled with the first task instance due date, and end date with when the series should end.
  2. Create a workflow that runs on create of task schedule and on update of the next scheduled date:
    1. Wait condition timeout 1 minute after next scheduled.
    2. Check condition is workflow execution time less than end date.
    3. If so, create task setting due date to 1 week from next scheduled date and mapping the fields from the task schedule record.
    4. Update task schedule “next scheduled” with the due date from the task created in step 3.

So yes, it can be done. The above approach could be expanded to handle different types of frequencies (monthly, semi-annually, etc).

But should it be done? Personally, I am not a fan of recurring tasks, and the standard warnings about over-use of wait conditions applies.

Photo by Ambitious Creative Co. – Rick Barrett on Unsplash

Tip #1051: SharePoint license included in Dynamics 365

So you want to use SharePoint integration with Dynamics 365 Online, do you need to buy a SharePoint license for your users?

The answer is probably not. Many Dynamics 365 license types include SharePoint plan 2 licenses.

So what does this get you? It includes everything needed for SharePoint document integration with Dynamics 365, but does not include office web apps or services like Exchange, Skype for Business, Teams, Yammer and Delve.

Thanks to CRM Viking for contributing to this tip.

Tip #1050: Drink safely and drive in moderation

Who would have thought that the wild celebration of the 40 measly tips would turn into 4 years of searching, begging, stealing, and borrowing that next tip. I have to admit, on odd occasion the thought of having an intimate relationship with the daily routine did cross my mind but I’m glad that the team has thought otherwise, organized a timely intervention and persevered with this madness.

This year we celebrated tip 1,000 by performing a glorious victory song while dancing naked around a campfire in Nashville but not, to my surprise, tip 1024, which most of us would consider a rounder number to celebrate.

Happy 2018

It’s time to call it a day until the year of the brown earth dog (though Pantone seems to disagree on the annual color selection). In this festive season, beware of small objects in children’s hands and unsafe swimwear. Befriend someone who knows CPR and always remember the first tip. See you in 2018!

Tip #1049: Download Dynamics 365 documentation

If you have recently searched for documentation for Dynamics 365, you have probably discovered that the documentation is consolidating in https://docs.microsoft.com/en-us/dynamics365/.

So if you click “Enterprise Edition Applications,” you can find the user guide, customization guide, and administrator guide for Sales, Customer Service, Field Service, etc.

But what if you yearn for the old days and want to download a copy of the documentation? The good news is, you still can. From any page on docs.microsoft.com, look at the lower left side of the screen.

This will get you a PDF copy of the entire guide which you are viewing, just like old times.

Cover photo by Chris Lawton on Unsplash

Tip #1048: Save As is a new New

There are a few obnoxious special, from a customizer point of view, entities in Dynamics 365. Quote Product, Order Product, Invoice Product, to name but a few. These entities have some artificial limitations around what can be customized. For example, new views cannot be created; NEW button just isn’t there!

Sometimes we are so immersed in the complexities of the new Dynamics 365 features that obvious solutions just fly by unnoticed. For years.

For years I thought that all customizations for these entities are out of limits including creating views. Until Guido “Trekkie not Star Wars fan” Preite mentioned in passing that one can use Save As functionality to get a new view. (*walking away…*)

Order product view

  1. Don’t see New or Edit button? Just double-click the view you want to edit.
  2. Then click the Save As and give it a name of your choice.
  3. Don’t like what you’ve created? Double-click to edit then click Actions > Delete View.

 Cover photo by Travis Yewell on Unsplash

Tip #1047: When in Doubt, Go Global (With Option Sets)

This is a lesson I have learned the hard way so take my bitter experiences and consider it wisdom derived from idiocy.

The lesson is simple. When creating an option set, unless you are ABSOLUTELY certain you do not need to, make it a global one. Even if you are absolutely certain, make it global anyway.

The consequences of not heeding this advice are almost as injurious as . If you have ever had the displeasure of trying to get a workflow to pass a value from one entity-defined option set to another, a row of soldiers with pointy sticks will not seem too bad an alternative.

Tip #1046: Find days until retirement

A question from a reader at a financial services firm:

I need to know how many days until my client reaches 65 years old. How can I do this with minimal configuration?

This type of calculation can be done using standard calculated fields in Dynamics 365.

  1. First, you will need to have a field that stores when the contact was born. While CRM includes a standard birthdate field, it is a date only field, you cannot mix deterministic and non-deterministic dates in calculation formulas. Since we will be calculating the difference between today and the contact’s 65th birthday, we will need to store the date in a local date time. Create a new birthday field(new_birthday). Just remember to set the time in field values to be 10:59 so the birthday isn’t displayed incorrectly in different timezones.
  2. Create a calculated whole number field for days util 65th birthday. Use formula DiffInDays(now(), ADDYEARS(65,new_birthday)) to get the number of days until 65.

Got any tip suggestions or question which might result in good tips? Send them to jar@crmtipoftheday.com

Photo by Cristian Newman

Tip #1045: Missing fields on Dynamics 365 account form

If you work with a Dynamics 365 v9 environment, you may notice that Microsoft has worked hard to simplify the default account form. In the past, there were many fields that were rarely used, so simplifying the form is a great thing. But some people may argue that they may have gone too far, as some frequently used fields are not displayed on the form by default. If you are a new CRM configurator, you need to know about these fields and form components are available so you don’t create unnecessary custom fields.

  • Account number: A text field and is frequently used when integrating Dynamics 365 with your ERP or financial system.
  • Address 2: Dynamics 365 includes 2 addresses on the account entity (and as many as you want more via the “more addresses” entity). By default, only address 1 is displayed. If you have two primary addresses for your customers (such as mailing and street address), add address 2 and define for which purpose each address should be used (such as street address in address 1 and mailing address in address 2).
  • Relationship Type (customertypecode): Option set used to classify companies based on the type of relationship that they have with you. Need to identify whether a company is a customer, prospect, competitor, or vendor? Use relationship type and update the option set with the appropriate values.
  • Category: Option set capturing whether the customer is “standard” or “preferred”
  • Classification: Option set indicating the potential value of the customer account based on the projected return on investment, cooperation level, sales cycle length or other criteria.
  • Modified By and Modified On: System fields indicating who last updated the record and when it was updated. If this is important detail to see on the record, you may want to add these fields to the form footer.
  • Status and Status reason: indicate the status (active/inactive) of the record. Typically users can tell if an account is active or inactive based on whether the record is editable; however, if you integrate your accounts with another system (like ERP) or you don’t grant users security permissions to update records, they may see active records on read-only forms, so adding the Status or Status Reason to the account form may be helpful in identifying the active state of a record.
  • Bonus: Bing map control–it’s still there, you just need to add it to the form if you want to display it on the form.

While this tip is simple, it serves two purposes:

For new CRM administrators and configurators, you need to be aware that these fields exist so you can take advantage of them if you need them. Between relationship type, category, and classification, there should be little need to create new categorization fields for companies.

For seasoned professionals with Dynamics CRM environments configured years ago with overly complicated account forms, you may want to consider resetting your account form to the default configuration when you upgrade to v9, and only add the additional components that you need to have on the form.

Cover photo by Julia Janeta on Unsplash

Tip #1044: Display lookups as hyperlinks in portal entity list

Entity lists in the Dynamics 365 portals do not have any special handling for the lookups – they just render the display names. Fair enough, after all, how is the rendering code supposed to know what page to link to?

If you are comfortable with liquid in portals then the task is relatively easy. Just use the entity list advanced sample and modify it to render lookups as hyperlinks. (If you find that someone butchered a copy-pasting of Adxstudio documentation, go to the nicely formatted source while it’s still available).

If you prefer standard entity list rendered by one of the built-in templates, then a bit of JQuery magic will do the job. Use the sample script as a starting point and just wrap the content of the lookup column using <a> tag. For example, the following code will convert any quote lookup it comes across in the entity list into a link to “/quote/?id=” page.

$(document).ready(function (){
  $(".entitylist.entity-grid").on("loaded", function(){
    $(this).children(".view-grid")
      .find("td[data-attribute='quote']")
        .each(function(){
          $(this).wrapInner("<a href='/quote/?id=" 
          + $(this).data('value').Id + "'</a>");
    })
  });
});