Tip #63: Execute javascript code during debug session

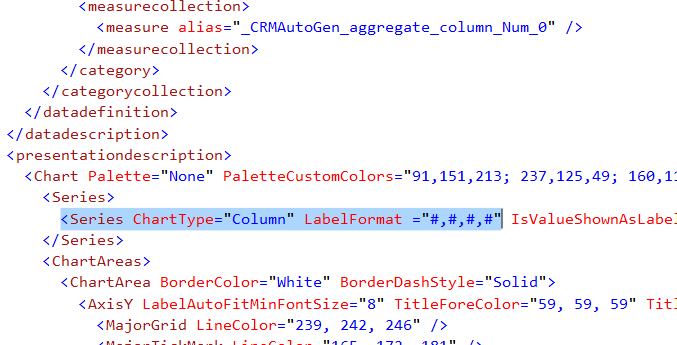
There are times when you want to quickly test out a piece of form Javascript code in the Developer Tools console. Microsoft Dynamics CRM 2013 renders form content in frames and you have to prefix frames[0] or frames[1]
to “Xrm.” to get the code running. In Chrome you can choose the target frame that you want the code to run on. You can choose the main.aspx frame in the console, and run the CRM form Javascript snippets without any changes.

Selecting content frame in Chrome

Developer Tools for Internet Explorer doesn’t offer this capability (yet). But you can always run the “cd” command against the correct frame with the main.aspx to avoid prefixing, e.g. cd(frames[1])

Changing current frame in IE

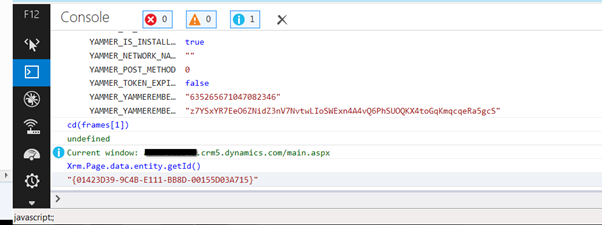
Using these approaches also have the added benefit of fully utilising the code completion capabilities of the developer tools.

Tipped to the jar by Raj Y “First truly independent tipster” Raman

Tipp Jarr’s double dip

Great tip to save time and a perfect technique to complement brand new Dynamics CRM DevTools from relentless Sonoma Partners. From the description:

Dynamics CRM DevTools is an extension to Google Chrome which provides a variety of tools to help optimize customizing and troubleshooting within Dynamics CRM. Currently all deployments of CRM 2013 and CRM 2011 UR 12+ are supported.

Tip #62: Where to find CRM product info

Today’s handy tip comes from none other than Amy “Deity of CRM Documentation” Langlois:

We know we have more work to do to inform our customers where to go to get product information and we are working on some ideas to help alleviate that problem. In the meantime, in your communications with customers, please point to this blog post: Check Out These Handy Links to Help for CRM 2013

This is a great reference to point customers to with links to all the various information “portals”. We are working on a simplified portal landscape so in the future we can have fewer places to send people. But for now, this tip sheet might help.

Tip #61: Change Marketing List View Layouts

When you create a marketing list in Microsoft Dynamics CRM, the list created will contain the typical fields required for a marketing list, such as name, address, city, state, and postal code. But what if you want to change the fields that appear in the view? What if you use a custom lookup field for Country, rather than the out of the box Address 1: Country field? What if you want to display address 2? The views used by marketing lists can be modified by a System Administrator.

  1. Launch Advanced find and search the View entity.
  2. Search for Name Contains “List Member View.”

Your search results should include at least three views: “Account List Members View,” “Contact List Members View,” and “Leads List Members View.” Keep in mind that a Marketing List may contain members from Accounts, Contacts, and Leads, so each member type has a separate view. If you wish to change the view for all member types, you will need to update each list member view.

Just double click the view from the search results, edit it, save it, and publish changes.


Tip #60: Remove Decimals From Charts

In Microsoft Dynamics CRM 2011 or 2013, when you have a chart summarizing a decimal or currency field, by default your chart values will contain decimals. What if you want to round to whole numbers?

To do this, you will need to export the chart XML. For a system chart, navigate to your solution to the entity where the chart resides, select the chart from the chart list, click “More Actions” then “Export Chart.

Open the xml file in the editor of your choice.

Search for the string “Series ChartType=” .Immediately after the charttype, paste in the following string LabelFormat =”#,#,#,#”. After the change, it should look like the following:

chart xml

Save your XML file, then go back to the Customization area from which you exported the chart XML. Click “More Actions” then “Import Chart.”

Select the chart XML that was edited and click “Import.”

When prompted, click “Replace” to overwrite the existing chart with your edited chart.

import chart

Tip #59: Marketing List Form Layout for List Type

On the Marketing List entity one of the required fields is Type, which is a two option field with the default value of Static. If you are in a rush as you create a new marketing list, give it a name, set targeted at – contacts, leads, accounts it is now ready to be saved. Even though Type is a required field it is pre-selected for Static. Unfortunately unless you think to look to the right side column its easy to save and create the marketing list record without considering your options. Once you do this you can’t change the type to Dynamic. At this point you have to delete the record and start again.

Marketing List with Type in Right Column

Marketing List with Type in Right Column

So what we like to do is to move the Type field from the right hand column to the left hand column just below the Purpose field. That way it is a little bit more ‘in your face’ which gives you the gentle reminder to stop, think and then make a selection before clicking and saving

Marketing List Form with Type in upper left column

Marketing List Form with Type in upper left column

Tip #58: Reset the Command Bar

If you upgrade to Microsoft Dynamics CRM 2013 and you find that one of the Command Bar buttons don’t work, reset the ribbon for the entity.

  1. Create a solution that just includes the entity with the button that isn’t working correctly and export from CRM.
  2. Extract the customization zip file.
  3. Open the customization.xml file in the editor of your choice.
  4. Search for RibbonDiff.
  5. Replace the entire <RibbonDiff> section with the following:
<RibbonDiffXml>
 <CustomActions />
 <Templates>
 <RibbonTemplates Id="Mscrm.Templates"></RibbonTemplates>
 </Templates>
 <CommandDefinitions />
 <RuleDefinitions>
 <TabDisplayRules />
 <DisplayRules />
 <EnableRules />
 </RuleDefinitions>
 <LocLabels />
 </RibbonDiffXml>

Save and zip up the solution, then import and publish in CRM.

Credit to the Power Objects blog for a variation of this tip for CRM 2011.

Tip #56: Quickly open your user record

This is quite an old one but I keep finding people that don’t know about it.

To quickly open your user settings record without hunting for a lookup link to your user record:

  1. Click on the settings cogwheel (in the top right hand corner next to your profile picture)
  2. Click Options
  3. Click on the user information link at the very bottom of the General tab.
Tipped to the jar by Scott “The Ribbon Man” Durow

Tipp Jarr’s double dip

Don’t be put off by the absence of the hyperlinks and colors on the Settings dialog. The words user information are, in fact, a hyperlink – just hover:

User information hyperlink on Settings form

Last but not least: if lookup is used, CRM 2013 will replace the content of the current window with the user information. Navigation via Settings dialog has additional advantage of user information being displayed in a dialog and you’ll be back exactly where you were after dismissing it.

Tip #55: How to make your time control look nice on BPF ribbon

If you have a date/time attribute as part of your Business Process Flow, you may notice that the time dropdown does not quite fit on BPF ribbon:

Wrapped time control on BPF ribbon

Currently there is no solution to the problem, but there is a simple workaround: change your personal time format to a 24 hours format. Click on the Settings cogwheel in the top-right hand corner next to your name and select Options. In the Personal Options dialog switch to the Formats tab, click on Customize button and switch to the Time tab. Select HH:mm format from the Time Format dropdown and save your changes. The result is a nice dropdown without any text wrapping:

Clean time formatting with 24 hours format

Tipped to the jar by

Tip #54: Create reminders for emails that you aren’t ready to act on yet

Sometimes I receive an email that requires some kind of action, but I don’t have time to do that action now. I want to schedule time to work on it when I’m not as busy as I am at the moment.

I track the email in Microsoft Dynamics CRM, then I drag the email from the Microsoft Outlook mail list to the calendar link. This will create a new appointment with the text and subject of the email. I can then schedule the appointment for a time that is free on my calendar. This has two benefits:

  1. It schedules time on my calendar to focus on the item (and reminds me)
  2. It makes that time show “busy” to my colleagues, so nobody bothers me while I’m working on it.