Tip #73: Be aware of what is compatible with your CRM environment

Microsoft Dynamics CRM depends on multiple other systems, such as Windows, SQL Server, Microsoft Exchange, and Outlook. To work in harmony, you need to be sure the version of those systems and applications is compatible with your version of Microsoft Dynamics CRM.

Microsoft maintains and regularly updates a compatibility list for Dynamics CRM. So if your Exchange manager announces that he is going to upgrade to Exchange 2010 service pack 1, check the compatibility list and verify that the version and update rollup level that you are on with CRM is compatible with that update for Exchange.

See the list here

Tip #72: Granular notifications for end users

Today’s tip was supposed to be called “Why it’s very important to keep your SDK up to date” but instead I named it after the updated functionality that was added to CRM Online, released for onpremises in UR1 and documented in the December update of the SDK.

Previously, if you wanted to notify user about something, all you had was control.setNotification(message) and control.clearNotification() pair of functions, meaning that you probably would have cramped all your validations in one place.

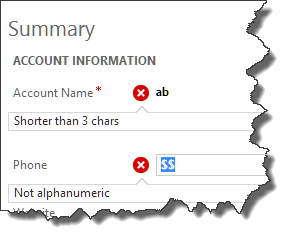
Now, the functions have become control.setNotification(message, id) and control.clearNotification(id) and you have a slightly more granular control which notifications to add or dismiss. Disappointingly, if you add multiple notifications for the same control, only the last one is visible to the end-user but a) that may change and, regardless, b) code becomes easier to manage, especially when multiple rules and controls are involved.

Granular validation of multiple fields

Say, if I want to ensure the length of the name for the account and also validate that both account and phone number are alphanumeric then I might use the following code:

var validations = [];

function onLoad() {

  validations.push( {
    id: "tooshort",
    rule: function(v) {
      return !v || v.length < 3;
    },
    message: "Shorter than 3 chars"});

  validations.push( {
    id: "noa1",
    rule: function(v) {
      return /[^\w]/.test(v);
    },
    message: "Not alphanumeric"});

}

function validate(controlName, ruleId) {

  var ctrl = Xrm.Page.getControl(controlName);
  var value = ctrl.getAttribute().getValue();

  for(i=0;i<validations.length;i++) {
    var valObj = validations[i];
    if(valObj.id == ruleId) {
      if(valObj.rule(value))
        ctrl.setNotification(valObj.message, valObj.id);
      else
        ctrl.clearNotification(valObj.id);
    }
  }

}

Add declarative validation

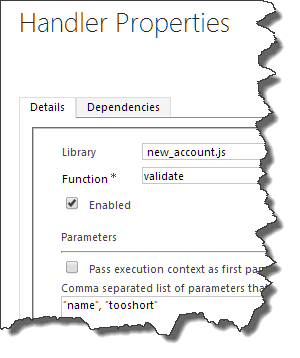
and then bind onchange event for name fields to validate with parameters “name”, “tooshort”, then another bind with “name”, “noa1” and finally one for phone field with parameters “telephone1”, “noa1”, using a [somewhat] declarative validation. You did know you can bind more than one function to the same handler, didn’t you?

Note that setting a notification on a control will block the form from saving until all notifications are cleared.

Tip #71: Option Set and Form Layout

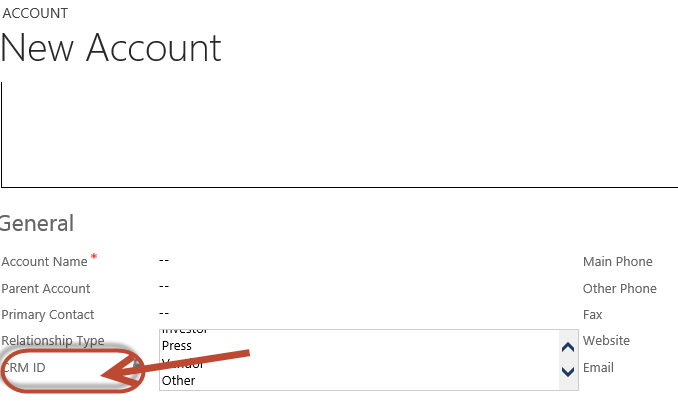
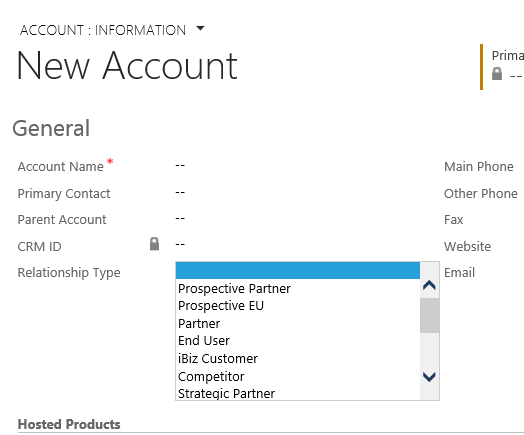
Currently there is a User Interface ‘bug’ where users are seeing a very small drop down list for option sets. When the drop down list tries to extend past the Section Line or overlaps another Field, it gets cut off.

We are waiting for Update Release to fix it. But in the meantime there are simple things you can do to resolve by adjusting your form layout.

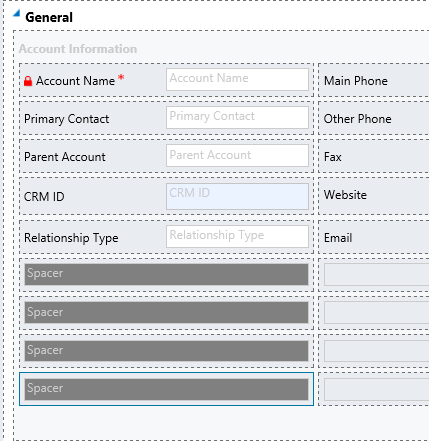
Move the Option Set higher up on the form so it isn’t on the last row of the section. And insert some spacers between the Option Set and the Section boundary or the next Field.

Small Drop Down - Before Fixing

Small Drop Down – Before Fixing

Modify Form Layout and Insert Spacer

Modify Form Layout and Insert Spacers

Option Set Drop Down After Editing the Layout

Option Set Drop Down After Editing the Layout

Tip #70: 5 ways to make your CRM environment more lovable

We love CRM
Happy Valentine’s Day.

If you are like me, you love CRM. But as with any relationship, sometimes there are things that can cause issues with the relationship. The following are some good tips on how to make the relationship between your Microsoft Dynamics CRM environment and its users more harmonious.

  1. Make forms easier to navigate. Place lesser used fields and sections in collapsed tabs. This will make forms load faster and provide easier access to the most important parts of the form without scrolling, while still providing easy access to lesser used fields when necessary.
  2. Move all required fields together on your form. This will get rid of “popcorn” forms where every time you click “save” a warning pops up saying that there are required fields that need to be populated before the form is saved.
  3. Make unused fields non searchable. This will make advanced find significantly easier to use. You can do this in bulk by selecting multiple fields in customization and clicking the edit button to edit multiple fields, or use the excellent XRM Toolbox Searchable Property Updater.
  4. Clean up your sitemap. Prioritize the order of subarea links based on frequency of use, remove links to unused entities (or remove them from the user’s security role).
  5. Re-evaluate your security model and customizations periodically. Remember that automated process that you created 3 years ago to automatically create 25 tasks when an opportunity closed? is that process still fit the way that your sales people work? Chances are if you have been using CRM for more than six months that some of the configuration choices you initially made may need to be tweaked or revisited. Were those requirements really a requirement? Do you have any user constraints that are unnecessarily limiting what users can do? Are the fields that you added being populated by users?

Tip #69: Get rid of the “outside of work hours” warning

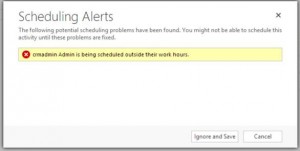
When scheduling an appointment in Microsoft Dynamics CRM 2013, you may see a warning that the time of the appointment is outside of a user’s work hours. Some users have reported seeing this every time they schedule an appointment.

wh1

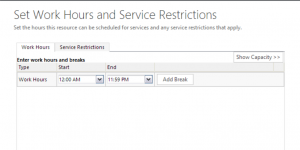
This can happen if the user’s work hours are set to 12:00 AM to 12:00 AM (all day). To fix, set the work hours for the user to 12:00 AM to 11:59 PM.

  1. Open the user record
  2. Click the drop down next to the user’s name to expose the navigation bar and select “Work Hours.”
  3. Click “Set up” and select “New Weekly Schedule”
  4. Click “Set Work Hours”
  5. For end date, you will not be able to select 11:59 PM from the drop-down, but you can type it in. Apply changes.

wh2

You will now be able to create appointments for that user without seeing the warning.

Thanks to Fast, Lean, and Smart Carsten Groth for this tip and helping me solve my problem.

Tip #68: Do you know this woman?

I have nothing personal against this woman

Annoying prompt to watch the video

but the dialog started to annoy me to no extent.

The problem is that visibility of the dialog is controlled via cookie so even if you check the box “Don’t show me this again”, you will see it again if you clear your cookies, use another device, or use in-private browsing.

Unfortunately there is not a way to disable this in CRM Online but on-premises simply add new DWORD (32-bit) DisableNavTour with the value of 1 to  HKEY_LOCAL_MACHINE\SOFTWARE\Microsoft\MSCRM on the front-end server. Detailed step-by-step instructions can be found in Microsoft Dynamics CRM 2013 Installing Guide ,  in the section aptly named How can I disable the Navigation Tour video? (on-premises versions only).

And if you ever miss it, you can click or tap Settings (cogwheel in the corner) and then click or tap Open Navigation Tour in your browser. 

Tip #67: Get To Advanced Find From Any View

One question I have been asked by several people upgrading to CRM 2013 is “where is Advanced Find.” In the simplified command bar of 2013, the Advanced Find button is not available from as many places as it was in CRM 2011. You can always find it by going to your “home” area, but there is another really easy way to get to it from any view in Microsoft Dynamics CRM 2013.

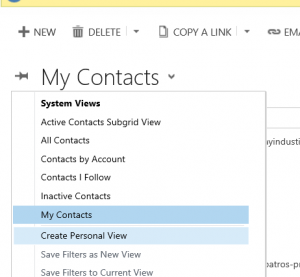
Click the view selector and scroll to the bottom. You will see an option for “create personal view.” By selecting this option, Advanced Find will appear.

Personal View

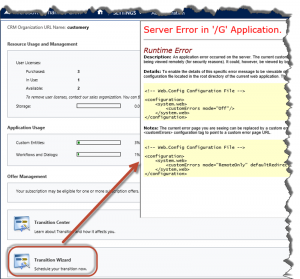
Tip #66: Error running Transition wizard

If you have CRM Online orgnanization that still uses Live ID authentication, by now you would have received an email reminder that opens with:

Our records show you have not completed the Transition wizard. Completion of the Transition wizard is necessary to move your Microsoft Dynamics CRM Online subscription to the Microsoft online services environment.

And continues on to the instructions:

To access the Transition wizard, your Billing Administrator needs to sign in to your Microsoft Dynamics CRM Online organization. On the nav bar, click or tap Microsoft Dynamics CRM > Settings > Administration > Manage Subscriptions.

The only problem is that when you try running the wizard, you get this:
Yellow Screen of Death when running Transition wizard

If that happens, chances are that you have changed primary alias (email address) on Live ID since the subscription started. Head to https://account.live.com, change the primary alias back to what it was when you signed up for this CRM organisation, logoff and logon back to CRM and try again. Your primary alias is your user email address in CRM – that does not change once provisioned.

Tip #65: Read the ReadMe

We all love Microsoft Dynamics CRM, but we admit it is not perfect. That’s why it is very helpful that Microsoft maintains a list of known issues in CRM On Premise and CRM Online in the release ReadMe file. Reading this will save you time when deploying CRM, as you will be aware of current limitations.

View the readme for CRM Online Fail ’13 and Dynamics CRM 2013 On Premise with Update Rollup 1.


Tip #64: Add PBL Rules to Quick Create Forms

In Microsoft Dynamics CRM 2013, the PBL (Portable Business Logic) rules are an easy way to add business logic to forms without having to write code. But what if you want to add a PBL rule to a Quick Create form?

At first glance, when you set up a quick create form, it appears that PBL rules are not available, as you won’t see the “Business Rule” button that is available from other forms, and when you create a PBL rule, the Quick Create forms won’t be listed in the Scope drop down. However, it is possible to add PBL rules to Quick Create forms.

Go to settings->customization–>entity where the quick create form lives. Expand the entity customization and go to Business Rules section, and define your business rule there. If Scope is set to all forms, the rule will apply to the quick create form too as long as all fields referenced by the PBL rule are present on the Quick Create form.