Tip #1188: The case of the missing activity tab

I was recently upgrading a client from CRM 2011 to Dynamics 365 online, and for one custom entity, after reconfiguring the form and adding the timeline control, the form would only display the notes tab of the social pane.

I removed the pane from the form, saved, published, and re-added the pane, and all I could see was the notes tab.

Next, I tried saving the form as a new form, but my experience was the same. Whatever I tried I could only see the notes pane.

Wanting to avoid the draconian solution suggested in the Dynamics forums to recreate the entity, my next step was to try creating a new form–not save and new, but hit the new button to make a totally new form.

At first it looked like I was still stuck, because the new form still showed just the notes tab, but after removing the social pane from the form, saving and publishing, then adding the timeline control back to the new form, I now could see all of the tabs of the social pane.

Summary: If this happens to you, create a new form and add the timeline control to it.

(Facebook and Twitter cover photo by Russ Ward on Unsplash)

Tip #1187: Automatically track all emails

Some housekeeping before we dig in. Firstly, the tip is from Mohamed “iProperty” Mostafa but since I was instrumental in rejecting all of his ideas, I’m taking part-credit for it. Secondly, the full title should be

Automatically Track All Incoming and Outgoing Email Messages in Dynamics 365 without opening Outlook and across any device :: Pure Exchange and Dynamics 365 Server Side Synchronisation

but SEO is not my strength plus it won’t fit in the margin. (“I” below belongs to Mohamed, it could have been me, but was not).

Sometimes organisations want to track all incoming and outgoing emails for a number of users at Server Side without having the user to do anything manually and across all devices. The requirement here is to save the user time from clicking on “Track” emails when they are sending them or having to manually move incoming emails into a tracked folder to be tracked. They also want this to work on every email sent from any device and every email received even if Outlook is not open. This what I call “pure Server Side Synchronisation”.

As the name gives it away, Dynamics 365 Server Side Synchronisation and Dynamics 365 App for Outlook can help us achieve this requirement with some help from Exchange Mail Flow Rules that uses the transportation layer directly. Just to re-iterate, we are here using Dynamics 365 App for Outlook (not the client). If you are not sure what is the difference between Dynamics 365 App for Outlook and the Dynamics 365 for Outlook (also known as the Outlook Client), you can refer to this comparison.

My approach is using Server Side Synchronisation between Dynamics 365 Online Cloud and Exchange Online but the same approach may work with other setups to achieve the same requirement: Track all incoming and outgoing emails automatically from any device. I’m also applying all of this on 1 single “test user” but you can apply this on as many users as you want. My test user is called “sales test”.

tl;dr

The abridged version of the process is here. If you are after exhilarating step-by-step instructions, go straight to Mohamed’s original post.

  1. Configure server-side synchronization
  2. Set up tracked folder
  3. Create the following email flow rules
    1. Outlook rule to copy all incoming email messages to the tracked crm folder except if the message has “crmtrack” in the message header.
      image
    2. Exchange Online Mail Flow rule that works at the transportation layer to “Bcc” every single email sent from the user to themselves and adds the “crmtrack” header value to the sent email message header
      image
    3. Outlook Rule to move all incoming email messages that has the “crmtrack” header to the tracked folder.
      clip_image023

The result of all of the above complicated approach is that ALL incoming emails are tracked in Dynamics 365 automatically as “Received” emails and ALL outgoing emails are tracked in Dynamics 365 CRM automatically as “Sent” emails. As this approach is using Exchange Online transportation layer, this is a pure Server Side Synchronisation of Email messages with Dynamics 365 which means it will work with “ALL Emails” sent from ANY Device and any app as the synchronisation happens at the server side and not on the client side. So if you sent an email from the Outlook for the Web (Web Mail), sent it from an Android device email client, iPhone Mail app, Outlook app on iPhone, Office Outlook or any other medium, all emails sent and received are tracked in Dynamics 365.

This is how it looks like in Dynamics 365: Tracked emails sent from any device and emails received while Outlook is closed:

clip_image025

(Facebook and Twitter cover photo by Matthew Henry on Unsplash)

Tip #1186: Race conditions with queue items

Today’s tip is from Marius “flow like a river” Lind. (And you can also become a tipster by sending your tip to jar@crmtipoftheday.com)

What happens when a race condition happens in a queue? Let’s say we have a bunch of customer service representatives who are working on cases in the same queue. The queue is sorted by priority and you should always pick the top case. Joel and Marius opens up the queue view at the same time, but Marius is a second faster than Joel to pick the top case. What happens now?

Well, one out of two things.

  1. Marius chose to pick but not remove the item from the queue.
    Joel picks the case, and since the queue item still exists the action taken by him simply resolves and the case is delegated to him.
  2. Marius chose to pick and remove the item from the queue.
    Joel is presented with the following error message
    clip_image002

So how do we deal with this?

For scenario 1, here’s a few options:

  • Accept that this might happen
  • Create a plugin which prevents someone from picking something that’s being worked on

For scenario 2:

  • Tell users about this, accept that it might happen

How to reduce the risk of this happening:

  • Make sure you teach your users to refresh the list view if it’s been open for a while
  • Distribute over several queues to prevent too many people working in the same queue
  • Or maybe you have a better idea, drop it into the comment.

Best regards, your friendly neighbourhood Viking!

(Facebook and Twitter cover photo by davide ragusa on Unsplash)

Tip #1185: Customize the document grid

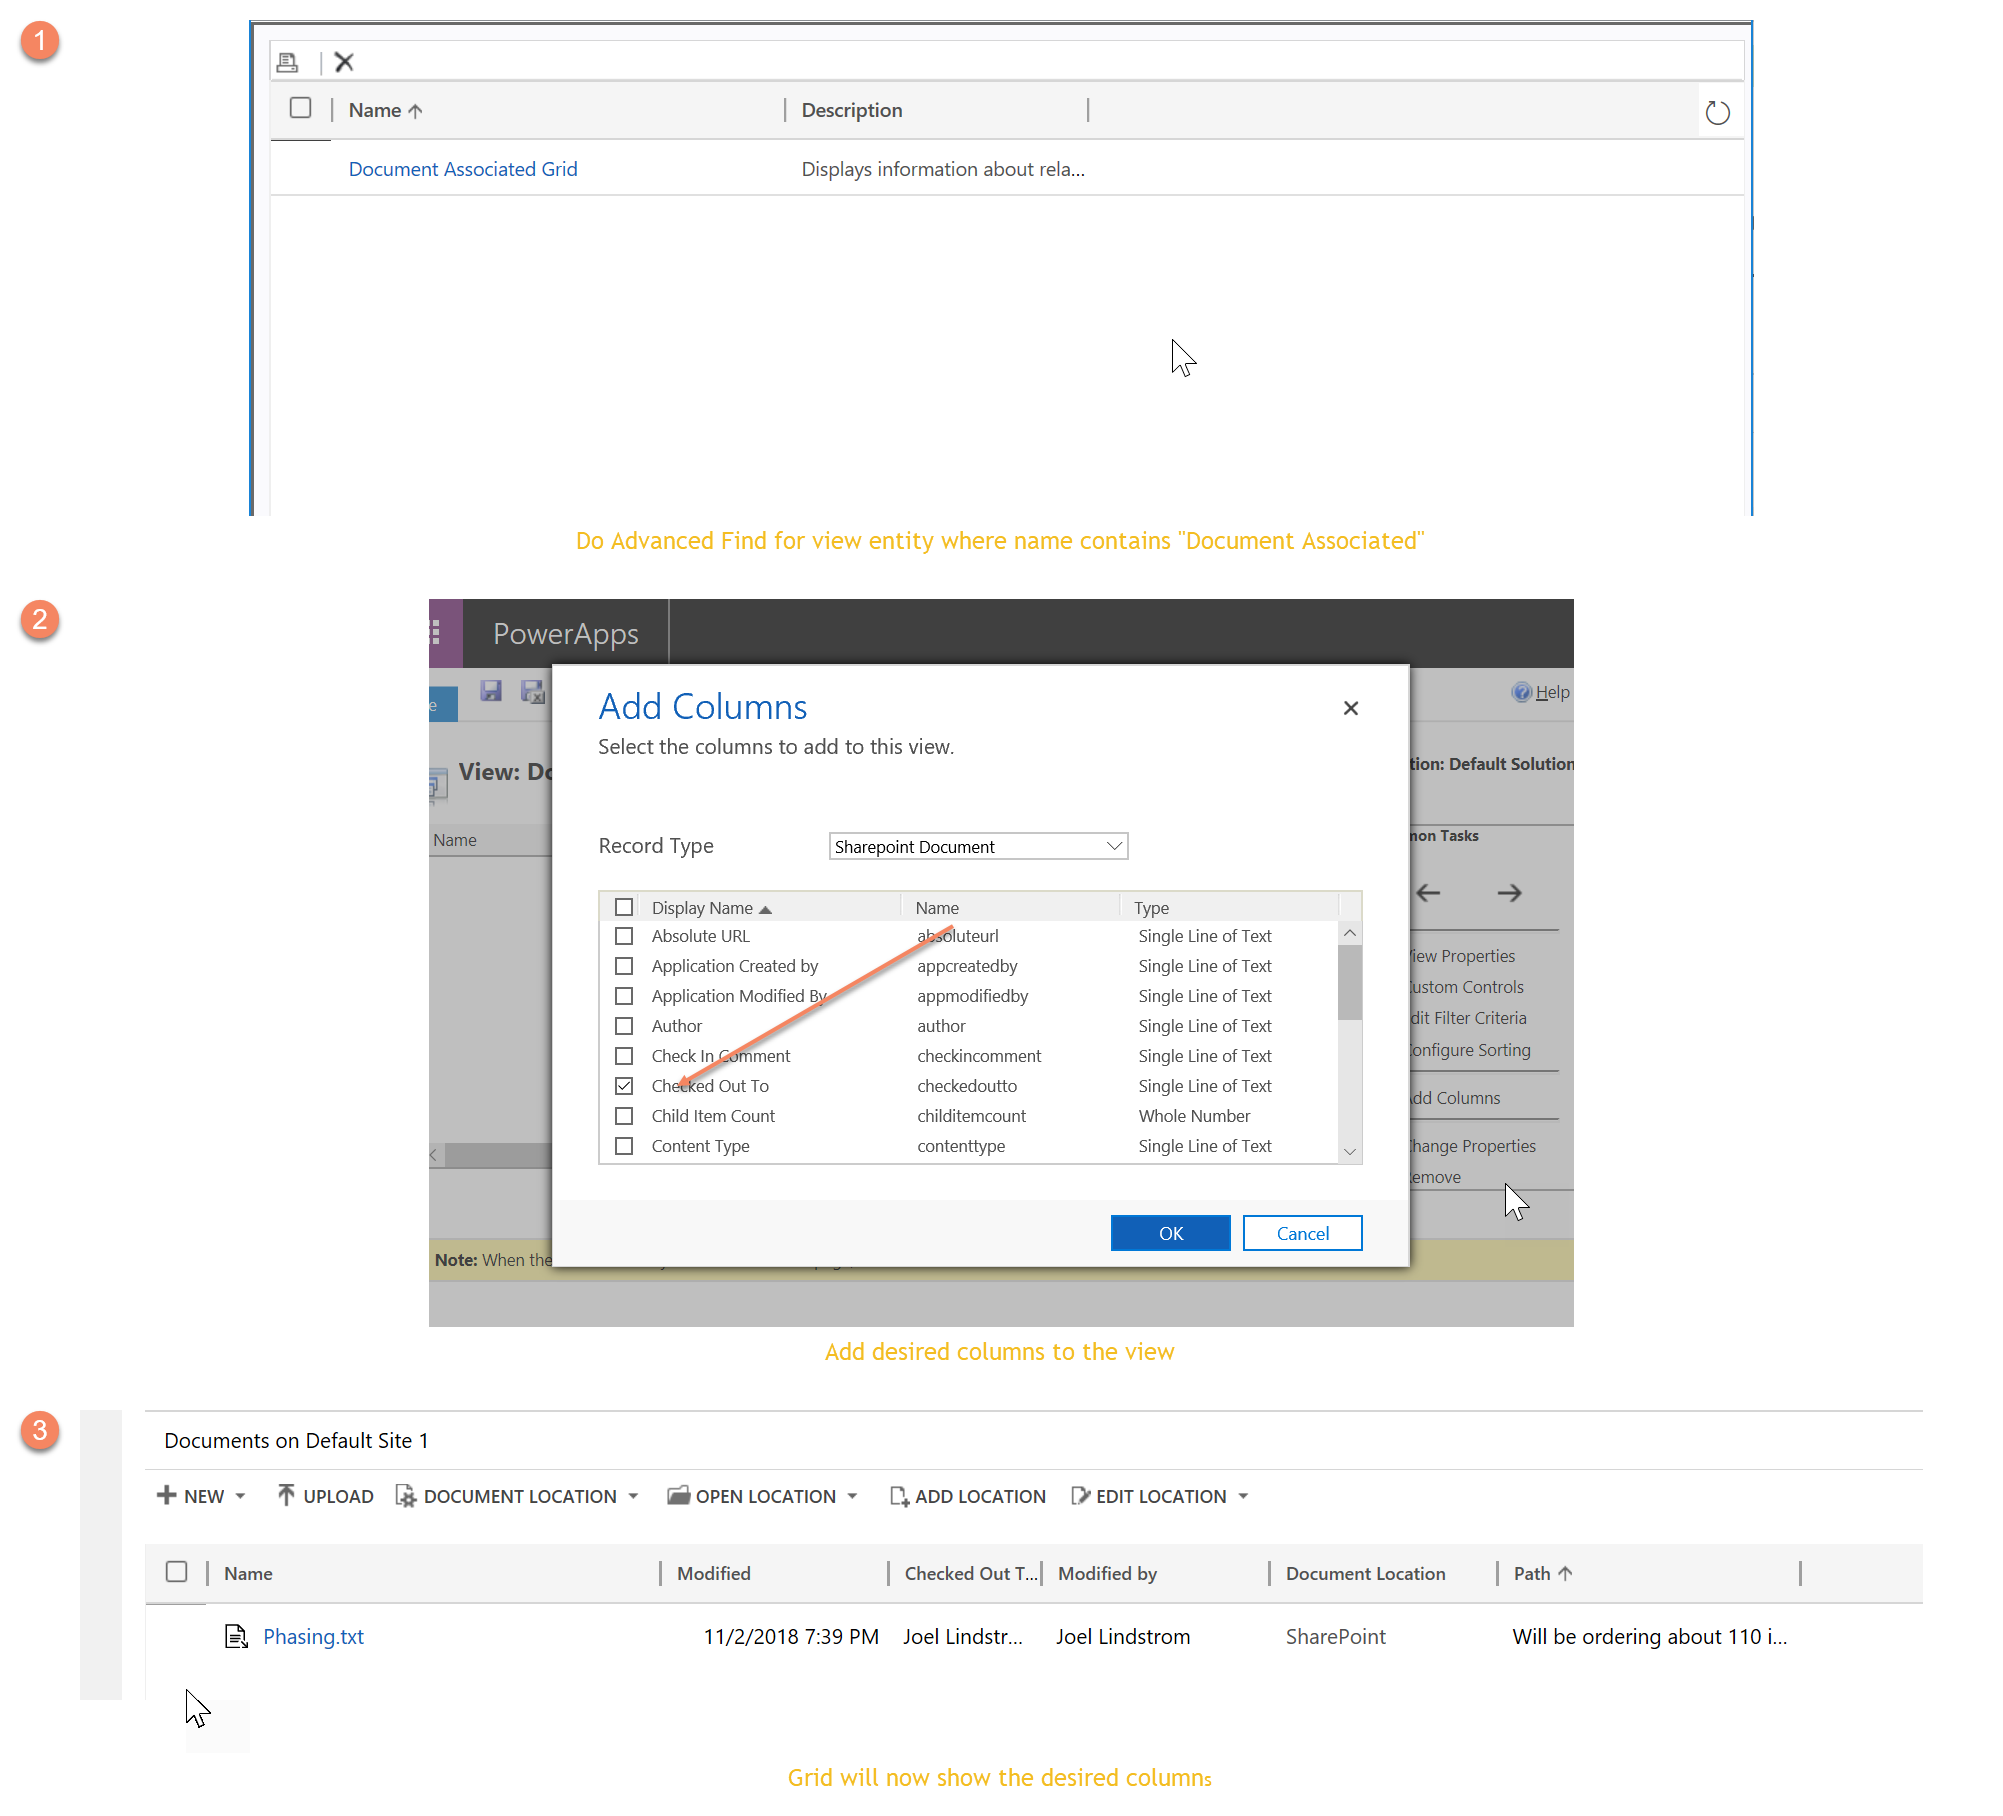
I upgraded to server side SharePoint integration and now I don’t see enough detail from the document grid. It doesn’t show me who checked out the file, and I have to open the SharePoint location to see who checked it out.

Reader

Good news–with server-side SharePoint integration you can customize the grid more than you could with the client side grid control. 

Do an advanced find of the view entity for where the name contains “Document Associated.” From there you can add a bunch of additional fields to the grid view.

(Facebook and Twitter cover photo by Stefan Schweihofer on Pixabay)

Tip #1184: Custom activity in Timeline

Under the rapid release cadence one of the challenges is to keep track of what’s changed when and how the features, both old and new, are exposed to end users. It’s like being on Masterchef when today’s challenge is cooking with open fire, tomorrow – flame thrower, and the day after we’re supposed to cook a perfect steak using nothing but our body heat.

For the reasons that will remain unknown, Neil “Agile” Benson decided to create a custom activity called Special Alert. Users could create special alerts from the Other Activities button on the main Activities command bar, but not from the Quick Create button or the Timeline control on the contact form or on the related Activities view on the contact form.

Turns out, there are few prerequisites for a custom activity to appear in the timeline control:

  • Entity is added to the app
  • Entity is enabled for Mobile
  • If Timeline is filtered by specific activities, entity is added in Timeline control configuration. Configuration is accessible via Timeline control properties.

If all these conditions are true, then Timeline will show the custom activity, as attested by Mr Benson.

(Facebook and Twitter cover photo by Jacob Miller on Unsplash)

Tip #1183: Templates are not working after upgrade

Release 9.1.X (the coveted October release) is already here and some organizations have already been upgraded to the new version. Steve “Mr SMB” Mordue was, for a change, on the receiving end, as his customers complained that Word templates stopped working after the upgrade. When a template is selected from a record, new shiny Dynamics UI says it is creating, the spinning dialog eventually stops, but then nothing happens and nothing gets created. Steve tried clearing cache, and re-uploading template with a new name, no luck.

Turns out, SharePoint integration was throwing a spanner into the shiny October mag wheels. When downloading your template, make sure the two highlighted SharePoint relationships are not selected.

image

After that, both Word and Excel templates work like a charm. To the extent they can charm anyone, of course.

The relationships on the screenshot are for the opportunity, you’d want to exclude similar ones when using a different document-enabled entity.

(Facebook and Twitter cover photo by rawpixel on Unsplash)


Tip #1182: The Tool Every Developer Needs (Even The Ones Who Don’t Use Code)

Whether your weapons are JavaScript and Plugins, or Processes and Flows,  there is a tool you should pick up before going anywhere near the keyboard. That is, of course, the pen.

This is a lesson I learned while at university with my computing lecturer insisting we write out our code before committing it to the screen. Our major assignment was to code a token ring network controller. It might have been tough to write out every line of Pascal to make it work but when I finally entered it into the computer, the entire thing was bug free. The time taken to write it out and think it through calmly and carefully paid dividends in not having to debug my otherwise incoherent, spaghetti code.

While I do not write every Workflow out in full before logging in to Dynamics, for the more complex ones there is a lot to be said for organising your thoughts on paper first. My general rule of thumb is if I cannot contain whatever it is I am developing on the screen (almost impossible for all but the most simple Flows), I write it out first. By going to a high level pseudo-version, I can see the algorithm on one page and usually improve my vision or discover issues which may not have been as visible in the weeds.

Often coders will lament that their non-coding associates do not have good habits when developing. For me this is the first good habit of any developer. The pen is mightier than the DWORD.

Tip #1181: Filtered lookups on editable grids

Today’s tip is from Nick “Benchpress” Doelman. Technically it’s from his wife which proves that all of us, MVPs, are mere mortals and the real knowledge still belongs to the users.

She only wanted to see contacts that belonged to an account on the record but the lookup view was showing all the contacts. Turns out, the editable grid lookup will only filter if the ‘filter by’ field is also on the view. For instance:

  1. Without the “Account” being visible on the editable grid view:
    clip_image001
  2. Now with the “Account” being added to the editable grid view:
    clip_image002

Don’t have a tip but your spouse works with Dynamics? Ask them and send the tip to jar@crmtipoftheday.com!

(Facebook and Twitter cover photo by Tyler Nix on Unsplash)

Tip #1180: Rejiggering the Outlook App

I dedicate today’s tip to Steve Mordue, who asked me how to do this.

Let’s say you have the Dynamics 365 App for Outlook configured against D365 instance A, but you are moving instances and want to use it with instance B.

  1. Log in to https://outlook.office365.com/owa/
  2. Click the settings gear in the upper right corner
  3. Select Manage Add-Ins
  4. Select “My Add-Ins”
  5. Tap the … on the Dynamics 365 Custom Add-In tile
  6. Select “Remove” 
  7. Install the Outlook app from Dynamics 365 instance B


Tip #1179: Add a dash of dash to your autonumbering

&tl;dr

Jonas “The Shuffler” Rapp reports: when modifying autonumbering for built-in entities like case, always include a dash in the pattern to stop Dynamics 365 from self-combusting.

Long story

One of the awesome users of the Auto Number Manager for XrmToolBox managed to break the system settings for Auto Numbers in Dynamics 365, so he called me up to see if I could find the problem.

clip_image001

The Auto Number Format of the Case Number (ticketnumber) attribute on the Case (incident) entity had been changed from the default value:

CAS-{SEQNUM:5}-{RANDSTRING:6}

To a custom format:

CASE{SEQNUM:7}

And now it was no longer possible to open the Auto-Numbering dialog in Dynamics 365.

I see four potential problems here:

  1. The prefix is four characters – will that fit?
  2. There is no dash between prefix and number
  3. The number is seven digits long
  4. There is no random string at the end

After some investigation using the number one troubleshooting methodology –  some simple trial-and-error – I came to some conclusions:

  1. Prefix may be even longer than that, I tried with CASENUMBER and that worked fine too
  2. Skipping the dash makes the dialog explode like above
  3. Seven digits works fine, even though the UI in the dialog will only show 6, there is no 7 available
  4. Works fine without random string, but in the dialog it still looks like it has the random suffix

clip_image002

So make sure you keep a DASH between your prefix and number when you are changing Auto Number Format for out of the box number attributes!

Happy numbering!