Tip #793: Enabled app does not mean installed

Gun lockedDepending on the licensing plan, Dynamics 365 instances can have an option to provision Dynamics 365 Portal. In Dynamics 365 Administration Center navigate to Applications and, if you have portal add-on in your subscription, you will see coveted Not Configured against the Portal Add-On app. Click Manage and off you go with the portal provisioning.

During the provisioning, depending on the portal selection, you may see the following message: “Cannot select this portal as the Voice of the Customer (VoC) has not been installed in your Dynamics 365-organisation”. Wait what? I just saw VoC enabled?!
VoC Enabled
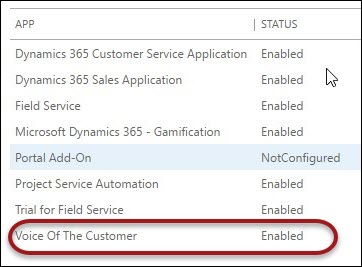
As Gustaf “Surströmming” Westerlund discovered, enabled does not mean installed. Go back to your instances, select the instance, click Solutions, then select Voice of the Customer and click Install. Enabled means that your license allow installation of that particular app, installed means that you actually installed the app.

Tip #792: Invoke Azure Functions from Dynamics 365

You probably heard of the new kid on the Azure block: Azure Functions, that allow serverless execution of code. Wouldn’t that be nice to be able to trigger this serverless execution from Dynamics 365? I’m glad you asked! Since functions are very new, some plumbing is required but not as much as one would think.

Without further ado:

  1. Create Azure queue and register service endpoint as documented in Walkthrough: Configure Microsoft Azure (SAS) for integration with Dynamics 365. The only difference in our sample is .NET Binary serialization format instead of JSON.
  2. Register new asynchronous step on create message for the opportunity.
  3. Create new function app in Azure. For some reason Azure folks couldn’t decide on the category so you need to go to Everything and search for Function App.
    Function app on consumption plan
    Note the best part – Consumption Plan. That means you don’t have to worry about the plan, scaling out and scaling up – it’s all taken care of and you only pay for what you use.
  4. Add new function, select ServiceBusQueueTrigger-CSharp template. Enter details of the queue that you created earlier. Since we are not doing anything fancy, Listen access rights are sufficient.
  5. Click on View Files, click Add, name file project.json. Enter this context:
    {
      "frameworks": {
        "net46":{
          "dependencies": {
            "WindowsAzure.ServiceBus": "3.4.3",
            "Microsoft.CrmSdk.CoreAssemblies": "8.2.0.1",
            "Microsoft.CrmSdk.Deployment": "8.2.0.1",
            "Microsoft.CrmSdk.Workflow": "8.2.0.1"
          }
        }
      }
    }
    

    This instructs Azure to pull these assemblies from nuget to compile the function.

  6. Switch to run.csx and replace the code with the following:
    using System;
    using System.Threading.Tasks;
    using Microsoft.ServiceBus.Messaging;
    using Microsoft.Xrm.Sdk;
    using System.Globalization;
    
    public static void Run(BrokeredMessage myQueueItem, TraceWriter log)
    {
        log.Info($"C# ServiceBus queue trigger function processed message: {myQueueItem}");
        log.Info($"CorrelationId: {myQueueItem.CorrelationId}");
    
        var rec = myQueueItem.GetBody<RemoteExecutionContext>();
        if(rec.PrimaryEntityName == "opportunity")
        {
            Entity entity = rec.InputParameters["Target"] as Entity;
            var name = entity.GetAttributeValue<string>("name");
            var est = entity.GetAttributeValue<Money>("estimatedvalue");
            string value = est == null ? "unknown value": string.Format("{0:C2}", est.Value);
            log.Info($"Opportunity {name} for {value} was created");
        }
    }
    

    Note how we replaced string input with BrokeredMessage. That’s the beauty of the functions – they are flexible and will take almost anything you throw at them (read documentation for the accepted types).

That’s it! Now you can create an opportunity in Dynamics 365 (enter name and estimated value) and, if everything is wired correctly, the function log will display something like:

2016-12-11T16:58:30.324 Script for function 'CrmTipOfTheDay' changed. Reloading.
2016-12-11T16:58:30.638 Compilation succeeded.
2016-12-11T16:58:57.540 Function started (Id=8b02256d-11cd-4f00-bf5e-512558a91edb)
2016-12-11T16:58:57.883 C# ServiceBus queue trigger function processed message: Microsoft.ServiceBus.Messaging.BrokeredMessage{MessageId:59326b1a62c64b20b5261abc667b4816}
2016-12-11T16:58:57.883 CorrelationId: {196dd84c-6b4c-4024-85eb-e50e2586c0e5}
2016-12-11T16:58:57.899 Opportunity Huge one for $9.95 was created
2016-12-11T16:58:57.899 Function completed (Success, Id=8b02256d-11cd-4f00-bf5e-512558a91edb)

So here you have it: we just remoted our plugin execution into a functional abyss running on consumption plan that will scale to consume whatever our Dynamics 365 can throw at it.

Big thanks to Matt Barbour who’s taken time from his busy schedule at eXtremeCRM to look into few stumbling blocks I encountered along the way.

Tip #791: Viewing team appointments

I would like to see my sales team’s appointments on the same calendar. Should I change my appointment sync rule to get all appointments for my team synchronized to my calendar?

No. Don’t do it. That is a sure-fire way to make your Outlook calendar unusable. You won’t know what is your appointment, vs. your team’s appointments, you will have multiple appointment reminders showing up, and you will probably miss your own appointments.

A better way

Use the Dynamics 365 mobile app. In CRM, create a view of activities that contains all appointments where the activity party’s manager equals you.

mobile-calendar

Tip #790: Finding the instance picker

If you have been administering CRM Online organizations, you may find that your cheese has been moved. Normally, you would click the Office 365 app selector from the Office 365 Admin console, and then select Dynamics CRM to get to the list of organizations.

Now you will find that replaced with the snazzy new Dynamics 365 logo, and when you click that button, you will now see a grid of Dynamics 365 apps, which includes all of your organizations.

pick

The problem is, there is no obvious way to get from here to the screen where you can copy, back up, or reset the organization.

To directly navigate to the traditional instance picker screen (at least in North America), go to the following URL: https://port.crm.dynamics.com/G/Instances/InstancePicker.aspx?Redirect=True

This will take you to the instance picker that we all know and love.

Thanks Scott Jung for the tip!


Tip #789: Disappearing Synchronized Contacts

Yesterday I set up CRM for Outlook. My contact synchronization rule is set to get all active contacts (about 4,000), and yesterday they were all there, now today there are only about 600. I use Outlook synchronization. What should I do?

Alien abductionWhenever I see weird contact synchronization behavior, such as contacts not synchronizing or synchronized contacts disappearing from outlook, the following is what I try:

First thing I would check out is does you have multiple computers configured to be the sync client. Outlook synchronization is only supposed to allow one client to be the synchronizing client, but I’ve noticed with recent versions of CRM for Outlook, if I configure my Surface to crm, shut it off, and then configure another computer, it does not always turn off synchronization on the original computer. I recommend reconfiguring outlook client on all of his computers.

Another possibility is you have CRM for Outlook configured on another computer synchronizing your production Exchange mailbox with a non production CRM environment. That could be synchronizing and wiping out the synchronized contacts from production. Reconfiguring all outlook clients would help with this too.

Finally, Outlook client maintains a local table of deleted contacts. With outlook synchronization, if you delete a contact from Outlook, it won’t synchronize that contact again. Reconfiguring the Outlook client will make deleted contacts come back. It will also duplicate any already synchronize contacts, so that’s a pain.

This is one of the reasons to consider server-side sync so that the contact synchronization isn’t impacted by computer changes. Most of the times that I see weird flaky contact synchronization behavior, it is usually Outlook synchronization. Even if you get to work right, the next time you reconfigure or upgrade the client, it’s going to duplicate contacts with Outlook synchronization. Go server side sync.

Tip #788: Video Guide to Dynamics 365 Business Rule Changes

Rule changesIn this Video we look at the new options available with Business Rules in the application. Not only does this include the updated editor, but we also look at the new Recommendation Action that is available.

YouTube player

Give us your feedback, all of it: good, bad, and ugly, I’m sure we can take it. Suggest new topics either in comments or by sending your ideas to jar@crmtipoftheday.com.

Don’t forget to subscribe to http://youtube.com/crmtipoftheday!

Tip #787: Creating records in Project Service

Dictionary keyWhen creating records for one of the Dynamics 365 solutions, you may find yourself in the same situation as Guido “Trekkie not Star Wars fan” Preite. The simplest possible code to create msdyn_actual (part of the Project Service)

Entity foobar = new Entity("msdyn_actual");
foobar["msdyn_description"] = "MY TEST";
service.Create(foobar);

generates “The given key was not present in the dictionary” error.

One of the advantages (and curses) of coding CRUD operations is that any attribute can be ignored even if marked as business required. However, most of the complex solutions include their own plugins that reasonably expect mandatory attributes to be present – hence the error (as generated by one of the Project Services plugins).

Solution is to use metadata browser (either from XrmToolbox or SDK) to figure out required attributes. In the case of msdyn_actual entity they are:

  • msdyn_documentdate
  • msdyn_startdatetime
  • msdyn_enddatetime
  • msdyn_transactiontypecode
  • msdyn_transactionclassification

(Interestingly enough, msdyn_description, primary name, is not required)

Entity foobar = new Entity("msdyn_actual");
foobar["msdyn_description"] = "MY TEST";

foobar["msdyn_transactiontypecode"] = 
   new OptionSetValue(192350000); // Cost

foobar["msdyn_transactionclassification"] = 
   new OptionSetValue(192350000); // Time

service.Create(foobar);

We did not use all required attributes but looks like only the type code and classification are explicitly expected and used by the built-in plugins.

Tip #786: Delete vs reset for Dynamics 365 instances

Format diskIn Dynamics 365 admin center, you can Reset a sandbox instance – this deletes the current instance and provisions a new one in its place, essentially returning it to the factory conditions. However, any provisioned organization in Dynamics 365 consumes storage – about 180MB for empty Dynamics 365 organization without any sample data or trial solutions.

Service health - storage consumption

Reset delete
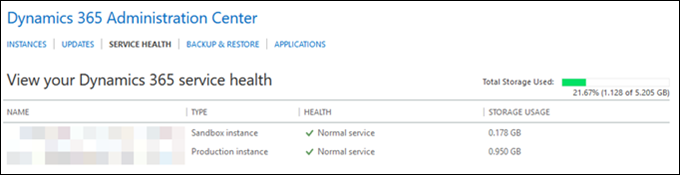
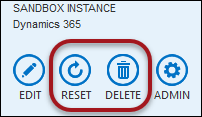
If you would like to put your instance on hold and avoid using those precious kilobytes, use Delete operation. Despite the scary name, the action is very similar to a reset except that, after wiping your organization clean, the system will not provision anything at all. Rest assured, your entitlement to the sandbox instance is safe (though it might take a few minutes for your entitlement to appear) and you will be able to provision a fresh org when needed – your entitlement will show up as an instance without any name with the state Instance to configure.

Note: unlike reset, delete operation will also destroy any backups you had for the sandbox instance so use it with caution.

No instance

Destructive operations like reset/delete are not allowed on production instances, so that admins do not reset their production environment by mistake. If you really need to reset a production instance, you would first need to change the instance type to a sandbox and then you’ll be able to do the operation. After the reset is complete, you could change the instance type to production if needed.

Tip #785: How to restore USD session

RestoreThis question frequently comes up during the USD (Unified Service Desk, not $) projects and training sessions: what is the most effective way to save/restore the entire USD session? This functionality would enable some interesting scenarios, e.g. transfer the entire session from one user to another with the call transfer, or simply save a complicated session in the end of the day and to be able to quickly resume it the following morning.

Thanks to Jayme Pechan for helping with the outline of the solution and hats off to Neil “USD Greasemonkey” Parkhurst for putting together the step-by-step guide.

This is the process in a nutshell

  1. Create a custom save/restore/transfer entity where you can store data for session.
  2. To save the session, create an action call to the CRM Global Manager’s CreateEntity action. In this action, you will want to populate the transfer entity custom fields with values that are needed to restore the various components.
    1. For the Agent Scripting component, the Replacement parameter list has the task name. During the restore, you will call GotoTask with this name to restore the location. So in the CreateEntity, place this name in one of your customer fields.
    2. For web controls, a URL is captured for this purpose.
    3. Most other [well-designed] hosted controls would automatically pick up their state when these URL’s and Agent script are populated so you don’t really to do anything else. For example, the Session Overview will get it’s data from the replacement parameters, once the URL’s restore so we don’t need to pass anything for these.
  3. Now that you have a created transfer entity and it’s corresponding ID, you can pass this ID with the phone call. Typically you use the UII parameter or various CTI fields that map to this.
  4. Now create a CTI Window Navigation Rule. This rule will handle restoring the session when it recognizes this transfer guid in the UII field.

One of the benefits from making this transfer entity an actual activity is that we could set the RegardingObjectId to the phonecall or activity that was being transferred. It would then count the number of times the activity was transferred, which is a useful metric for customer service. Also, you can place these activities into a queue as well for an offline transfer. For example, you can add an escalate button in USD that does this save and places the activity into a supervisor queue. The agent would then notify the caller that they will receive a callback. The supervisor then looks at their queue, double clicks on the transfer item and instead of displaying it, your popup window navigation rule in USD can run the same action call sequence to do the restore in USD. They could then, of course, click the number and call the customer back.

Sounds easy, right? Well, not quite, but luckily Neil has it covered.

Tip #784: Some finesse in portal cache resets

FlamethrowerNot so long ago we tipped about flushing your portal cache. The main advice is still valid:

Do not use cache invalidation handle

This method no longer works in online portals, and is now obsolete.

Turning your portal off and then back on still works but it’s like using a flamethrower to kill a mosquito. It takes few minutes to accomplish the task and it disrupts the availability of your portal.

Good news is there are better methods now.

  • In a recent update to online service you will now see a reset portal button, which will automate the stop/start the portal for you, invalidating the entire cache.
  • Updating the website record in CRM, ie change the name field will also do the job. Note: this is not a formal mechanism because it was added as a temporary measure, and the development team reserves the right to remove this behavior in the future.
  • Publishing all customizations in CRM will also invalidate the portal cache.

The above methods are effective but drop the entire cache indiscriminately. Much better and recommended approach is to ensure that “Change tracking” is enabled for the entities used in the portal.

Change tracking for an entity

If this option is enabled, you don’t have to do any of these tricks to clear up cache. Portals use change tracking feature to intelligently refresh the portal cache for a specific entity without resorting to a big hammer.

Thanks to Tanguy “The XRM Toolbox” Touzard and Shan “Smoke ’em” McArthur for beating the issue into a pulp.