Tip #833: Creating closed tasks on mobile

Dear Tipsters,

How can I create and close a task in one step on mobile, similar to the create and mark complete process in Dynamics 365 in browser experience?

Signed Taskmaster

Taskmaster:

  • In the Dynamics 365 mobile app, create a task.
  • From the edit form, click the options (…) button in the lower right corner.
  • Click close task.

Alternative approach: create a task flow process to create the task and have the task flow trigger a workflow to close the task, giving you a quick “create and close task” button on mobile.

Tip #832: Dynamic does not work in sandbox

Dynamic not DynamicS. The reference is to dynamic keyword making C# developer’s life easier since 2010. As Rickard “Ikea Frysta Köttbullar” Norström has discovered, the following code works in a sandbox on-premises but spits the dummy in Dynamics 365 Online environment. Not all sandboxes were created equal, it seems.

string outstring = "get it from an external service";
if (!string.IsNullOrEmpty(outstring))
{
   dynamic outp = JArray.Parse(outstring);
   if (outp.Count == 1)
   {
      var objekt = outp[0];
      if (objekt["ProjectTypeID"] != "ART")
      ...
   }
}

Avoiding dynamic and using explicit cast (instead of relying on var seems to be the key:

JArray outp = JArray.Parse(outstring);
string outstring = "get it from an external service";
if (!string.IsNullOrEmpty(outstring))
{
   JArray outp = JArray.Parse(outstring);
   if (outp.Count == 1)
   {
      JToken objekt = outp[0];
      if (objekt["ProjectTypeID"] != "ART")
      ...
   }
}

Tipp Jarr’s $0.02 + GST

If object coming down the wire is well known in advance, entire Newtonsoft assembly can be avoided by using DataContractJsonSerializer instead.

Tip #831: Avoiding pain when renewing certificates in AD FS

Expiring certificate for https://adfs.contoso.com, you say? Considering Let’s Encrypt goodness, that should be easy to fix, right?

  • Import new certificate (make sure to include private key)
  • Grant permission to AD FS service account to read the private key
  • Open AD FS manager, navigate to AD FS > Service > Certificates
  • Click Set Service Communications Certificate… and select new certificate

Done, right? So why all these ERR_CONNECTION_RESET errors and general snafu? That’s because old certificate is still lurking around in the configuration and a bit of PowerShell is needed to oust it out.

# that will show old thumbprint hanging around
Get-AdfsSslCertificate

# get the thumbprint of the new certificate
$thumb = (Get-AdfsCertificate -CertificateType `
     Service-Communications).Thumbprint

# and fix it
Set-AdfsSslCertificate -Thumbprint $thumb

The restart AD FS service and it’ll be as good as new! The mix of UI and PowerShell can be very confusing, especially for noob administrators like me.

Tip #830: Calendar items lost after revoking O365 global administrator role

We did write about the consequences of granting and then removing global administrator roles. As Oswin Kroon has discovered, there is more to it if you’re actually using that O365 account to organize things in your life.

tl;dr

Removing global administrator role from an O365 account may result in a loss of calendar appointments.

A tale of disappearing appointments

as told by Oswin Kroon

Last week a rather strange event took place in my Outlook calendar as most of my items suddenly disappeared from one day to another. I had a bit of a search (more like 3-4 hours of wasted time) I managed to get the items back.

You may ask yourself “What does this have to do with CRM/D365?” Well, allow me to explain what when wrong:

The day before I revoked my O365 admin role and replaced it with a regular user role. Nothing wrong with that, but as it happens this also means that you will lose your D365 sysadmin role as well. Since that was the only role I had, I was left without a valid role and became a D365 outcast. Still, this shouldn’t have too much impact on Outlook. But it does! As I later found out it were only my tracked calendar items that I lost in Outlook, resulting in the conclusion that losing your D365 privileges equals to losing the privilege to even read your personal calendar items if they were tracked.

After I regained my D365 sysadmin role all items were restored (although I actually started to like a blank calendar on Fridays).

Anyway, feel free to test out this scenario on your own and see if you notice the same behavior.

Tip #829: Project Service Automation – When are Actuals actually created

Time is moneyMatt “Almost Resident” Johnson is definitely into PSA these days, learning and sharing what he learned.

Here’s a quick reference for anyone interested in when the Actuals are created during a Project in PSA. Maybe this will save someone a bit of investigation time or make things clearer in their mind.

Time and Materials Project

Steps Actuals Created
Resource adds time/expense
Resource submits time/expense
Time/expense approved by PM Actual created – Cost
Actual created – Unbilled Sales
Invoice created for all unbilled sales
Invoice confirmed (sent to customer) Actual created – Unbilled Sales (reversal of the previously created unbilled sale)
Actual created – Billed Sales
Invoice marked as Paid  

Notes:

  • Actuals can be seen against either the Project, the Contract or the Invoice
  • Actuals will not be created if the contract is not associated with the project even if time is submitted and approved.

Fixed Price Project

Steps Actuals Created
Resource adds time/expense
Resource submits time/expense
Time/expense approved by PM Actual created – Cost
Milestone marked as ready for invoicing
Invoice created for Milestone Amount(s)
Invoice confirmed (sent to customer) Actual created – Billed Sales (Transaction class == Milestone)
Invoice marked as Paid

Notes:

  • Actuals can be seen against either the Project or the Contract. Only the Billed Sales (Milestone) Actual will be associated with the Invoice.
  • Out of the box Milestones must be marked as Ready for Invoicing manually.
  • Although a milestone can be associated with a single Task, once this task is completed 100% it doesn’t automagically mark the Milestone as Ready for Invoicing.
  • A Task can actually be associated with multiple Milestones but a Milestone can only have one Task associated with it.

Tip #828: Quickly migrate existing CRM Online licenses to Dynamics 365 licenses using PowerShell

I was not aware that Gayan “Performance Wizard” Perera shares my affection for PowerShell. Until this quick tip on how to bulk migrate CRM Online licenses to Dynamics 365 licenses using PowerShell.

$credentials = Get-Credential
Connect-MsolService -Credential $credentials
# this will get you a list of license types along with the tenant name which we'll be using later
Get-MsolAccountSku | Format-Table AccountSkuId, SkuPartNumber

# need to create a custom plan and remove sharepoint and project essentials. these are already assinged by Office E* plans
$myplan = New-MsolLicenseOptions -AccountSkuId "tenant:DYN365_ENTERPRISE_TEAM_MEMBERS" -DisabledPlans SHAREPOINTENTERPRISE,SHAREPOINTWAC,PROJECT_ESSENTIALS

# get a list of users using Get-MsolUser and foreach loop; https://support.microsoft.com/en-nz/help/2777380/getting-all-licensed-office-365-users-with-powershell

# "tenant" is the name from the Get-MsolAccountSku command above
Set-MsolUserLicense -UserPrincipalName "user@user.com" -AddLicenses "tenant:DYN365_ENTERPRISE_TEAM_MEMBERS" -LicenseOptions $myplan

# remove the existing license, ensure you're removing the correct old license. i.e. "CRMPLAN2"
Set-MsolUserLicense -UserPrincipalName "user@user.com" -RemoveLicenses "tenant:CRMPLAN2"

Comes in handy when you have to assign the new D365 licenses to hundreds or thousands of users.

Seal of approval

Tip #827: Restricting date picker on portal forms

This tip comes directly from none other than Tanguy “The XRM Toolbox” Touzard himself.

It’s super easy to build an entity form and a page to allow editing of the Dynamics 365 records in a portal. But what if we want to restrict a date picker control to a certain range, which could be dynamic, e.g. based on today’s date.

Good news is that the portals use bootstrap framework so we should be able to use properties of the bootstrap date picker to set the range. The challenge is to get the actual control but for the master such as Tanguy, that’s not difficult.

The code that you’d want to add to Custom Javascript field of the entity form would look like the following:

$(document).ready(function() {
   $("#foo_dateofbirth")  // input control
   .next()   // the date picker container
   .data("DateTimePicker") // the date picker object
   .setMaxDate(moment()); // force the past
});

Here we’re forcing the date of birth to be in the past. You can use setMinDate(date) to restrict minimum date allowed as well.

Tip #826: USD goodness unleashed

Whether you are an experienced Unified Service Desk developer or just about to dip your toes into the dark waters of USD, you are on a constant lookout for good code samples and snippets. But hey, why not to take it one step further?

Jayme Pechan, one of the USD fathers, has made the entire library of USD goodies available on Github. Full list of components is available and, apart from the Parature article list, they all look extremely useful, especially Controller.

If nothing else, you should be able to study the code to see how things should be done in USD!

Tip #825: Tabs Gone Wild – Edge and IE

This tip shouldn’t be confused with a politically incorrect reference to ‘Girls Gone Wild’. So let’s get past that and into the issue with Learning Path and IE 11 and Microsoft Edge Browsers.

If you open your Dynamics 365 instance in one of these browsers you will get an uncontrollable situation where new tabs start opening faster than you can move your mouse and click to close them.

Learning Path Opens Multiple Tabs

Learning Path Opens Multiple Tabs

This is an issue in Edge and IE currently if you have Learning Path enabled. It doesn’t happen in Chrome or FireFox.

So if you want to use either of these browsers than just opt out of learning path. This is a temporary workaround. A true fix is in the works.

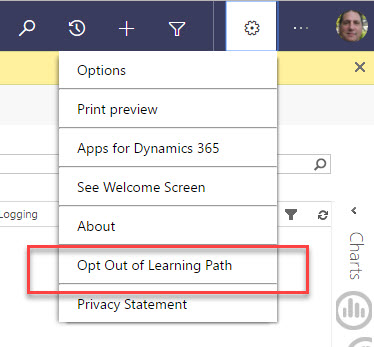
Click on the gear icon and then select Opt Out of Learning Path.

Opt Out of Learning Path

The fix should be created to MVP Extraodinaire Rhett Clinton.

Tip #824: Track messages when you send them with Folder Level Tracking

Happy Valentine’s Day. Here’s a tip you may love if you use Folder Level Tracking.

One common criticism of Folder Level Tracking is you can’t track a message at the same time that you send the message, like you can when you use CRM for Outlook. You can move the message from the Sent folder to the tracking folder after you send the message, but there is no way to track the message when you send it. This is incorrect.

If you use Outlook (any version since 2007), you can track your messages at the same time you send them via Folder Level Tracking. When you compose your email, go to the Options tab of the ribbon.

sentoptions

Click the “Save Sent Item To” button, then browse to the desired tracking folder. When you send the message, the sent email will be saved to the selected folder, rather than saving it to the “Sent” folder. The message will then be tracked, and set regarding to whatever record to which that folder is linked.