Tip #1312: View process history from Unified Interface forms

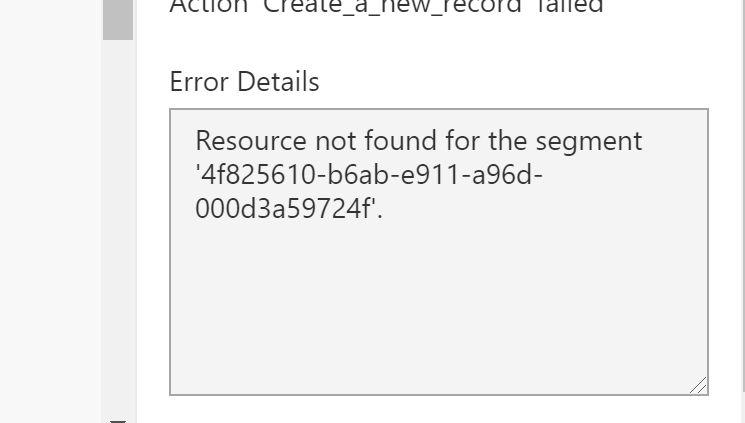
Tipster note–this tip is an unsupported tip. It’s not going to damage anything, but it is unsupported and may stop working with future updates. Proceed at your own risk.

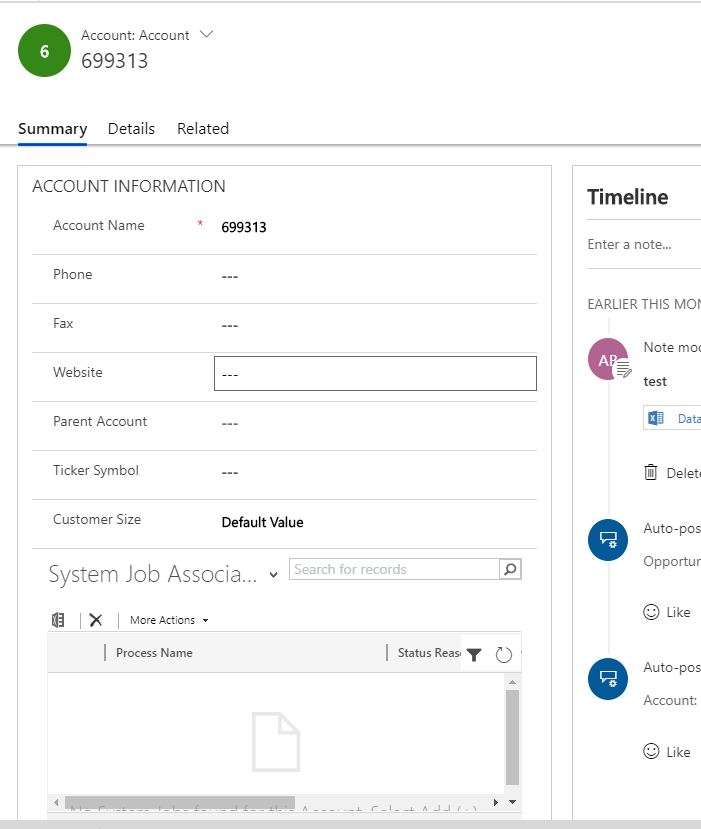
So you have moved to unified interface, but you want to be able to see the process and workflow history for a record. Microsoft has not yet given us a way to check the process history for a record from Unified Interface, and while you can navigate to classic settings and see the full process and system job history, it is very cumbersome to see it in context of a specific record.

Using the following approach you can display the process history for a record on the unified interface form.

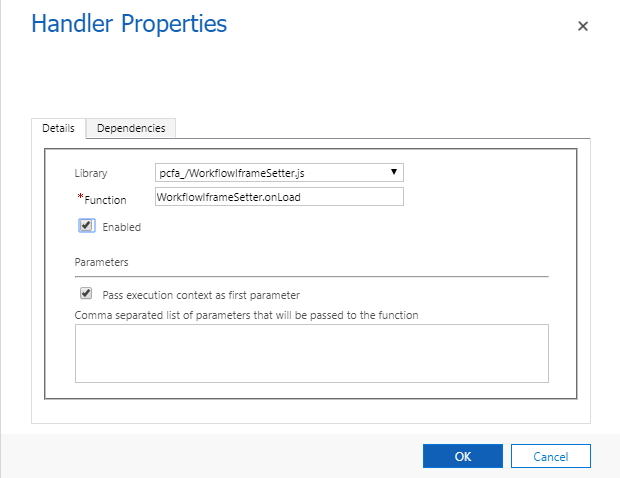
  1. Create an iFrame on your form called IFRAME_Workflows
  2. Create a javascript web resource
var WorkflowIframeSetter = function() {
  function onLoad(executionContext) {
    var formContext = executionContext.getFormContext();
    //if this is CreateForm - let's leave the form blank
    if (formContext.ui.getFormType() === 1) {
      return;
    }

    //Getting entity Metadata to get otc (Object Type Code)
    Xrm.Utility.getEntityMetadata(formContext.data.entity.getEntityName()).then(
      function(entityMetadata){
          var otc = entityMetadata.ObjectTypeCode;
          var url = "/userdefined/areas.aspx?inlineEdit=1&navItemName=Background%20Processes&oId=" + 
            formContext.data.entity.getId() + 
            "&oType=" +
            otc +
            "&pagemode=iframe&rof=true&security=852023&tabSet=areaAsyncOperations";
          
            formContext.getControl("IFRAME_Workflows").setSrc(url);
      });
  } // onLoad function
                
  return {
    onLoad: onLoad
  };
}();
  1. Add to your form

Voilà Process history on your Unified Interface form

Thanks to Andrew Butenko for the script.

Cover photo by unsplash-logoHenry & Co.

Tip #1311: Use entity name in Flow lookups

If you are building your Flows from solutions and connecting to Common Data Service, you should use the CDS (current environment) connector.

When you do, if you populate lookup fields, you might get a “resource not found” error message.

If you get this error, like I did, you are probably just putting the guid of the record in the lookup field. You need to also include the entity name in your reference.

Once you do, your lookup field should populate properly. Thanks to David Yack and Antti Pajunen for this tip.

Cover photo by unsplash-logoWesley Pribadi

Tip #1310: Using Flow to test concurrency

Today’s tip is from Shidin ‘D365fanboi’ Haridas – thank you!

Got a tip of your own? Why won’t you send it to jar@crmtipoftheday.com when you have a minute? Now, over to Shidin.


Most CRM implementations, at some point, would have required to implement a bespoke auto-numbering system.

However, testing the custom built auto-numbering solution end-scenarios, especially involving optimistic concurrency was always the toughest challenge.

Flow can be used to help out testing such end-scenarios of optimistic concurrency:

  1. Create a flow with a loop to create the entity records (in the below example, initialized an array collection to loop through)

Flow to create CDS records in a loop

  1. In the loop control settings, enable ‘Concurrency Control’ and increase degree of parallelism to 2+.

FLow concurrency settings

  1. Now, when the flow executes, multiple records will be created in the Dynamics 365 database at the exact time!!
  2. To verifying this, create an alternate key on the auto-number attribute.

The flow run will fail if the bespoke auto-numbering system tried to insert the same values against the record.

Tîpp Jäår $0.02 + GST

  • It’s been a while since I implemented an auto-numbering system that required testing. Why? Because Common Data Service supports auto-numbering. Having said that, I have seen autonumbering requirements in the wild that wouldn’t fit on one page and require a team of 3 or more software engineers to implement. Those exactly are the occasions where you’d want to test. Or change the requirements. Or job.
  • Don’t restrict your imagination to auto-numbers. There are plenty of other situations where you’d want to test records be created at the same time.
  • Be aware of the Flow limits – those would be very easy to break while doing loop-de-loop.

Cover photo by Pixabay

Tip #1309: 213 revisited: Embedded user role list

Seth Bacon commented recently on tip 213 letting us know that it still worked in classic UI to embed a subgrid of security roles on user records, but this approach does not work in unified interface.

Well it is 2019 now and we now other methods. Hardit Bhatia explains how to do this with an embedded canvas app.


In Dynamics 365, security roles play an important role. They control how users access different types of records. Existing security roles can be leveraged as well as new security roles can be created to control privileges granted to users. An administrator may want an easy way to look at security roles assigned to users. Displaying user security roles using a sub-grid of the Security Roles entity isn’t possible because the only view that is available for selection is the “All Roles” view. When a sub-grid for Security Role entity is added to a user form, it doesn’t display any records. This is because there is a copy of each security role for each business unit and the “All Roles” view filters out business unit specific roles. Also, the views related to the Security Role entity cannot be edited and new views cannot be created.

This problem was originally identified and a solution to the problem was presented in this post. However, this solution was viable only prior to the Unified Interface. Now with Unified Interface, embedded canvas apps present a very simple solution to this problem.

Here is a detailed step-by-step guide to creating this embedded canvas app (a summarized description is at the end of the article):

  • First, add a section to an existing tab (or on a new tab) of the User entity main form and add any required field to this section (a required field ensures that the app will refresh in response to any change in data on the host model-driven form). As an example, I added a new section “User Roles” to the Summary tab and added the ‘First Name’ field:

This will open the app designer with a predefined screen that has an edit form added to it:

  • Add a new list screen, Security Role as a data source, and then a gallery (Title layout or any other type as needed). Set the Items property of the gallery as shown below (on a side note, in this example, the Text property of the label is set to “User Roles for: ” & [@ModelDrivenFormIntegration].Item.’Full Name’, and the default icons to refresh, sort, and add are deleted or they can be hidden by setting their visible property to false):
  • Note that the ModelDrivenFormIntegration is used only to lookup the user record. Accessing Security Roles using this user record gives five different options, select the one that reads ‘Security Roles (systemuserroles_association)’ as that is the name of the relationship between the Users and Security Roles entity:
  • Set the Title property of the gallery to ThisItem.Name to display the name of the security role(s) assigned to the user and move up this new screen so it is the 1st screen within this app (the original form screen can be deleted if needed):
  • Give the app a suitable name and save the app (when an app is saved for the 1st time, it gets published on the save). Once the add designer is closed, the App ID gets populated with the ID of this new app:
  • Click on OK, Save and Publish the changes on the Users entity main form. Navigate to a user record in the model-driven app and the embedded canvas app will display the list of security roles assigned to that user:

To summarize, you can utilize an embedded canvas app with a gallery to view a list of security roles assigned to the user in the Unified Interface using the ModelDrivenFormIntegration control. By adding a security roles list and setting the Items property (as shown below), you can have visibility into a user’s assigned security roles from within a model-driven app directly on the user record.

Facebook and twitter cover photo by unsplash-logoJessica Ruscello

Tip #1308: Secret support in SDK

We usually don’t “tip” about SDK releases but 9.1.0.3 just landed in Nuget and it is too good not to be mentioned.

By popular demand, support for not one but two new authentication types have been added:

  • Current User ID login when using Online flows with OAuth (Including constructor/connection string support). This allows you to use the current logged in user for Windows integrated authentication (SSO)
  • ClientID / Client Secret when using OAuth flows (Including constructor/connection string support). Certificate-based authentication is better but it’s been such a pain in the neck…

The other goodness is in the Solution Packager:

  • Support for Environment Variables (definitions and values). All we are missing now is the feature to be released as part of the Wave 2.
  • Support for Connectors. Ditto.

Note. From 9.1.x forward, new packages requires a minimum version of ADAL 3.19.x and has been tested to ADAL 5.2.

At last! If you are adding this to an existing project, please be aware that you must update ADAL as well as the CrmServiceClient. ADAL 2.x cannot be used at all and if you want to peg to a specific version, binding redirect is your best bet.

These changes will surface in the SDK Tools and PowerShell modules shortly after the release of the main Nuget packages. Stay tuned.

Cover photo by unsplash-logoKristina Flour

Tip #1307: PowerApps designer makes your work in progress easier

Today’s tip is from EY Kalman. Got a tip? Send it to jar@crmtipoftheday.com (and include either your Twitter handle or LinkedIn profile link for the eternal appreciation link).

Late last night I decided to start playing around with entering the data fields directly into the entity first (the aim is to drive a Model App eventually). Managed to get some stuff done, then headed to bed.

This morning I brought it all up again, and picked up from where I left off. Something immediately jumped out at me – the fields I was adding were shown in bold (as outlined in the image below)

This intrigued me – originally I thought that perhaps I was creating a field that was named the same as a default schema, and the system was letting me know this somehow. However, this wasn’t the case at all.

What it actually is, is showing the new fields that have been added (whilst the entity hasn’t yet been saved). Once you save the entity, then the bolding of the name disappears.

So quite a useful way to see new fields, and work out exactly where you are with things!

Imagine the following scenario:

You’re in the middle of editing the values of specific fields within Dynamics. Suddenly a colleague comes over to your desk to ask you something, or you get a phone call (obviously to assist with a technical matter!). You spend some time on the call, and deal with whatever is needed. You hang up, and look back at the screen.

Hold on. The train of thought is gone. You’re looking at the overall entity, and can’t remember if you did update a specific field, or you didn’t? And if you did, did you already publish the entity, or not?

You’ll need to open up each field that you’re needing to update, to see if you already dealt with it or not. MAJOR pain and headache, and loss of productivity.

Well…not to fear! When dealing with field values in PowerApps Entities, there’s an extremely helpful visual cue for this (outlined below):

How it works is simple:

  1. You open up an existing field in the Entity Designer, and edit something, anything at all, within it
  2. You save it
  3. Bingo! The icon shows next to it!
  4. When you then Publish the entity, the icon disappears

Now, what could we possibly do with all of that time saved…

Cover photo by unsplash-logoCarl Heyerdahl

Tip #1306: Business rules do not work on editable grid

Today’s tip is from Eric Regnier. Got a tip? Send it to jar@crmtipoftheday.com (and don’t forget to include either your Twitter handle or LinkedIn profile link for the eternal appreciation link)

Do you know that business rules (scope = entity) work on editable grids? Pick one of the following answers:

  1. Nope didn’t know but will try it out right before putting my kids to bed!
  2. Yeah but it’s really buggy so I try to avoid it…
  3. Yup and I abuse them!

If your answer is anything between 1 to 2, here’s a quick tip to keep in mind:

Business Rules will only work if the conditional field is also a column on the grid.

If the field is not a column then the BR won’t work…

BR with conditional field on Created On field

BR with conditional field on Task field

Cover photo by Miguel Constantin Montes from Pexels

Tip #1305: Test and enable mailboxes failure because of throttling

This next tip comes from Marius “Why are you still on-premises” Agur Lind. Got a tip of your own? Send it to jar@crmtipoftheday.com (and don’t forget to include either your Twitter handle or LinkedIn profile link for the eternal link appreciation).

Have you ever used an on-premise deployment and found that some testing and enabling mailboxes fail at weird intervals? Have you double, triple, and quadruple-checked the password and it’s still failing? Tried to see if dirsync is failing and updated the user password?

Well here’s what be ailing you:

Go check out the details of the warning message under alerts, and you might just find the following:

System.Web.Services.Protocols.SoapException: The server cannot service this request right now. Try again later.

The reason why you’re getting this error is most probably because you’ve hit the outgoing email threshold of your Exchange Online. Wanna know how to fix it? Add more licenses.

Yes, I’m not kidding, the Exchange Online threshold policy is based on the number of user licenses, so if you’re hitting this limit you just have to try again later. There is no queue system, you just have to handle it yourself.

Could be worse, but there you have it.

Cover photo by unsplash-logoJp Valery

Tip #1304: Why can’t I export my failures?

You use the import utility in Dynamics, and sometimes you get the option to export your failed row and sometimes you don’t. What gives?

The answer is it depends on your import file type. If you import from XML or from CSV, you will get the Export error rows option.

If you import from xlsx, the export error row option will not be there.