 of the
Seth Bacon commented recently on tip 213 letting us know that it still worked in classic UI to embed a subgrid of security roles on user records, but this approach does not work in unified interface.
Well it is 2019 now and we now other methods. Hardit Bhatia explains how to do this with an embedded canvas app.
In Dynamics 365, security roles play an important role. They control how users access different types of records. Existing security roles can be leveraged as well as new security roles can be created to control privileges granted to users. An administrator may want an easy way to look at security roles assigned to users. Displaying user security roles using a sub-grid of the Security Roles entity isn’t possible because the only view that is available for selection is the “All Roles” view. When a sub-grid for Security Role entity is added to a user form, it doesn’t display any records. This is because there is a copy of each security role for each business unit and the “All Roles” view filters out business unit specific roles. Also, the views related to the Security Role entity cannot be edited and new views cannot be created.
This problem was originally identified and a solution to the problem was presented in this post. However, this solution was viable only prior to the Unified Interface. Now with Unified Interface, embedded canvas apps present a very simple solution to this problem.
Here is a detailed step-by-step guide to creating this embedded canvas app (a summarized description is at the end of the article):
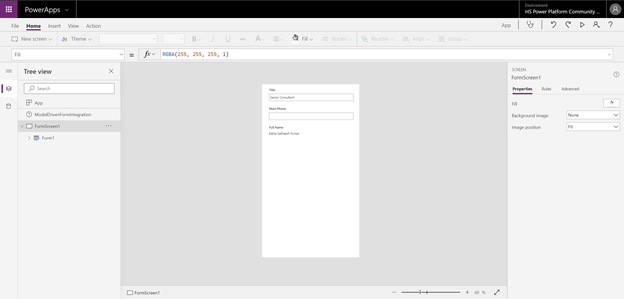
- First, add a section to an existing tab (or on a new tab) of the User entity main form and add any required field to this section (a required field ensures that the app will refresh in response to any change in data on the host model-driven form). As an example, I added a new section “User Roles” to the Summary tab and added the ‘First Name’ field:
This will open the app designer with a predefined screen that has an edit form added to it:
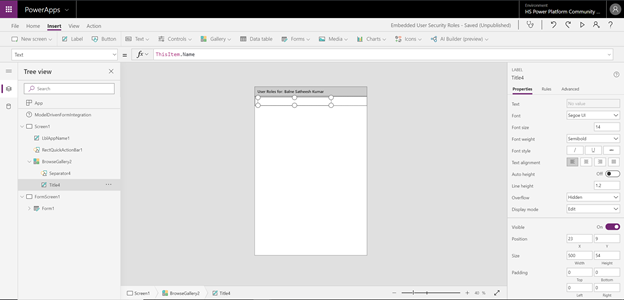
- Add a new list screen, Security Role as a data source, and then a gallery (Title layout or any other type as needed). Set the Items property of the gallery as shown below (on a side note, in this example, the Text property of the label is set to “User Roles for: ” & [@ModelDrivenFormIntegration].Item.’Full Name’, and the default icons to refresh, sort, and add are deleted or they can be hidden by setting their visible property to false):
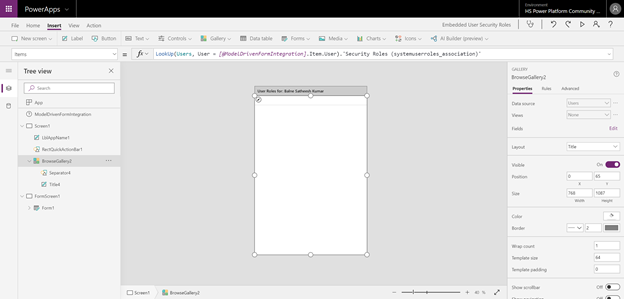
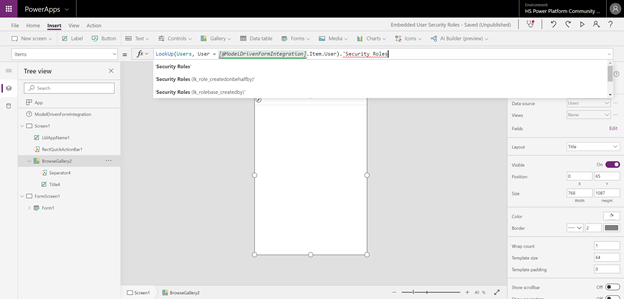
- Note that the ModelDrivenFormIntegration is used only to lookup the user record. Accessing Security Roles using this user record gives five different options, select the one that reads ‘Security Roles (systemuserroles_association)’ as that is the name of the relationship between the Users and Security Roles entity:
- Set the Title property of the gallery to ThisItem.Name to display the name of the security role(s) assigned to the user and move up this new screen so it is the 1st screen within this app (the original form screen can be deleted if needed):
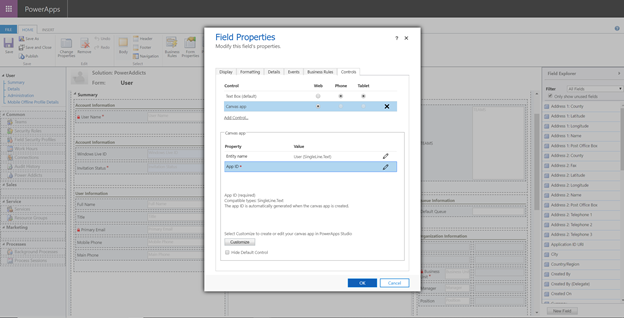
- Give the app a suitable name and save the app (when an app is saved for the 1st time, it gets published on the save). Once the add designer is closed, the App ID gets populated with the ID of this new app:

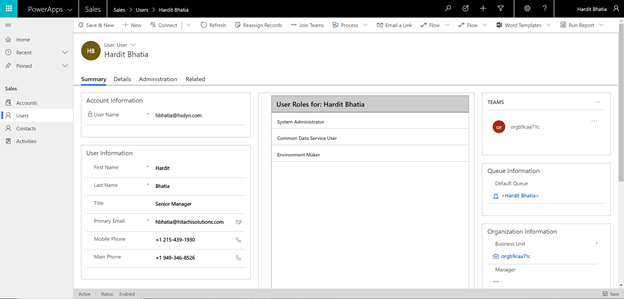
- Click on OK, Save and Publish the changes on the Users entity main form. Navigate to a user record in the model-driven app and the embedded canvas app will display the list of security roles assigned to that user:
To summarize, you can utilize an embedded canvas app with a gallery to view a list of security roles assigned to the user in the Unified Interface using the ModelDrivenFormIntegration control. By adding a security roles list and setting the Items property (as shown below), you can have visibility into a user’s assigned security roles from within a model-driven app directly on the user record.

Facebook and twitter cover photo by Jessica Ruscello