Tip #69: Get rid of the “outside of work hours” warning

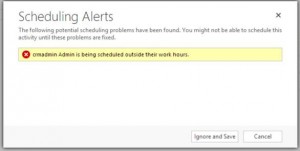
When scheduling an appointment in Microsoft Dynamics CRM 2013, you may see a warning that the time of the appointment is outside of a user’s work hours. Some users have reported seeing this every time they schedule an appointment.

wh1

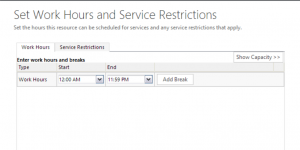
This can happen if the user’s work hours are set to 12:00 AM to 12:00 AM (all day). To fix, set the work hours for the user to 12:00 AM to 11:59 PM.

  1. Open the user record
  2. Click the drop down next to the user’s name to expose the navigation bar and select “Work Hours.”
  3. Click “Set up” and select “New Weekly Schedule”
  4. Click “Set Work Hours”
  5. For end date, you will not be able to select 11:59 PM from the drop-down, but you can type it in. Apply changes.

wh2

You will now be able to create appointments for that user without seeing the warning.

Thanks to Fast, Lean, and Smart Carsten Groth for this tip and helping me solve my problem.

Tip #68: Do you know this woman?

I have nothing personal against this woman

Annoying prompt to watch the video

but the dialog started to annoy me to no extent.

The problem is that visibility of the dialog is controlled via cookie so even if you check the box “Don’t show me this again”, you will see it again if you clear your cookies, use another device, or use in-private browsing.

Unfortunately there is not a way to disable this in CRM Online but on-premises simply add new DWORD (32-bit) DisableNavTour with the value of 1 to  HKEY_LOCAL_MACHINE\SOFTWARE\Microsoft\MSCRM on the front-end server. Detailed step-by-step instructions can be found in Microsoft Dynamics CRM 2013 Installing Guide ,  in the section aptly named How can I disable the Navigation Tour video? (on-premises versions only).

And if you ever miss it, you can click or tap Settings (cogwheel in the corner) and then click or tap Open Navigation Tour in your browser. 

Tip #67: Get To Advanced Find From Any View

One question I have been asked by several people upgrading to CRM 2013 is “where is Advanced Find.” In the simplified command bar of 2013, the Advanced Find button is not available from as many places as it was in CRM 2011. You can always find it by going to your “home” area, but there is another really easy way to get to it from any view in Microsoft Dynamics CRM 2013.

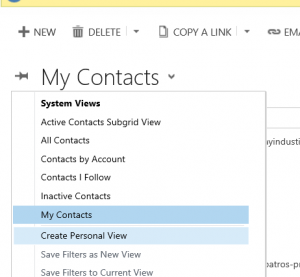
Click the view selector and scroll to the bottom. You will see an option for “create personal view.” By selecting this option, Advanced Find will appear.

Personal View

Tip #66: Error running Transition wizard

If you have CRM Online orgnanization that still uses Live ID authentication, by now you would have received an email reminder that opens with:

Our records show you have not completed the Transition wizard. Completion of the Transition wizard is necessary to move your Microsoft Dynamics CRM Online subscription to the Microsoft online services environment.

And continues on to the instructions:

To access the Transition wizard, your Billing Administrator needs to sign in to your Microsoft Dynamics CRM Online organization. On the nav bar, click or tap Microsoft Dynamics CRM > Settings > Administration > Manage Subscriptions.

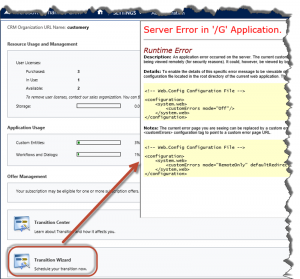
The only problem is that when you try running the wizard, you get this:
Yellow Screen of Death when running Transition wizard

If that happens, chances are that you have changed primary alias (email address) on Live ID since the subscription started. Head to https://account.live.com, change the primary alias back to what it was when you signed up for this CRM organisation, logoff and logon back to CRM and try again. Your primary alias is your user email address in CRM – that does not change once provisioned.

Tip #65: Read the ReadMe

We all love Microsoft Dynamics CRM, but we admit it is not perfect. That’s why it is very helpful that Microsoft maintains a list of known issues in CRM On Premise and CRM Online in the release ReadMe file. Reading this will save you time when deploying CRM, as you will be aware of current limitations.

View the readme for CRM Online Fail ’13 and Dynamics CRM 2013 On Premise with Update Rollup 1.


Tip #64: Add PBL Rules to Quick Create Forms

In Microsoft Dynamics CRM 2013, the PBL (Portable Business Logic) rules are an easy way to add business logic to forms without having to write code. But what if you want to add a PBL rule to a Quick Create form?

At first glance, when you set up a quick create form, it appears that PBL rules are not available, as you won’t see the “Business Rule” button that is available from other forms, and when you create a PBL rule, the Quick Create forms won’t be listed in the Scope drop down. However, it is possible to add PBL rules to Quick Create forms.

Go to settings->customization–>entity where the quick create form lives. Expand the entity customization and go to Business Rules section, and define your business rule there. If Scope is set to all forms, the rule will apply to the quick create form too as long as all fields referenced by the PBL rule are present on the Quick Create form.

Tip #63: Execute javascript code during debug session

There are times when you want to quickly test out a piece of form Javascript code in the Developer Tools console. Microsoft Dynamics CRM 2013 renders form content in frames and you have to prefix frames[0] or frames[1]
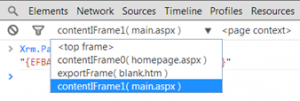
to “Xrm.” to get the code running. In Chrome you can choose the target frame that you want the code to run on. You can choose the main.aspx frame in the console, and run the CRM form Javascript snippets without any changes.

Selecting content frame in Chrome

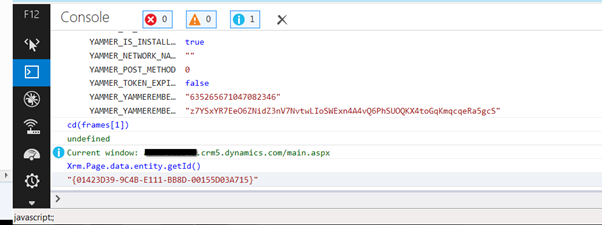
Developer Tools for Internet Explorer doesn’t offer this capability (yet). But you can always run the “cd” command against the correct frame with the main.aspx to avoid prefixing, e.g. cd(frames[1])

Changing current frame in IE

Using these approaches also have the added benefit of fully utilising the code completion capabilities of the developer tools.

Tipped to the jar by Raj Y “First truly independent tipster” Raman

Tipp Jarr’s double dip

Great tip to save time and a perfect technique to complement brand new Dynamics CRM DevTools from relentless Sonoma Partners. From the description:

Dynamics CRM DevTools is an extension to Google Chrome which provides a variety of tools to help optimize customizing and troubleshooting within Dynamics CRM. Currently all deployments of CRM 2013 and CRM 2011 UR 12+ are supported.

Tip #62: Where to find CRM product info

Today’s handy tip comes from none other than Amy “Deity of CRM Documentation” Langlois:

We know we have more work to do to inform our customers where to go to get product information and we are working on some ideas to help alleviate that problem. In the meantime, in your communications with customers, please point to this blog post: Check Out These Handy Links to Help for CRM 2013

This is a great reference to point customers to with links to all the various information “portals”. We are working on a simplified portal landscape so in the future we can have fewer places to send people. But for now, this tip sheet might help.

Tip #61: Change Marketing List View Layouts

When you create a marketing list in Microsoft Dynamics CRM, the list created will contain the typical fields required for a marketing list, such as name, address, city, state, and postal code. But what if you want to change the fields that appear in the view? What if you use a custom lookup field for Country, rather than the out of the box Address 1: Country field? What if you want to display address 2? The views used by marketing lists can be modified by a System Administrator.

  1. Launch Advanced find and search the View entity.
  2. Search for Name Contains “List Member View.”

Your search results should include at least three views: “Account List Members View,” “Contact List Members View,” and “Leads List Members View.” Keep in mind that a Marketing List may contain members from Accounts, Contacts, and Leads, so each member type has a separate view. If you wish to change the view for all member types, you will need to update each list member view.

Just double click the view from the search results, edit it, save it, and publish changes.


Tip #60: Remove Decimals From Charts

In Microsoft Dynamics CRM 2011 or 2013, when you have a chart summarizing a decimal or currency field, by default your chart values will contain decimals. What if you want to round to whole numbers?

To do this, you will need to export the chart XML. For a system chart, navigate to your solution to the entity where the chart resides, select the chart from the chart list, click “More Actions” then “Export Chart.

Open the xml file in the editor of your choice.

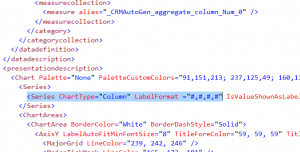
Search for the string “Series ChartType=” .Immediately after the charttype, paste in the following string LabelFormat =”#,#,#,#”. After the change, it should look like the following:

chart xml

Save your XML file, then go back to the Customization area from which you exported the chart XML. Click “More Actions” then “Import Chart.”

Select the chart XML that was edited and click “Import.”

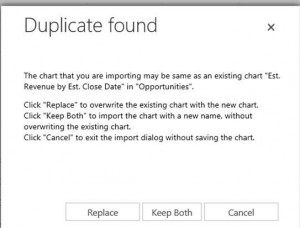
When prompted, click “Replace” to overwrite the existing chart with your edited chart.

import chart