Tip #123: Waiting for Godo in CRM workflows

This week’s tips all seem to be about workflows and here is an old favorite of mine. I always found it interesting how non-intuitive wording around Timeout condition pushed majority of developers to use rather convoluted but easier to read and understand Wait conditions when a workflow needs to be paused for a fixed duration.

For example, if workflow needs to be paused for 1 day, a large number of CRM developers would create something involving process execution time:
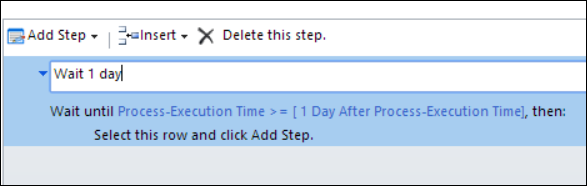
Wait 1 day condition

Stop it.

Timeout property of the process allows for one extra condition called Duration
Duration condition

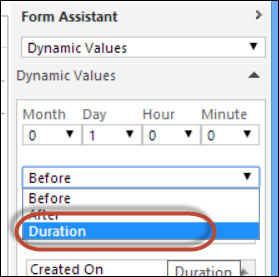
and, when selected, condition becomes easy to read and understand without doing any mental gymnastics:
Wait 1 day with timeout

Tip #122: If you must use waiting workflows

In yesterday’s tip we suggested to avoid wait conditions altogether; but if you must use them:

Tip #121: Don’t use wait conditions

Workflow wait conditions can be very useful. Say you need to have an email go to a customer 30 days prior to their contract renewal, it can be tempting to use a wait condition. However, excessive use of wait conditions has a downside.

  • Performance: each waiting workflow instance carries performance overhead. The more waiting workflow instances that you have, the more server resources will be consumed by the Asynchronous Processing Service.
  • If you change the logic in your workflow and republish (like update the text of the email sent to your client), it does not change waiting workflow instances. For example, if you change the renewal email frequency to 15 days rather than 30 days, any workflow instances that are waiting will not be updated. (See tip # 24 for a potential way to minimize this risk).

As an alternative to wait conditions, use a scheduled batch process using Scribe or SSIS with Kingswaysoft to fill the role of the wait condition. This can be scheduled to run in batch with no impact to performance of the Asynchronous Processing Service.


Tip #120: Use the filtered views

When you are writing reports for Microsoft Dynamics CRM, a common temptation is to use the base tables or non filtered views. it can be tempting to do this to make your report run faster. Before going this route, please consider what you are giving up:

  1. You have to grant the CRM service account a higher level of database access, which is not supported.
  2. You create a security back door–any report written against the base tables and views will not be constrained by CRM security. Users will have access to records outside of their normal record access levels.
  3. You give up the ability to use prefiltering.
  4. The report will not reflect user time zone or language settings.
  5. An upgrade may break your reports–just ask CRM 2011 users who had reports reading from the extension base tables.

Before opening up the barn door, please be sure you have exhausted all other optimization options:

  • Eliminate unnecessary joins
  • Use prefiltering, and set the filter to the desired data subset.
  • Move your query to a stored procedure*
  • Create a custom view*

* These options will require modification of database permissions to grant the CRM service account permission for the stored procedure or view; however, they are safer options than granting all users read access over all base tables or views.


Tip #119: Help me – help you

When CRM users see the infamous Microsoft Dynamics CRM has encountered an error dialog, they often select the option to send error report and honestly believe that system administrators, support, developers, all of the above will be getting a copy of the report that contains exact steps how to solve the problem.

Dialog: Microsoft Dynamics CRM has encountered an error

Explain to your CRM users that, while it’s quite important to send this error report, it’ll be delivered directly to Microsoft bypassing all the local “authorities”. Ask them always to perform two extra steps that will assist problem troubleshooting:

  • Click View the data that will be sent to Microsoft link
  • Press Ctrl-A, Ctrl-C to copy the content of the window that will come up, then paste it into the email to support

The content is immensely useful – it contains script messages, stack trace, all javascript developer could wish for.

Error details that are sent to Microsoft

Ask your users for help and you shall receive.

Tip #118: Prevent users from seeing script errors

You have completed your CRM configuration, you have tested your forms, everything is working great, and users are now “live” in the system. Even if everything is as perfect as possible, users may occasionally see some random script errors. Like any web application, a number of different factors can conspire to occasionally create an error condition and make the “an error has occurred” box pop up.

If you want to prevent users from seeing error messages, you can do so by changing a setting in the Dynamics CRM privacy settings. Go to Settings–>Administration–>Privacy Preferences.

privacy

Selecting either the “Automatically send” or “Never send” will prevent users from seeing most form error messages.

Note–I’m not recommending using this to cover up legitimate form script errors. But once you have tested your scripts and verified that they are working correctly, changing the privacy setting can be a good idea to prevent users being thrown off course by a random error message.

Tip #117: CRM for Tablets – Form Features not available

CRM Organizations are starting to use the CRM Tablets application more and more. It is helpful to remind ourselves of some of the constraints that we are under in the existing release. Don’t despair though as I firmly believe we will see some of these solved directly or indirectly in upcoming releases. Additionally, you can use the tablet application when it works for you and then if you need a feature or function that isn’t available in the app you can seamlessly switch to the browser view.

These are some of the features that are available in the web application that are not in CRM for tablets:

  • Yammer and Activity Feeds
  • Bing Maps integration
  • SharePoint Document Libraries
  • iFrames – typically used for including web pages in a form.
  • Web Resources
  • The ability to switch to another form when there are multiple record types per form. The CRM for tablets app always uses the first form in the form order that you have privileges to use.
CRM 2013 Tablet App

CRM 2013 Tablet App

Tip #116: Prevent CRM for Outlook from getting disabled

When you use CRM for Outlook, occasionally something will happen, like a slow response from the server, and Outlook will ask the user if they want to disable the add-in. If the CRM add-in is disabled, CRM functionality will no longer be available from Outlook.

To prevent the add-in from being permanently disabled, you can use a registry script or group policy to enable the add-in if it is disabled.

The add-in enable behavior is controlled by the registry key hklm/software/microsoft/office/outlook/addins/crmaddin.addin/LoadBehavior

Setting it to 3 sets the addin to enabled

Tip #115: Careful about reusing contact fields

George, work location just keep disappearing for multiple contact records

“This is not happening”, I thought to myself, there are no workflows, no scripts, no – gasp! – triggers on contact entity in this particular implementation. But surely enough, enter a value into the custom work location field and it will disappear shortly afterwards. Then I noticed that it does not actually disappear, it just gets moved to the second line of the address.

Eureka!

Here is what happened: in my previous life as CRM rookie (yes, this implementation is that old), I decided to re-use 3rd line of the address (it’s a 3rd wheel, after all) to hold additional attribute Work Location as requested by the customer. It was all working fine until recently they decided to install and use Outlook client.

  • When Outlook synchronizes contacts with CRM, 3rd line of the address is added to the combined address held in Outlook
  • If there is no second line, the 3rd line gets pushed one up
  • Outlook detects the change in the data and marks the record as updated
  • Lo and behold, 15 minutes later another synchronization pushes the record back to CRM, except that the second line gets updated and work location gets deleted

Diagram: disappearing address field

Lesson learned

If you intend to re-use any of the contact fields, especially parts of the address, think twice about how these fields will be synchronized to Outlook and how clever Outlook UI may alter the content.

Tip #114: Form Field Display Name Fade Out

One of the changes from CRM 2011 to CRM 2013 is that the display name on the form for a field no longer wraps to the next line. It just kinds of fades off into the sunset.

You can fix it by changing the width of the section that the fields is in.

Take a look at the before and after pictures.

Form Field Display Name with Fade

Form Field Display Name with Fade

Edit the Section Width

Edit the Section Width

Form Field without Fade

Form Field without Fade