Tip #1019: Understand decimal precision in Dynamics 365

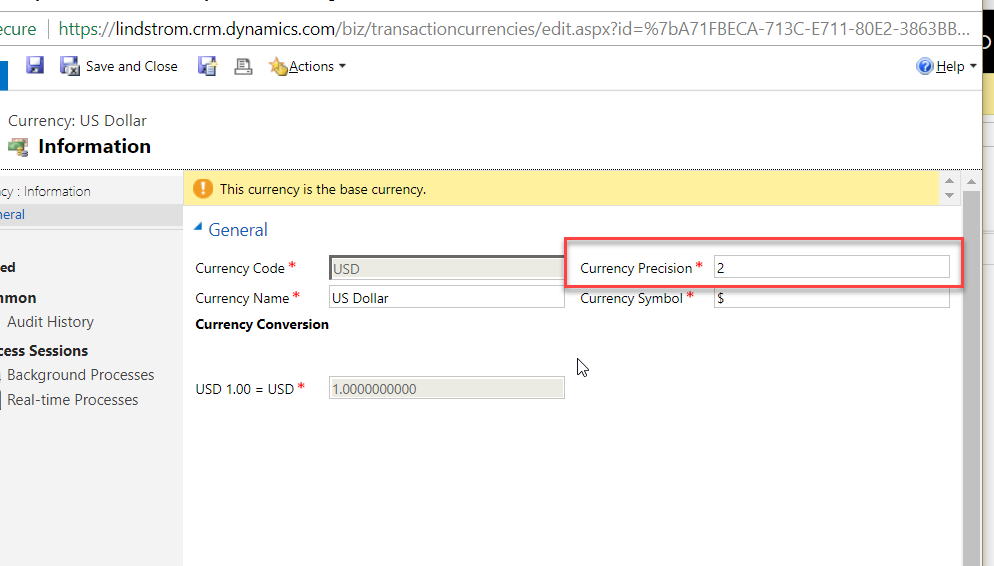
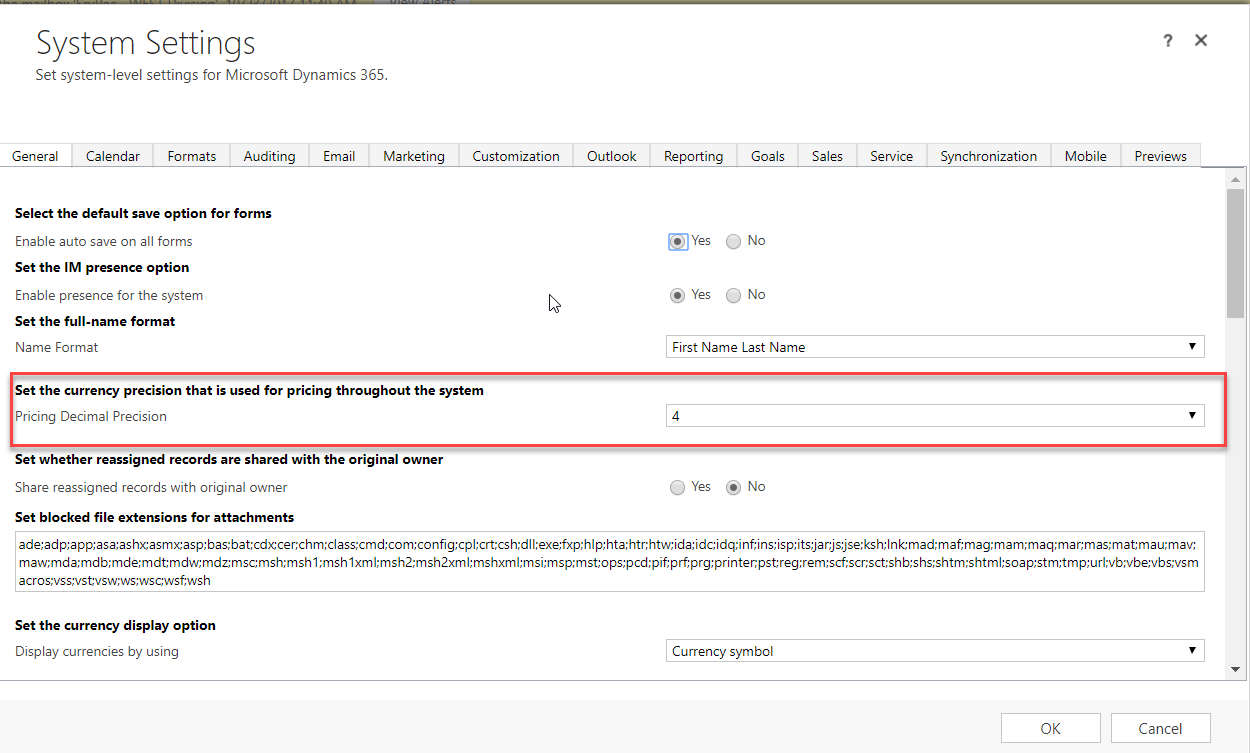
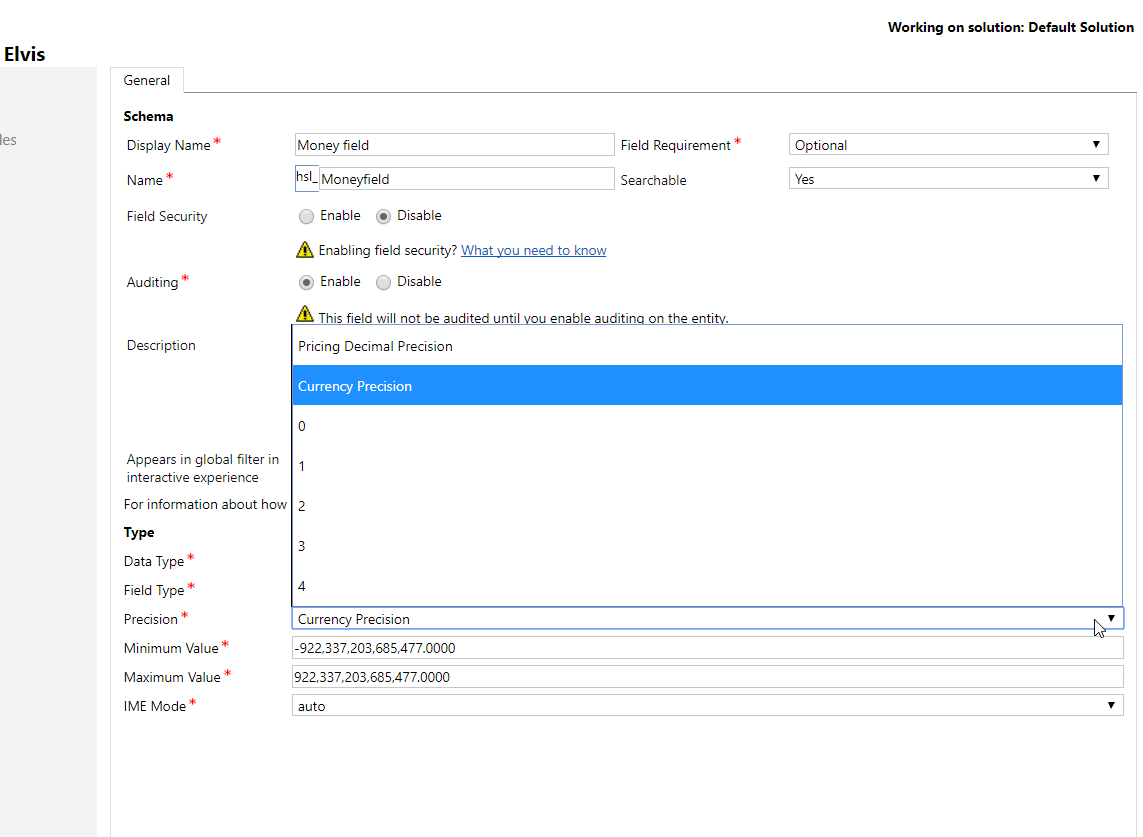
There are three places in Dynamics 365 that determine the number of decimal digits are displayed on money fields in Dynamics 365. If you find a money field is not behaving as expected, you need to know how these three settings work.

  1. Currency level: On the currency record, set the decimal precision. This will determine the default decimal precision to currency fields in CRM.

2. System Settings: In Settings>>Administration>>System Settings, there is a setting specific to pricing fields. If you set this to a different value than the currency default, fields like the unit price on quotes, opportunities, orders, and invoices will display the number of digits selected in settings.

3. Field level: when you create or edit the configuration of a money field, you can choose the currency default setting (the value selected in #1) or a different precision value.


Tip #1018: Automatically create Dynamics 365 records from Social Engagement

This tip comes from Amy Pritts. Send your tips to jar@crmtipoftheday.com.

One of the really cool features of Microsoft Social Engagement is the ability to automatically create records in CRM from social posts. However, you should be aware that there are several steps to make this work.

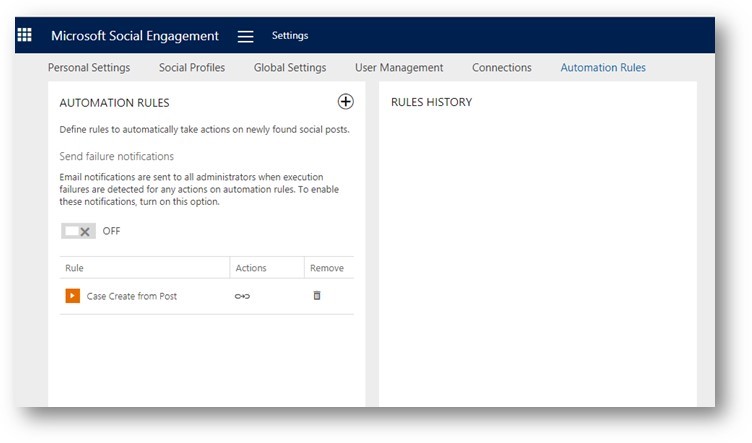
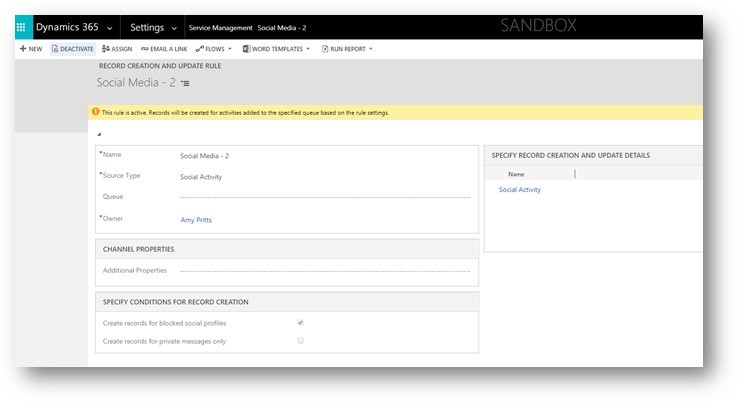
  • To automatically create D365 records from MSE posts, users must set auto create rules both in Social Engagement AND configure record create rules in D365. Simply setting MSE auto create rules for specific entities like Cases to active does not automatically create a Case, it only automatically creates a Social Activity in D365.
  • This seems crazy to me—why would you have to set up specific entities for auto record create in MSE, then? But that’s when I read this caveat in the documentation:

So you have to set up this…

…AND this

Tip #1017: Protect your cell number

Microsoft’s strong focus on security means sometimes they get false positives for people signing up for trials and misdiagnose them as bots or service abusers. If you provision multiple Dynamics 365 trials, chances are you found yourself in this situation more than once. Other scenario where you wouldn’t want to use your number if you have concerns about your privacy when submitting the number for MFA (multi-factor authentication).

Twilio, the voice and messaging service provider (and we have no affiliation with it), has a very extensive toolkit that allows to use a pre-registered number for MFA while still receiving messages on your phone.

  1. Create new Twilio account if you don’t have one.
  2. Register new phone number with messaging capabilities ($1/month for US/Canada number).
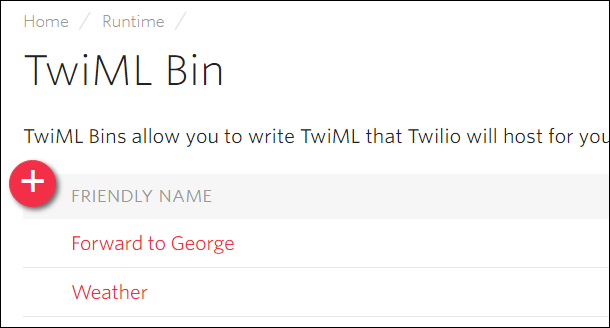
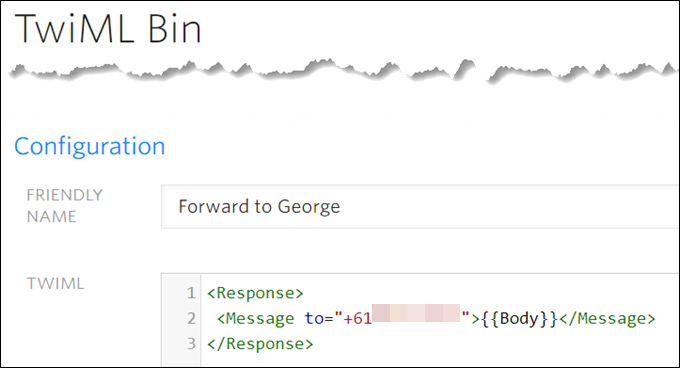
  3. Now can use TwiML Bins to setup message forwarding. Simply create a new Bin in your Twilio account
    TwiML Bins
    TwilML forwarding bin
    and save the following code to it:

    <Response>
       <Message to="+13655550123">{{Body}}</Message>
    </Response>
    

    (Obviously, use your cell number to forward to!)

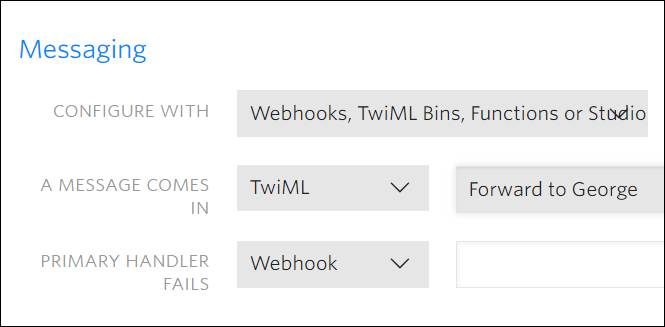
  4. Head to your Active Numbers page, set your Messaging URL to configure with “Webhooks/Twiml,” and select your TwiML Bin from the available drop-down.
    Incoming number configuration
  5. You’re all set!

I do not believe you’re not circumventing or breaking anything as far as MFA is concerned because its purpose is to prove that you have something that others don’t. Could be a phone, could be just a phone number to receive messages to.

Tip #1016: App Designer and disabled sitemap subareas in Dynamics 365

If you “comment out” subareas in the Dynamics 365 sitemap or disable them with the XRM Toolbox sitemap editor, you should be aware that if you edit the sitemap with the Dynamics 365 App Designer, the disabled subareas will be removed from the sitemap.

Why is this a big deal?

The reason this matters is because it is fairly common to comment out standard sitemap links that you don’t want to roll out yet. Then when you need these features, enable them. Let’s say that you have Field Service installed in your environment, but you aren’t ready to use it. If you delete these links from the sitemap, it can be cumbersome to add them all back later. If you disable the field service group links, you can easily re-enable them when you want to add them to the sitemap. But if you edit the standard CRM custom app sitemap with the App Designer sitemap designer, these disabled sitemap areas will be removed.

Recommendation

Based on this behavior, I recommend that you don’t use the App Designer sitemap editor to edit the default Dynamics 365 sitemap. Only use it to create and edit sitemaps for new app modules–for the default CRM sitemap, use the XRM toolbox if you want to disable sitemap subarea links.


Tip #1015: Remove mandatory and locked fields

Tip 1006: “Remove the stuff you don’t need. Doing tickets for internal helpdesk and don’t need entitlements? Turn it off and remove it from the form.”. Easy for Joel to say.

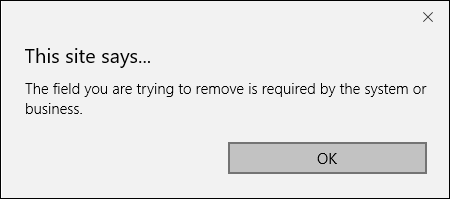
Dynamics 365 has a lot of baggage, both good and bad – let’s see what happens when I create a new Case form. We immediately receive a bunch of fields that are declared to be super important and therefore are locked. Let’s say I don’t case about First Response By but I cannot remove it.

Mandatory field

Lead has a Topic but I cannot remove it because it’s mandatory. Who said that the Last Name is a must have? That’s not quite how it works in some Eastern cultures. You get the picture. Someone over-analyzed the demand, and decided that 80% of customers would like to describe lead using something called topic and what kind of person has no last name?! And that smug decision from years ago made the life of the remaining 20% incredibly miserable.

There are few ways of dealing with mandatory or locked fields:

  • Change the requirement level, publish, then remove
  • Sometimes it is possible to unlock (for sections), then remove. Careful here, it is possible to break some of the system scripts that way.
  • Group those pesky fields on a single section/tab and hide the container. This is probably the safest technique as it won’t break any scripts if they exist and rely on any of the fields.
  • Switch to header or footer and add the field there, Dynamics 365 will now allow you to remove it from the body. Headers will allow piling up the fields with the warning after 4 that the rest is useless.
  • If form to be used in portals, why not to start with Quick Create. Those start as empty shell allowing some neat scenarios. For example, I like to omit Topic from the lead/contact us web form as it does not mean anything to a site visitor. Dynamics 365 will allow record creation without mandatory fields filled in – it’s a UI restriction only. But when Dynamics user opens the full form later on, they will be forced to specify the topic, i.e. to classify the lead, before saving the record. Win-win.

I’d say, whatever were the reasons for making the field mandatory, most likely they do not apply in all or even majority of scenarios. Let me decide where I want to force data entry upon the user. That’d be my ask for Dynamics 365 version 17.

Tip #1014: How to target delegated administrator in apps

I love when people ask a question but then answer it themselves within couple minutes. Take, for example, Steve “RapidStart” Mordue.

Has anyone else experienced issues with attempting to use an App Designer built app with Delegated Admin Role?

Before I could even type my a non-answer stating that only someone insane would try something like that, came in the reply from Steve himself.

To paraphrase: when building an app with App Designer, targeting specific role, and wanting delegated administators to access the app, make sure to include System Administrator as one of the roles for the forms and dashboards. Otherwise delegated administrators will see neither (but “normal” users with system administrator roles will!)

Tîpp Jäår

Delegated administrators are special. They are kind of administrators but without a specific role assigned. Since you cannot assign a specific role to a delegated administrator, the role of system administrator must be assigned to the app explicitly to apply to delegated admins.

Tip #1013: Include attributes that are not there

New Developer Guide, as it turned out, contains a lot of useful nuggets, little enhancements that make developer’s life much easier.

How many times did you need some field values for the use in javascript but didn’t really want to include the fields on the form? Something like lattitude and longitude, for example. Would it mean much to a user if I showed values -33.868820 and 151.209296? But I could definitely use those values to display a map with a pin indicating my current location.

The workaround used to be to add fields to the form but then set them to be invisible. Starting from version 9.0 you no longer need to add attribute to the form, you can instead set the attribute as a dependency for the JavaScript web resource:

  • Attribute will be available within the client API attributes collection.
  • The controls collection of the attribute will be empty.


Tip #1012: Developer Guide of the Future says hello

According to the timestamp on the page, it is the future because, as of the time of writing, there is no place on Earth where 31st of October is a reality.

Developer guide is available

Developer Guide for Dynamics 365 Customer Engagement, version 9.0, the release formerly known as July 2017 Update for Dynamics 365 (online), is now available and I must say, it seems to be organized pretty well and overall first impression is good. Time will tell.

Tip #1011: Case subject/category code strategies

Whether you use the standard Dynamics 365 Case Subject tree, or you use an alternative method and hope that the subject tree dies, categorization of your cases is important if you want to report on them later and analyze your case history. By assigning subjects to cases, you can group cases by category, identify related issues, and spot trends that will be helpful in improving your products and services in the future. By analyzing your case history by subject, you can identify which products or categories have the most issues and perform root cause analysis on these issues.

But if you are starting from scratch, sometimes it is hard to know which subjects you should include, and how your structure should be organized.

My recommendation is start simple. Too often managers want to overload the subject tree with too many options. This can be counter-productive, as customer service agents will find navigation through the list to be cumbersome, and may pick the wrong subject. Start with a handful of subjects and add to it over time based on user feedback.

The subjects that you use will probably differ based on you type of business and how your customer service teams are organized.

Companies that sell products

If you have customer service and sales teams ordered by product line, then categorizing cases by product line usually makes sense with subcategory types that clarifies the question or issue.

  • Product A
    • Sales Question
    • Technical support question
    • Returns
  • Product B
    • Sales Question
    • Technical support question
    • Returns
  • Product C
    • Sales Question
    • Technical support question
    • Returns

A Software Company

The following example is for a software company that has teams separated by function and technical tier.

  • Bug
  • Feature Request
  • Sales Question
  • How To
  • Technical Issue
  • Cancellation

Corporate IT

If you are using CRM to support internal helpdesk tickets, you probably will want to categorize by IT area and team handling the request.

  • Desktop Hardware
  • Desktop Software
  • Server
  • Networking
  • New Employee
  • Office 365
  • CRM
  • Change Request

By Department

In some organizations where issues are strictly handled by each department, categorizing by department can make sense.

  • Software Development
  • Sales
  • Information Technology
  • Human Resources
  • Mail Room
  • Operations
  • Shipping

How did you arrive at your case subject/category structure? Let us know in the comments..

Tip #1010: Use synchronization filters

I have a customer who is running Dyn 2016 8.0 On-prem and Server Side Sync. One of the accounts has 12000+ appointments and when/if we do a “Test and Approve” of the mailbox it seems that the resync of the mailbox with the Exchange Server (ver 2010) takes a very long time, often over 12 hours.

(That was Gustaf “Surströmming” Westerlund asking for help, if you must know)

Joel to the rescue

Update said user’s sync filter for appointments to start date on or after 1-Sep-2017 or something like that. NO reason to sync old/completed appointments.

Tîpp Jäår

Be smart, be like Joel, and start using synchronization filters to exclude old or irrelevant data. That can definitely speed up both initial and ongoing synchronizations.

Another common scenario is when a user account is used to perform initial data import or integration, and that user ends up owning bazillions of contacts. Default synchronization filter is My Contacts which will attempt to drag all those records across into the user’s address book. Smart move would be to adjust the filter and exclude contacts from the initial synchronisation altogether and then, over the time, start bringing the relevant records in (once you figured out what does “relevant” mean to that poor user). You can use last contact date, for example.