Tip #783: Video Guide to Dynamics 365 Visual Business Process Flow Editor

FlowchartsIn this video we look at new updated Business Process Visual Editor that is included in Dynamics 365. We look at how things are laid out, as well as some of the new options that are available as part of the editor.

YouTube player

Give us your feedback, all of it: good, bad, and ugly, I’m sure we can take it. Suggest new topics either in comments or by sending your ideas to jar@crmtipoftheday.com.

Don’t forget to subscribe to http://youtube.com/crmtipoftheday!

Tip #782: Hyperlink from PowerBI to Dynamics 365

Have you ever wished you could link from a table row in Power BI to over to Dynamics CRM – allowing users to filter and view the records in a grid or matrix in PowerBI and when they want more detail, they can click to open the corresponding record CRM?

Wish granted!

To begin: ensure you’ve added the entity’s primary id (GUID) to the dataset for the entity you want to build the hyperlink for.

Add a new column in the entity using this formula as a template:

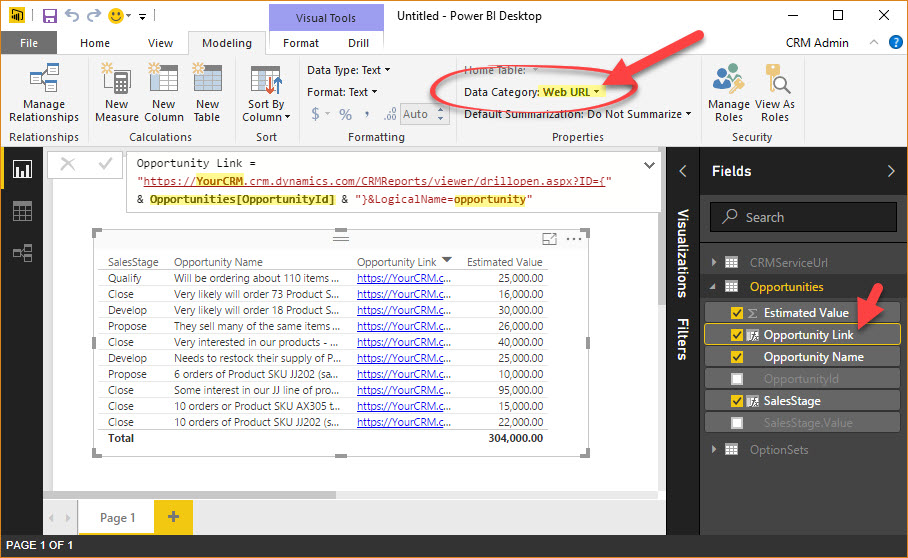
Opportunity Link = “https://yourorganization.crm.dynamics.com/CRMReports/viewer/drillopen.aspx?ID={” & Opportunities[OpportunityId] & “}&LogicalName=opportunity

tip-of-the-day-hyperlink-from-powerbi-to-crm

  1. Give the link a name (in this case it’s to the opportunity table, so I’ve named it ‘Opportunity Link’)
  2. Change the first part of the URL (up to the /CRMReports portion) to match the URL for your CRM organization.
  3. Opportunities[opportunityid] is the reference to the recordid field (guid) in the “opportunities” table
  4. Replace ‘opportunity‘ with the schema (logical) name of the entity from CRM.
  5. Select this new column and on the ‘Modeling’ tab, change the ‘Data Category’ to Web URL.
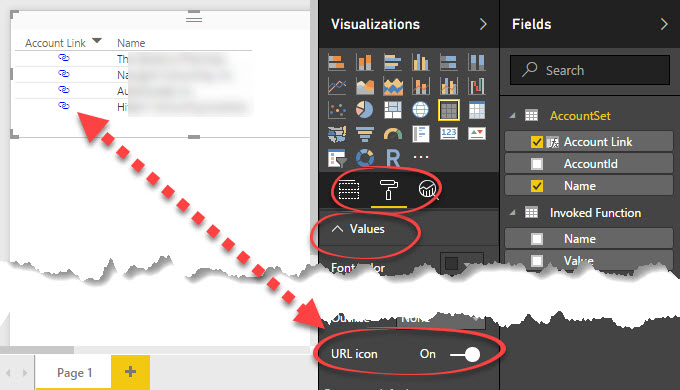
  6. Bonus tip thanks to @CRMChartGuy – On the Formatting tab of the entity, expand the ‘Values’ area and change the ‘URL icon’ setting to “On” – This will change the URL to an icon that looks like a couple of links of a chain. – nice!

Enjoy!

Tip #781: Where are my folders?

So you want to use folder tracking, but when you go to “Configure Folder Tracking Rules,” you don’t see any of your folders.

Check your security role–on the “Business Management” tab, verify that the role has user-level create, read, write, delete, and append privilege for “Mailbox Auto Tracking Folder.”

tracking-mailbox

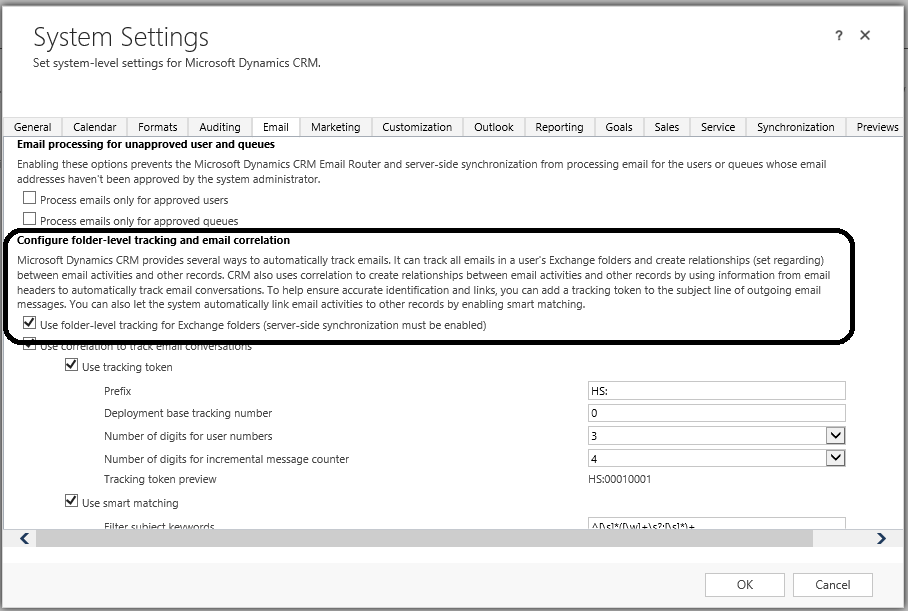
Also, verify that folder tracking has been enabled for your organization. Go to settings–> Email Configuration–> Email Configuration Settings. Check the box to use folder-level tracking for Exchange Folders under the Configure folder-level tracking and email correlation section.

email-settings


Tip #780: When trial is “sorry, that didn’t work”

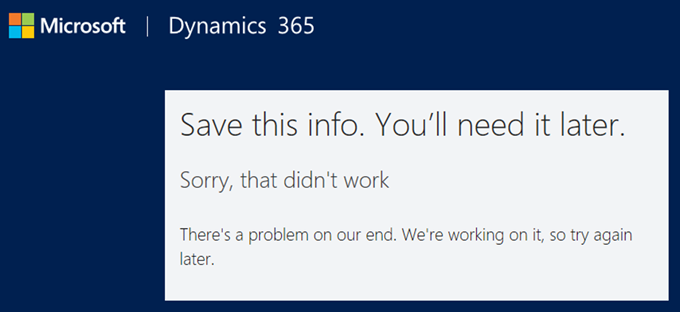
During the provisioning of new Dynamics 365 trial you may find yourself in the situation when provisioning process does not complete and you receive the “Sorry, that didn’t work” error message:

Sorry that didn't work

Fubar symptoms include:

  • Office portal works just fine
  • CRM trial is actually provisioned and can be found under Billing > Subscriptions
  • No CRM licenses assigned even to the global administrator
  • https://yourorg.crm.dynamics.com URL does not resolve

To push CRM trial to completion, type or copypaste the following URL into your browser: https://port.crm.dynamics.com/G/setup/index.aspx. At this point you’ll be presented with the Dynamics 365 trial provisioning screen that allows you to select Sales, Customer Service, or none of the above, with Field Service and Project Service coming soon.

Notes:

  • The above URL is for US, different regions will have https://port.crmX.dynamics.com/G/setup/index.aspx with 9 <= X < 1.
  • If you provision Office 365 trial first, add Dynamics 365 trial to it, and get stuck, the steps above still work but DNS may not resolve. Edit the instance and change the instance URL by hands should fix that one.

Tip #779: SaRA goes web

SaRA for CRMPreviously on SaRA:

In this episode, SaRA adds new diagnostic scenarios for web sign-ins:

  • Verify network connectivity
  • Verify sign-in credentials
  • Retrieve the list of Dynamics 365 instances for the tenant. If there is more than one instance, you are prompted to select which instance you cannot access.
  • Verify user has a Dynamic 365 license
  • Check if the Dynamics 365 instance has access restricted using a security group.
  • Verify connectivity to URLs accessed when signing into Dynamics 365
  • Passive sign-in checks and SSL certificate verification

Original blog post has some additional details and nice screenshots for additional details.

I’m not sure what to make out of the Firefox absence from the list of browsers – either it’s bulletproof or team didn’t get around to cracking it yet.

Tip #778: Video guide to Dynamics 365 navigation and basic features

Bird eye viewIn this high level video, we take our first look at Dynamics 365. We walk through the new App based navigation, look at the new Editable Grid feature, and talk about some of the new changes around Business Process Flows.

YouTube player

Give us your feedback, all of it: good, bad, and ugly, I’m sure we can take it. Suggest new topics either in comments or by sending your ideas to jar@crmtipoftheday.com.

Don’t forget to subscribe to http://youtube.com/crmtipoftheday.

Tip #777: So long Microsoft.Xrm.Client and thanks for all the fish

So long and thanks for all the fishAt the beginning of the year we reported some ongoing issues with CrmServiceClient and recommended continuing use of Microsoft.Xrm.Client. The issues reported have been resolved and, as of now, there are no compelling reasons to use Microsoft.Xrm.Client.

If you’re starting new project then the choice is trivial – simply use nuget packages for XrmTooling and you’re all set.

If you have an existing project that utilises Microsoft.Xrm.Client, consider refactoring to replace it with CrmServiceClient. One good reason is that Microsoft.Xrm.Client is no longer distributed as part of SDK and won’t be developed any further. CrmServiceClient, on the other hand, will transition you from SOAP to Web API without any or with very little efforts on your part. And don’t forget support for new features like S2S authenticationCrmServiceClient will support it at some point while you have no chance with Microsoft.Xrm.Client.

Tip #776: Power BI tiles on Dynamics 365 dashboards

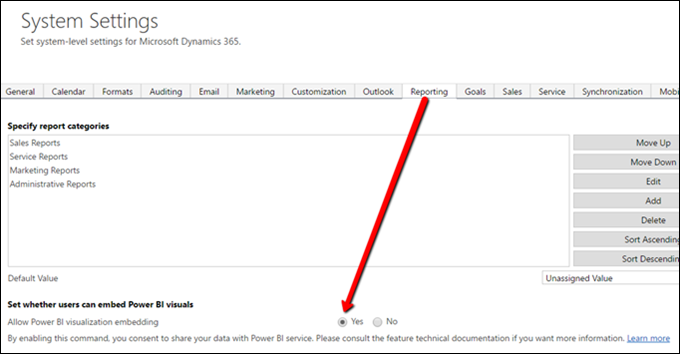
Tiles puzzleOne of the cool new features in Dynamics CRM 365 is ability to embed Power BI tiles into the dashboards. However, as Andrhe “I’ve got 88 in my handle” Margono has discovered after spinning off a brand new trial, the option to add Power BI tiles to the Dynamics 365 dashboard was nowhere to be found. Turns out, this is an option that needs to be enabled first in Settings > Administration > Reporting > Allow Power BI visualization embedding:

Enable Power BI tiles

With the fine print of data privacy sharing (do not ignore this one – you are about to share your data with Power BI service and hence all the users who have access to the service, whether they have permissions to access this data in CRM or not).

Once the option set it to Yes, the functionality lights up and Power BI tiles can be added to the Dynamics 365 dashboard.

Tip #775: Change The Default Order of Activities on the Social Pane

If you are like me, you have a love/hate relationship with the Social Pane.  A conceptually cool widget on an entity form, it is where Posts (do you still use these?), Notes, Yammer, OneNote, OneDrive for Business and our focus of this tip…Activities reside.  Why do I hold any disdain for this collection of valuable information?  Because it is for all intents and purposes a black box.  There is VERY little that you can configure on the Social Pane, but in this tip I’ll show what configuration you can actually perform on the social pane…. modifying the default sort and order of the activities on the Social Pane.
By default, the sort and order of Activities on the Social Pane displays by Last Updated.

screenshot

In our scenario, we will modify this sort order to Due Date.  From the Form Editor, click on the Notes Properties control (Activities Tab) and then Change Properties.  Next, click on the Activity Wall tab.  In the data section, you will see two option sets for “Sort the Activity Wall according to” and “Order by”.

Change the value in the option set to Due Date and click Save.

screenshot2

Once this form change is saved and published, you will see the changes reflected in the Social Pane!  Cool, huh?

screenshot3

Here’s a bonus tip: Once your new default sort and order is set you have one additional bit of capability within the Social Pane.  You can filter what is displayed in the pane by either status of all activities (In Progress or Overdue) as well as by activity type!

screenshot4

screenshot-5

Tip #774: Hierarchy Security and Personal Views

If you use hierarchy security, you should be aware that it will grant visibility to user’s personal views to their managers (or superior positions). This means that a manager may have many more personal views show in his or her view list, and users should be advised not to create views with names like “Accounts my boss is micromanaging.”

(H/T to Jeff Braeunig for this tip)