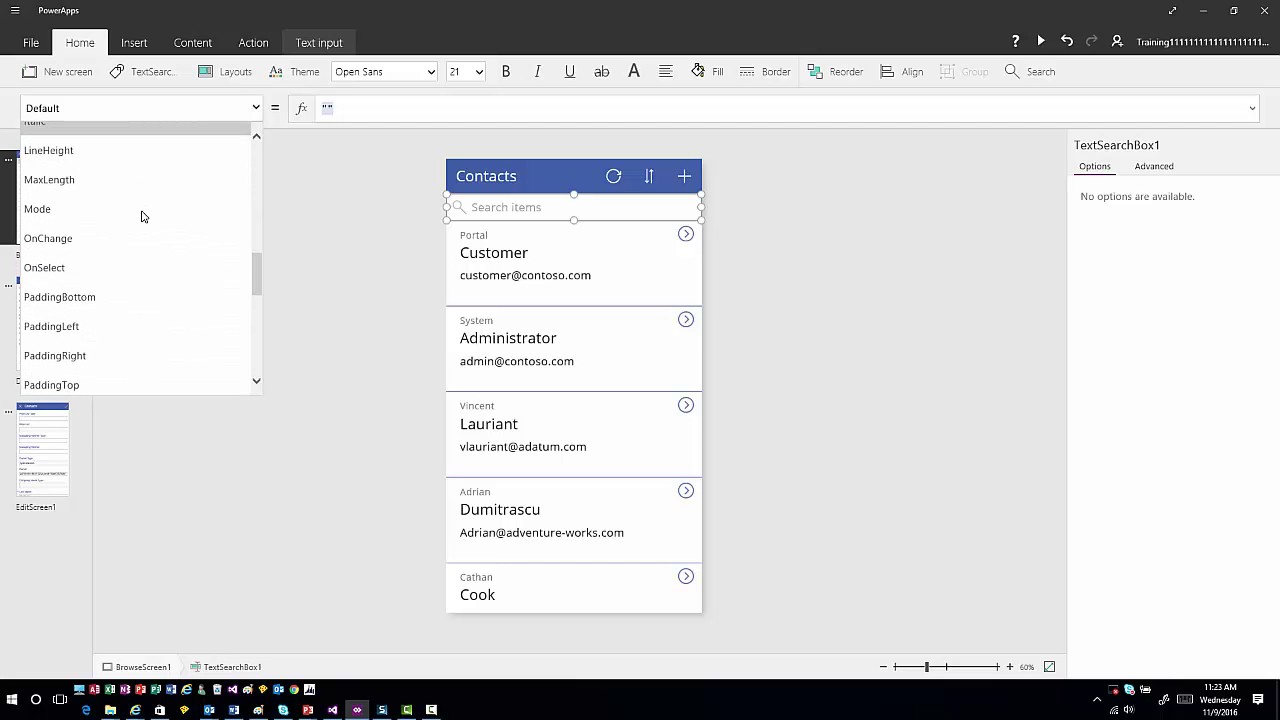
Tip #771: Dynamics 365 Developer Toolkit is available

Developer toolsGood news for the developers – after long delays and missed Visual Studio releases, Microsoft Dynamics 365 Developer Toolkit has been released as a free Visual Studio extension and is available for download.

The first thing you’d want to do after the installation is to let the tool know where your tools live. Go to Tools > Options in Visual Studio, select CRM Developer Toolkit > Tool Paths and set paths for Plugin Registration tool and SDK bin folder. Then restart Visual Studio.

This version support VS 2012 – 2015, and requires the use of the CRM SDK 8.2 (Note: it does not require you to build for the 8.2 SDK, but it does require the 8.2 SDK to be present on the machine hosting it). The public beta version support Plugins, Workflows, Class Generation, Custom Operations, Workflow generation, debugging and more.

Keep in mind that this is public beta 1 of the toolkit so some bumps are expected.

Tip #770: Power to the users and developers with Chrome extension

Shoot yourself in a footIf you are developer or power user, and don’t mind shooting yourself in a foot, check out Chrome Extension for Dynamics CRM Power users, available as a Chrome extension or as a birthday suit a.k.a. source code.

Just some of our favorite features:

  • God Mode. Makes all mandatory fields optional. Makes hidden fields/tabs/sections visible. Makes read-only fields editable.
  • Record Properties. Displays information about current record like Created By, Created On, Modified By, Modified on, Permissions and Owner.
  • Changed Fields. Highlights fields in the form that have been changed, but not saved yet.
  • Minimum Values. This is intended for use on a new record. It fills out minimum values for all required fields.

This is a tiny subset of all the features available so do check it out when you have a minute and save yourself hours.

Tip #769: Careful who you use as certificate authority

Fake certificateSometimes we need to call web services from a plugin or a custom workflow activity. For CRM Online it means calling it from the sandbox and there are certain restrictions that apply to the network access.

These restrictions are clear and well understood, however, if you call service over https protocol, one addition restriction applies: the certificate of the site you’re connecting to must be issued by a trusted authority.

Not all authorities are equal and the fact that your client browser trusts a particular authority, does not mean that CRM server will follow the suit. If you try to access a web service over https using HttpClient (or any other client), and certificate issuing authority is not trusted, you will receive a generic error with the exception details containing some particulars:

The underlying connection was closed: Could not establish trust relationship for the SSL/TLS secure channel. System.Security.Authentication.AuthenticationException: The remote certificate is invalid according to the validation procedure.

What certificates seems to be fine on the client side but may cause some drama when accessed in CRM Online? Those issued by (what turns out to be) dodgy authorities of WoSign and StartCom (yours truly was actually a fan of StartCom until they got into the dubious partnership with WoSign), and deservingly so. Unfortunately, certificates issued by new and cool kid on the block, Let’s Encrypt, also got caught, which is not cool at all.

Interestingly enough, all of these certificates are just fine on CRM On-premises (hosted on Windows 2012 R2 server).

Bottom line: if you are using a https web service in a plugin or a custom workflow activity in CRM Online, test it thoroughly.

Tip #768: Avoid running out of memory when using CRM context

Low memoryWhen you process large data in your code, email attachments, for example, there is always a danger of running out of the available memory. Consider this code dealing with the email attachments:

using (OrganizationServiceContext crmContext = new OrganizationServiceContext(crmSvc))
{
    var attachments = 
        from a in crmContext.CreateQuery("activitymimeattachment")
        select new {
          body = a.GetAttributeValue<string>("body")
        };
		
    foreach (var att in attachments)
    {
        ProcessAttachment(att);
    }
}

The danger here is running out of memory on retrieval of the file attached to the CRM notes. Even though from C# point of view everything is clear, the culprit here is OrganizationServiceContext that keeps all the data retrieved via LINQ queries in the context.

Possible solution to the problem include:

  • Use pagination and re-initialize context after a handful of pages processed. The main drawback is that the entire context is re-initialized, including the data you didn’t have to.

    while (recordsExist)
    {
        pageNumber++;
        recordsExist = true;
        using (OrganizationServiceContext crmContext 
    		= new OrganizationServiceContext(crmSvc))
        {
            var attachments = 
               from a in crmContext.CreateQuery("activitymimeattachment")
               select new {
                  body = a.GetAttributeValue<string>("body")
               };
            foreach (var att in attachments
                .Skip(pageNumber)
                .Take(pageSize))
            {
                recordsExist = true;
                ProcessAttachment(att);
            }
        }
    }
    
  • Remove (detach) entities from context immediately after processing. Argument for the function is an Entity and therefore you won’t be able to use anonymous types in LINQ select which could somewhat affect the performance.
    var attachments = 
        from a in crmContext.CreateQuery("activitymimeattachment")
        select a;
    foreach (var att in attachments)
    {
    	ProcessAttachment(att);
    	crmContext.Detach(att, true);
    }
    

Tip #767: Server-to-server authentication is here

HeadlessWoot, woot! At long last we can create passive clients – the ones that do not have someone sitting in front of them. Clients like web sites or services – and authenticate them without using username and password AND get the magic bearer token that is good to use in Web API.

The detailed walkthrough is available, describing in glorious details the process of creating a web site (MVC applicaton) that can talk to Dynamics CRM. Don’t be put off by references to the web sites – you don’t have to be building one to take advantage of the feature. In fact, substantially lesser efforts required to create an equivalent console application that can be deployed as a Web Job and run unattended as a service.

  1. Register your application on Azure AD. No need for multi-tenant, single-tenant will do. What I found is that if you are using https://portal.azure.com, it does not create the application instance locally requiring the logon and consent. Easy to say with the web site, not so much with a console application. If instance is not created you will not be able to create an application user (see below). There is probably another way to do it but using old portal does immediately create an instance.
    Local Azure app
  2. Add permissions to access CRM and generate your key (same instructions)
  3. Create an application user. This is where the good stuff happens, we’re allowing a specific application to access CRM without a consent from a user.
  4. Create console application in Visual Studio and add nuget packages
  5. You are good to go!
  6. The code looks like this:
static void Main(string[] args)
{
    string organizationUrl = "https://notarealone.crm.dynamics.com";
    string clientId = "6db9cae3-dead-beef-dead-7179d4958975";
    string appKey = "get you own";
    string aadInstance = "https://login.microsoftonline.com/";
    string tenantID = "your tenant id";

    ClientCredential clientcred = new ClientCredential(clientId, appKey);
    AuthenticationContext authenticationContext = new AuthenticationContext(aadInstance + tenantID);
    AuthenticationResult authenticationResult = authenticationContext.AcquireToken(organizationUrl, clientcred);
    var requestedToken = authenticationResult.AccessToken;
            
    using (var sdkService = new OrganizationWebProxyClient(GetServiceUrl(organizationUrl), false))
    {
        sdkService.HeaderToken = requestedToken;

        OrganizationRequest request = new OrganizationRequest()
        {
            RequestName = "WhoAmI"
        };

        WhoAmIResponse response = sdkService.Execute(new WhoAmIRequest()) as WhoAmIResponse;
        Console.WriteLine(response.UserId);
    }
}
static private Uri GetServiceUrl(string organizationUrl)
{
    return new Uri(organizationUrl + @"/xrmservices/2011/organization.svc/web?SdkClientVersion=8.2");
}

Last but not least, to quickly find your tenant id, select application in either Azure portal and ask for Endpoints, your tenant id will be splattered all over endpoint urls as a guid that follows the domain.

Tip #766: Drop your full text index the supported way

As reported in the Dynamics forum, there are known issues with upgrading CRM On Premises to CRM 2016 SP1 if you have full-text indexing enabled. You will get the following error:

System.Data.SqlClient.SqlException: Cannot drop index ‘cndx_PrimaryKey_OpportunityProduct’ because it enforces the full-text key for table or indexed view ‘OpportunityProductBase’.

Various posts include SQL scripts to remove the full text index from your CRM database. While these work, they are risky and not supported by Microsoft.

So how do you remove the full text index in a supported way?

  1. Go to Settings > Administration > System Settings >General tab.
  2. Select No next to Enable full-text search for Quick Find. Uncheck any entities that you previously selected to use full text indexing for Quick Find.
  3. Wait 24 hours. This is to allow the indexing service to drop the full text index.
  4. After 24 hours you should be able to successfully upgrade to SP1.

After upgrading, you can re-enable full-text Quick Find.

Tip #765: Dynamics 365 for Team Members – fine print

Team membersOne of the new licenses is Dynamics 365 for Team Members Enterprise Edition, starting at $10 per user per month. As attractive as it sounds, this license comes with some caveats. Before shelling out your credit card and getting this license for all of your users, read the Dynamics 365 Enterprise Edition Licensing Guide, and get a magnifying glass for small print. But here is what I think is important (as inspired by Jukka “Kalsarikännit” Niiranen‘s comments):

The Good

  • Full Read across all Dynamics 365 Applications. Very nice, no room to misinterpret this one.
  • Edit access to Accounts, Contacts, Activities, and Notes. “Glamorized” address book functionality but couple it with Outlook and suddenly it’s quite powerful mechanism for uniform tracking customers interactions in your organization.
  • Full access to Knowledge Management, Interactive Service Hub for KM. Nice, ability for everyone to contribute and publish.
  • Ability to participate in projects by recording time & expenses. Can apply for projects as well.
  • Full access to custom entities as long as they stay within the license restrictions, i.e. no sneaky plugins updating opportunities
  • PowerApps access (within the licensed entities boundaries)
  • Portal or API access Only: Submit cases and read/update Cases user has submitted. Great for ESS portals where users can submit tickets.

The Bad

  • Edit access, where it’s permitted, is not spelled out. Does that include Delete? What about Append as in create a new lookup field on a contact pointing to a custom entity?
  • Granted rights are “for their own use and not for, or on behalf of, other individuals”. “On behalf of” as in “John Unlicensed asked me to update an account”? Or as in “you cannot edit an account owned by another user”?
  • PowerApps and API access – overlap is not clear. Looks like I can create a custom mobile app that allows team members to submit cases but am I allowed to create a PowerApp doing the same?

The Ugly

This one is so confusing, it’s worth copying verbatim. “If the custom entity is based on or replicates the functionality of entities included in Microsoft Dynamics 365, or if the entity links to entities included in Microsoft Dynamics 365, then users accessing the custom entity must also be licensed to access the included or replicated entity. For example, users creating an entity that replicates the cases entity for a ticketing system would still require the user to be licensed for cases. In other words, customizations may only be performed against entities users are licensed to access.”

“Based” I understand, “links” I understand, “replicates” – this is so fuzzy I don’t know where to begin. Say, I create “Deal with it” custom entity with a title and a deadline. So far so good. Then I link it to the customer. Is it a ticketing system yet? How about if I add some queuing and deploy workflows to route this item between users. Have I replicated cases yet? Add hierarchical relationship, some status code transition rules. Are we there yet?

As Jukka pointed out, what about custom entities that are clearly out of the contention for now but may overlap with the functionality released by Microsoft in the future? Will you suddenly find yourself in a violation of the licensing agreement?

I can see the intent – nothing new here, this kind of licensing has been around since Microsoft Access 1.0 days – but definition of “replicating” desperately needs to be expanded and explained using more detailed samples.

Good again

Team members license is designed as a successor to the ambiguous essential license and, despite some confusion and somewhat fuzzy definitions, it is a huge improvement. My take? Get it for everyone in your organization, make people to share their customer communications via CRM and then see if anyone requires more – and there are plenty of other licenses to choose from.

Tip #764: How to customize schedule board slots

UPDATE 03-JUL-2018

Following the discussion in the comments section: since version 8.2 customized booking doesn’t apply when using the schedule board daily, weekly, or monthly views. The good news is that this feature is on the roadmap!

Original tip

Schedule boardSchedule board is one of the centerpieces of the Dynamics 365 for Field Service (yep, that’s the new name). But every time we deployed field service, we’ve been asked to change the default layout that includes Work Order number, and start and end times.

Field Service Documentation defines Scheduler Field Service slot text template as

Enter HTML code to define the text and format that is displayed in the Field Service bookings on the schedule board.

which is not much of a help without the knowledge how to refer to the fields of the Work Order and related entities.

Partner documentation is even more condenscending in the assessment of our abilities:

This is an advanced option! Do NOT try it unless you know HTML.

Well, duh, I know HTML, I’ve been using interwebs since 1988. Long story short:

  • The template is a <div>block. You can try other elements but we found that wrapping it as a div gives enough flexibility and containment.
  • Fields can be referred by logical name using {} notation.
  • Fields from the parent entities can be referred to using {relationship_name.field_name} notation. Nesting works up to two levels.
  • Primary entity is Booking Resource Booking, start there and work your way up. First step is to get to the Work Order which is msdyn_msdyn_workorder_bookableresourcebooking_WorkOrder relationship.
  • This information is to be read when user is looking at the board. The moment user starts interacting, tooltips and details panel become available to display any additional information.
  • Beware of the size of the slot. Whatever fits in hourly layout, most likely will be truncated in daily.
  • Changes are immediate, there is no publishing cycle.
  • If you get it wrong, default template will be used.

Schedule slotWe have a customer who has quotes linked to Work Order so their current template looks like this (and produces the layout in the image)

<div>
Quote: {msdyn_msdyn_workorder_bookableresourcebooking_WorkOrder.foobar_quoteid}<br/>
{msdyn_msdyn_workorder_bookableresourcebooking_WorkOrder.msdyn_city}<br/>
{msdyn_msdyn_workorder_bookableresourcebooking_WorkOrder.msdyn_account_msdyn_workorder_ServiceAccount.name}<br/>
{msdyn_msdyn_workorder_bookableresourcebooking_WorkOrder.msdyn_account_msdyn_workorder_ServiceAccount.telephone1}
</div>

P.S. Don’t listen to Neil “New CRM Release – New Country” Benson who will tell you he was the one helping me out to figure out the layout.

Tip #763: Video introduction to PowerApps

Mobile developmentIn this video we introduce PowerApps. We will look at how to create an app and working with basic controls including creating a button to invoke a flow.

YouTube player

Give us your feedback, all of it: good, bad, and ugly, I’m sure we can take it. Suggest new topics either in comments or by sending your ideas to jar@crmtipoftheday.com.

Don’t forget to subscribe to http://youtube.com/crmtipoftheday.

Tip #762: Good news for Campaign Monitor fans

VaporwareWe rarely if ever post vendors news but considering the official demise of Dynamics Marketing, this one is hard to ignore.

We’ve long been a big fan of Campaign Monitor, the (proudly Australian) vendor very much focused on helping to create beautiful and actionable emails “your customers can’t ignore”. And they just announced integration with Dynamics CRM. Focusing solely on building marketing lists and pulling customer information into Campaign Monitor itself, it does not look like a product in the same league as ClickDimensions but then, again, it’s not pretending to be.

If you have Dynamics CRM and are Campaign Monitor user/fan, this is something worth exploring and it certainly gives you a very good immediate (and inexpensive) alternative to the Dynamics 365 for Marketing that is not going to see the light of the day until Spring 2017.