Tip #1262: Dynamics 365 Mobile Offline: it’s baaaaack!

Remember me?

When Dynamics 365 v.8 was released, mobile offline was a big deal. But when we got to v9, the feature was turned off due to stability issues.

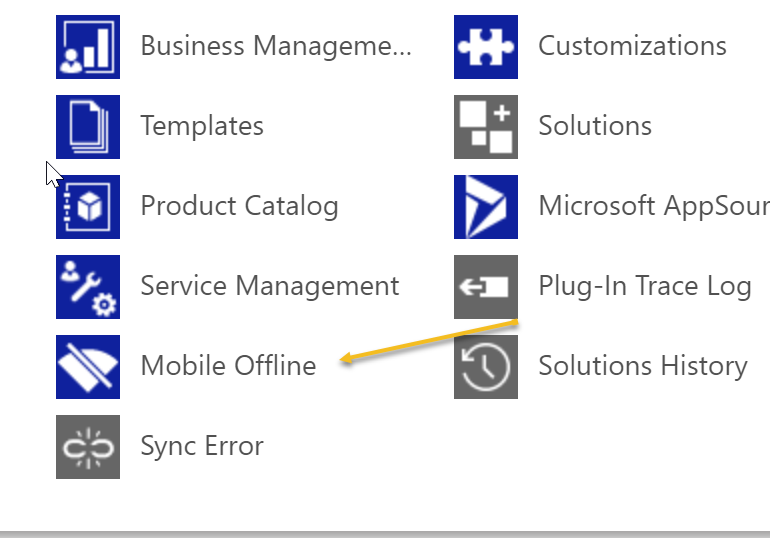
Well good news, it is now back. You can configure offline profiles from the classic/advanced settings area.

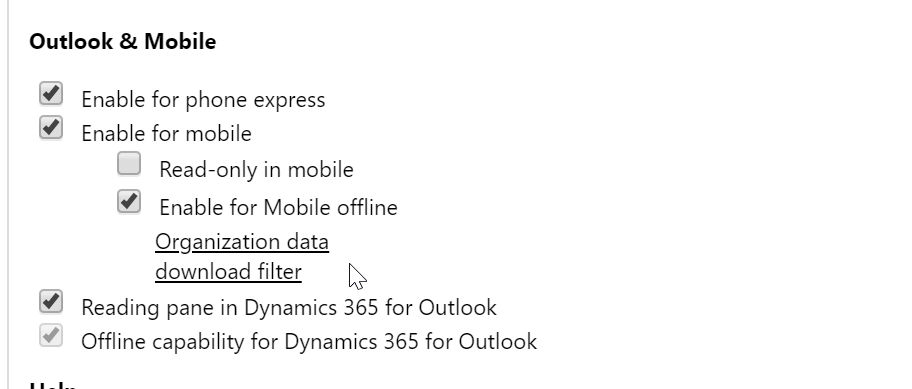
To use offline mobile, set the organization data download filters on the entity configuration


Then in settings, specify what records should be taken offline for the user–remember the way it works is the organization rules specify the pool of data to be available offline, and the user profiles determine what subset of that data the user gets.

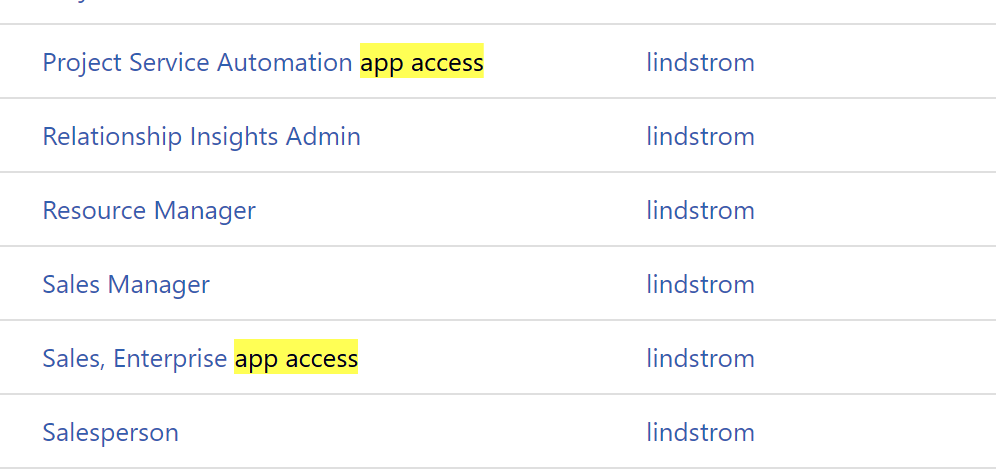
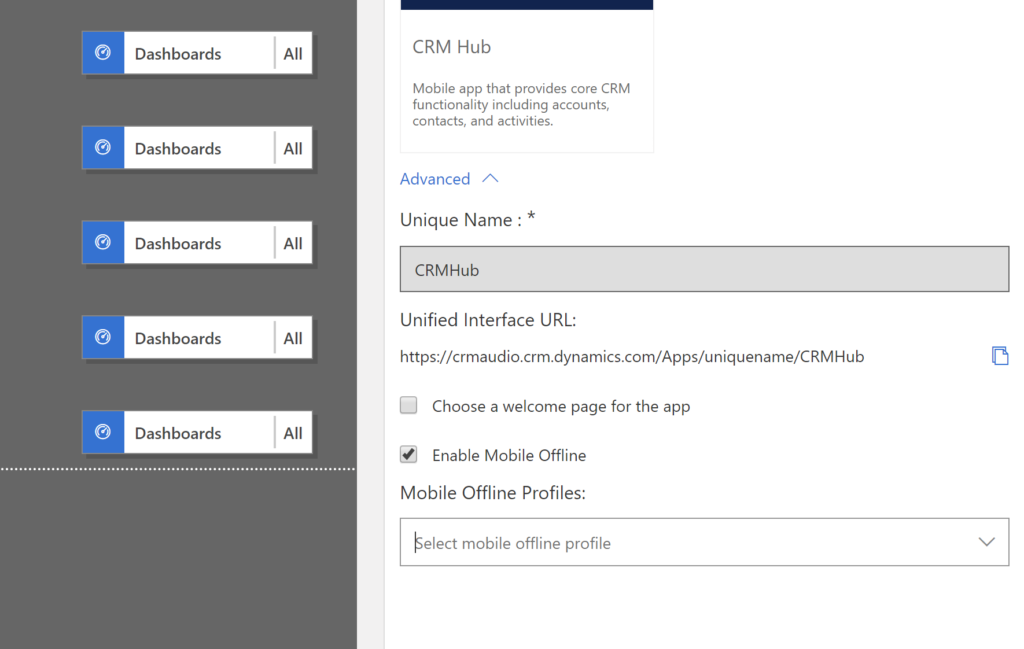
One thing that is different from the original v8 release is the offline profiles are now tied to model driven apps. In the properties of the app (click on the app name in app designer) you can enable an app for mobile offline, then associate what profile should be associated with the model driven app. This way if users switch between multiple apps, they will have the data that they need for the selected app.


See the full documentation here:
https://docs.microsoft.com/en-us/dynamics365/customer-engagement/mobile-app/v8/go-mobile/work-offline

Are you using the offline feature? Let us know how it is working.

Tip #1261: Get BAD & MAD in Hawaii

Is there a plan for new Masterclasses in 2019? These classes seem the way to go to be future proof and finetune our current methods.

From the email

Good news! We are opening BAD season straight after the Business Application Summit that takes place in Atlanta on June 10-11. At the summit you’ll hear about a lot of new things, but there won’t be any time to digest. That’s where Busines Application Developer (BAD) Masterclass picks up and breaks it all down for the developers and architects. And don’t just take our word for it.

Very much enjoyed. Two days full of knowledge, learning and excitement. Was a great experience to learn new things from such a great personalities.

– Anagha

Why Hawaii? It is literally half way between US & Australia, where we live. If you are coming to BAS all the way from Asia, Australia, or New Zealand, why wouldn’t you stop for couple days, recharge the batteries, and learn something new?

Wait, are you MAD?

We’ve been repeatedly asked not to let developers have all the fun. We listened. Introducing Managing Application Developers (MAD) Workshop.

Managing your business application developer team doesn’t have to be difficult. In this half-day workshop we’ll discuss communication strategy, common misunderstandings between business and technical teams and learn about leading your team with a good application lifecycle plan. Some of the planned discussion topics:

  • Can you fire all developers now?
  • What are your developers not telling you?
  • Make peace between developers and citizens

MAD Workshop runs in parallel with BAD Masterclass and is designed for team leaders, project managers, CTOs, CEOs, and all other people who are actually responsible for the teams, technology, and, ultimately, projects success.

While your developers are learning BAD, discover how to make the full use of that knowledge. Register your developers and get MAD for FREE!

Register

Follow the links, read the agenda and register:

See you there!
Julie, David & George

Cover photo by unsplash-logoJohannes Hohls

Tip #1260: Use App Access Roles

If you use any of the new Microsoft solutions/apps for Field Service, Customer Service, PSA, or marketing, you will notice some new roles appear in your security role list that contain the works “app access.”

We’ve discussed all of the reasons that model-driven apps may not work correctly for users. The most common reason is that the user doesn’t have a security role with access to the model-driven app.

While you can grant any role to any app, this gets messy. If you give one of your primary roles access to an app, you are giving everybody with that role access to the app.

If you are going to deploy numerous apps, you will find yourself in situations where you want to grant access to the app to selected people, and not everyone.

The beauty of the app access role design is it lets you easily control access to the app without modifying your primary security roles. You can simply add the Field Service app access role to any user to make the Field Service app show up in their app list, and you can remove that security role to make their access to the Field Service model-driven app disappear..

You also may want to follow this design pattern for your custom model-driven apps. Say you are deploying a bank teller app–simply create a blank role called Bank Teller app access, then only assign this role to the app (other than System Administrator and Configurator, which don’t count).

Then for every user for which you want enable access of the Bank Teller model-driven app, simply add this role.

***Note–remember that this grants access to the app, but does not give them access to dashboards and data components in the app.

Summary: Separate app access and data security for maximum flexibility.

Tip #1259: Can non-developers really create PowerApps?

I’m seeing a common reaction in the Power Platform community when wizards like Scott Durow post really cool PowerApp examples.

This is really cool, but I don’t think an average non technical consultant or user can create PowerApps.

Average Citizen

I get this reaction–there are some very long, complicated expressions and near code operations that you can use to make some amazing things happen with PowerApps. But there are also many apps that don’t require these advanced formulas.

Two words: think Excel. PowerApps grew out of Microsoft Office, and by design the formulas in PowerApps mirror the formulas in Excel. Like PowerApps, Excel has some simple formulas, but you can also build some long and complicated formulas like: “=IF((OR(E13=0,ISBLANK(E13))),IF((OR(H13=0,ISBLANK(H13))),IF((OR(K13=0,ISBLANK(K13))),IF((OR(N13=0,ISBLANK(N13))),IF((OR(Q13=0,ISBLANK(Q13))),IF((OR(T13=0,ISBLANK(T13))),IF((OR(W13=0,ISBLANK(W13))),IF((OR(Z13=0,ISBLANK(Z13))),IF((OR(AC13=0,ISBLANK(AC13))),IF((OR(AF13=0,ISBLANK(AF13))),IF((OR(AI13=0,ISBLANK(AI13))),IF((OR(AL13=0,ISBLANK(AL13))),”99″,”12″),”11″),”10″),”09″),”08″),”07″),”06″),”05″),”04″),”03″),”02″),”01″).”

So if you don’t know how to use formulas like patch yet, that doesn’t mean you can’t build PowerApps. Imagine our quote at the beginning of the post, instead substituting Excel:

I think that VBA macro is cool and everything, but I don’t think an average non-technical consultant or user can create Excel spreadsheets.

Said Nobody

In other words:

Use common sense (UCS)

George Doubinski

The user who doesn’t know how to create VBA macros would never try to use that feature of Excel, but would still use Excel to create simple spreadhseets. Likewise the user or consultant who doesn’t know how to use advanced functions in PowerApps can create basic PowerApps, use galleries, use templates, and be productive with PowerApps.

My advice:

  • Don’t let the fact that you don’t know how to use advanced PowerApps formulas scare you from using the platform. You can do some amazing things without touching the more advanced formulas.
  • Build on your knowledge once you get comfortable with the basics–find one formula with which you may not be comfortable, learn how it works, and add to your bag of tricks. If you add one formula every week or two, before long you will go from a basic PowerApps maker to an advanced PowerApps maker.
  • Make friends with more advanced PowerApps makers and get their feedback if there is anything that more advanced formulas could add to make your app more performant. Get comfortable with delegation and how it may impact your app.
  • If you are an advanced PowerApps maker, don’t be a snob. Remember that none of us were experts 2 years ago, share your knowledge with others. Also, don’t feel you have to overcomplicate every app you build–even if you know advanced wizardry, sometimes something more simple can be better. Use the right tool for the job.

Cover photo by unsplash-logoDavid Armstrong

Tip #1258: Dynamic attribute names in Flow

You know who are the most relentless follow-uppers? Super Simple Flow users, that’s who.

Thank you everyone for your answers to my previous question. I have a follow up question. Is it possible to get the value of an attribute off of an entity dynamically instead of declaratively? E.g. instead of blah?[0]?.fullname something like blah?[0]?[someattributenameIgotinapreviousstep]

Michael “Super Simple Flow User” Ochs

Demo

Let’s consider a scenario where you need to build a full name of a contact while taking into account that some countries do not follow ‘firstname lastname’ convention. For example, to a Westerner, Chinese names are rather complicated. In a real-life implementation I would consider keeping fullname as a separate custom field, just to be on a safe side. But for the demo sake, let’s say we would like to follow ‘lastname firstname’ convention if contact’s account is located in China.

Side note: this Flow also demonstrates a scenario when variables do make sense.

The full flow may look like this:

Let’s break it down.

  • First step is given to us by On Record Selected trigger (on account entity)
  • Second step is getting the last created contact. See Tip #1256.
  • Next two steps simply declare the variables to hold the field names for the first and last names (as they come from CDS)
  • Shall we swap? is a cute name when we check the parent account’s country and swap the attribute names
  • Finally, we’re ready to build the full name. Expression we built in Tip #1257 just got a bit more complicated (I broke it down to separate lines for the readability):
concat(
  body('Get_Last_Contact')?['value']?[0]
    ?[variables('FirstName')],
  ' ',
  body('Get_Last_Contact')?['value']?[0]
    ?[variables('LastName')]
)
  • The last step is unchanged from Tip #1257 – we send ourself a mobile notification with the fullname we just built

The end result (after relocating Alpine Ski House to China):

A mobile notifcation displaying last name then first name for a contact

Time for Doubinski George to take a small break from Flow.

Cover photo by unsplash-logoAndersen Jensen

Tip #1257: Learn Compose action in Flow

I wanted to name this tip “Do not use variables in Flow” but then it would have been a click-bait, not a tip.

Yesterday we worked our way through the concept of getting an attribute of the first record from the list. The very first step we avoided was to “declare the variable”. Yes, it would have worked but unless we intend to modify the value, it’d be a one-off assignment.

If you need a result of an expression and you are not planning to modify the value then, instead of a variable, consider using Compose action (which takes its name from the intent of taking multiple inputs and building a single output).

Using the same example (getting the full name of the last created contact for an account):

Expression in the Last Contact’s FullName Compose action is (note the use of ? to avoid runtime errors):

body('Get_Last_Contact')?['value']?[0]?.fullname

Expression in the results check is:

empty(outputs('Last_Contact''s_FullName'))

Advantages of using Compose:

  • No overhead of creating and maintaining the variable
  • Can be used in a scope (variables can only be declared at the top level)
  • Simples!

The only downside I can think of (besides of using – gulp – code!) is that the only visual property available is Output which could potentially make the downstream use unclear.

Cover photo by unsplash-logoIsaac Ibbott

Tip #1256: Get attribute of the first record from the list

This is probably a super simple question, but I’m a super simple flow user. After listing records from D365 how would I go about retrieving an attribute value of the first result returned?

Michael “Super Simple Flow User” Ochs

I won’t name the person who suggested the following:

  1. Declare variables to store values.
  2. Include top 1 limit for your query.
  3. Loop through your set (so 0 or 1 record) and set required values to variables.
  4. Use it and enjoy.

You know who you are, Andrii “Granny’s Moonshine” Butenko, and credit is where credit due – step 2 is actually correct if you only need that one record. I guess step 4 is also correct when you get something right.

The way I would do it:

  1. Build the query using filter, orderby and top to get exactly what I am after.
  2. Use expression to get the attribute while avoiding the runtime errors.

Demo

Let’s say I have an account and I want to find the full name of child contact created last.

Build the query by filtering contacts on the parent account, ordering the results by createdon in descending order (so that the last created contact is on top), then limiting results to 1.


After that, use the following expression to get the full name of the first contact returned.

body('Get_Last_Contact')?['value']?[0]?.fullname

Note that the query may or may not return any results so we use question mark operator (?) to avoid runtime errors.

To reference null properties in an object without a runtime error, use the question mark operator.

Workflow Definition Language schema

The result is either the full name or empty (if account has no contacts).

The only downside of using the expression (besides being not-exactly-nocode) is that the expression won’t know when you rename the List Records step. Which is why Tip #1247 is important.

Cover photo by unsplash-logoCupcake Media

Tip #1255: Say hello to PowerApps Component Framework

At long last we have that abbreviation sorted out. CCF PCF or PowerApps control Component Framework a.k.a. Goodbye Web Resources is now available for public preview. It sounds grand and does hold the promise of changing the way we extend PowerApps, both model-driven and canvas.

Read the announcement conveniently placed within the new PowerApps Component Framework (Preview) forum.

Tîpp Jäår action plan

Cover photo by unsplash-logoVadim Sherbakov

Tip #1254: Design Dynamics 365 email templates with the new email editor

In a recent virtual conversation with Steve Mordue, Steve inquired about using the new Unified Interface email editor to create email templates.

While Microsoft has not (yet) gotten around to adding the template creation process to unified interface, there is at least one approach you can take to design your templates in the new email editor.

  1. Create an email in Unified Interface
  2. Add your fancy schmancy formatting
  3. CTRL+a and CTRL+c to select all of the contents of the email body/description.
  4. Create a new email template in the Advanced Settings area.
  5. Select the template body field and CTRL+v to paste the contents.

This will maintain most of the formatting, including images. You can then add in your template specific merge fields.

Cover photo by unsplash-logoPeter Lewicki