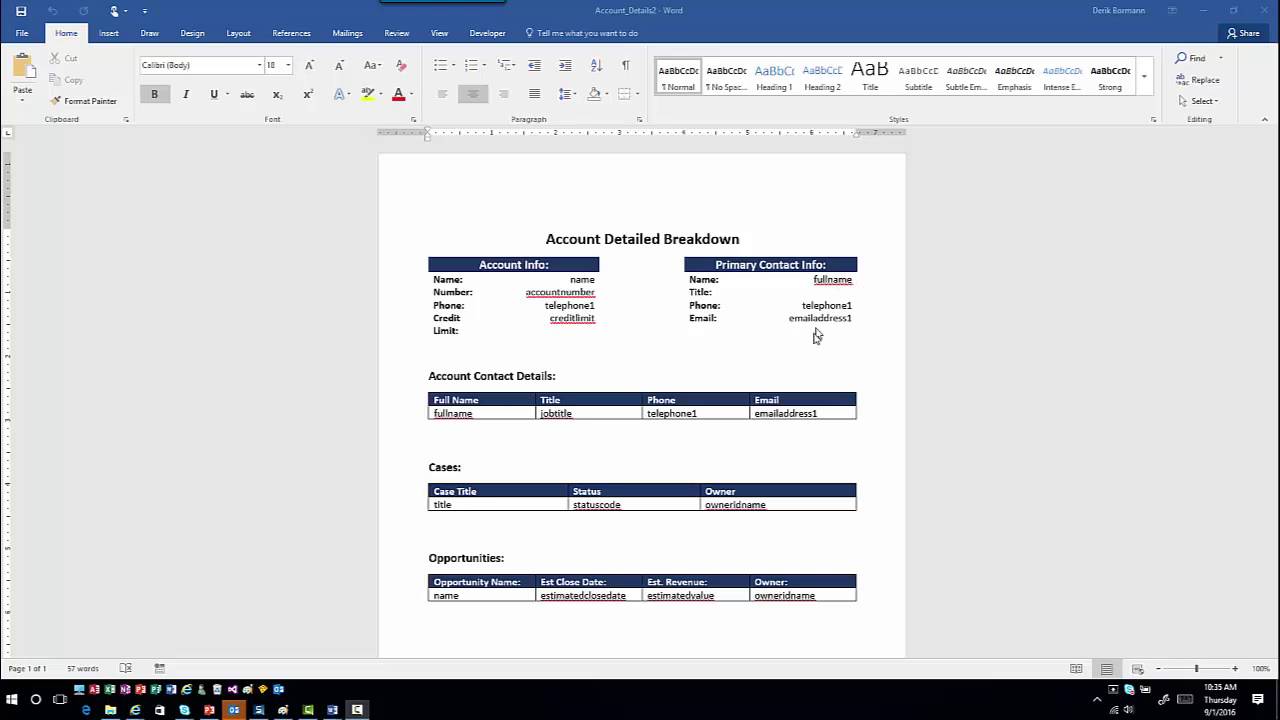
Tip #721: Tale of a small change

SisyphusDynamics CRM does an excellent job hiding complexities of the relational design, solid data model, and friendly and consistent UX. Quite frequently CRM customizers and developers are the ones who’s paying the price.

User advocate: We have a custom text field on the contact entity called Position but noticed that users type almost the same values over and over. We’d like to replace this field with a dropdown. I know CRM is very user-friendly when it comes to adding fields, that should be like 15 minutes job for you, right?
Me: 10 hours and 2 weeks elapsed. We can add it to the next sprint.
User advocate: WHAT?!
Me: Let’s see

Task Efforts (hours) Elapsed time (days)
Identify the field, build the query returning all distinct values currently in that field, give the list to business to confirm and cleanup 0.5
Receive “go ahead” on the original list without any changes. Sigh. Identify misspellings and common abbreviations. Send summary with unresolved to business 0.5 1
Thumb twiddling for 2 days 3
Attend a 1 hour meeting regarding available values in this optionset as asked by business 1 4
Thumb twiddling for 1 days 5
Receive the final list. Create a table in Excel mapping old to new values. 0.5 6
Create the optionset field. Realize it’ll take the afternoon to type all values. Export the entity, modify XML by hand to add the values, import back. 0.5 6
Start exporting contacts + existing values. Realize that you have about 400,000 of those. Think about writing a workflow, cringe at the idea of handling the map in the workflow editor. 0.5 6
Write a piece of code iterating through the contacts and inserting the new value using the map. 1 6
Remember that you’d need to deal with inactive contacts and modifiedby will be affected. Advise business about the implications. 6
Thumb twiddling for 1 days 7
Receive go ahead including instructions to re-activate and update existing contacts. Modify the code. 0.5 8
Run the code in the sandbox. Modify 7 existing forms for the contacts replacing the field. Text search through the existing scripts. Find one reference, replace. 2.5 8
Recall that there are reports using the old field. Extract 15 reports from the report solution, do a quick text search. Find 3 reports affected, change the field reference in the query, alias it to the existing column name 1.5 8
Send email about testing the results. Thumb twiddling for 3 days. 11
Receive go ahead for production. Deploy solution adding the field. Run data update. Deploy second solution with forms and reports. 1.5 12
Total 10.5 12

User advocate: Ok, Mr SmartyPants, let’s add it to the next sprint.

Three weeks later after the successful sprint…

User advocate: I’ve heard CRM 2016 has this nice auto-complete feature. We realized we would be better off to allow users to type in the box and UI to come up with the suggested values. That should be like 15 minutes to add this to the existing dropdown, right?

Me: (╯°□°)╯︵ ┻━┻

Tip #720: Thoughts about IP restrictions for your CRM Online logins

This image is not available in your countryThere are almost daily improvements to CRM Online management facilities. Just as we managed to catch our breath after on-demand backup and restore were made available for CRM Online, we now have an ability to put trusted IP rules in place.

Even though there were numerous tweets and pingbacks about the article I thought I’d take couple minutes to clear up some misconceptions.

This is not CRM Online specific feature, this is Azure Active Directory feature. You can protect your SharePoint, Yammer, custom web apps, etc. Just follow the instructions of the original article.

In the rush to bring the news, parts of the were copied verbatim. It caused some confusion and additional questions. For example, article mentions the requirements:

  • A subscription to Azure Active Directory Premium.
  • A federated or managed Azure Active Directory tenant.
  • Federated tenants require that multi-factor authentication (MFA) be enabled.

Well, you cannot have CRM Online without a tenant so second requirement is not really a requirement. As far as the third one is concerned, I’d be very interested to hear from anyone who managed to get federated tenants with MFA working with CRM Online including all moving parts like web, API, Outlook, and mobile access.

We’ve already written about using Application Request Routing and Web Application Proxy to protect your CRM On-premises. The approaches are different though. CRM Online uses conditional access in Azure AD which enforces restrictions only during the authentication, while ARR and WAP will ensure continuous protection.

Quite frequently you will hear people referring to the feature as “geofencing” (and yours truly is not an exception). It’s a handy moniker but be aware that geofencing usually refers to location-based services and using IP addresses to perform geofencing on a wider scale (beyond known IP addresses of your offices, for example) comes with few caveats.

  • It’s unreliable at best – you are placing your trust in the information coming from elsewhere.
  • It’s dynamic in nature, and costly and difficult to maintain, especially as cloud-service providers hunt and acquire additional blocks of IP addresses all the time. Unless you’re the size of Netflix, of course.
  • As Australian census clusterfk demonstrated, while adding some additional hurdles, geofencing/geoblocking is not in itself a reliable security mechanism. (Brief, somewhat technical but accurate and trustworthy summary).

Tip #719: No More Free CRM Online Trial Extensions

The end of the free lunch is now here!. It used to be that after spinning up a 30 day trial you could go back to CRM Support at least once and get a 30 day extension. Well you can still get the extension but you are going to have to give up your credit card to get it. Now they won’t charge you unless you go past the extension date. Is there forgiveness if you get dinged? I don’t know. Post a reply back here with your experience.30 Day Trial Extension

Tip #718: Tipster guide to Dynamics CRM and Machine Learning – Part 2

Robot suggestionsIn this video we expand on the Machine Learning topics from the previous video. We show you how to configure Topic Analysis on Knowledge Articles, for better analysis for cases from inside CRM.

YouTube player

Give us your feedback, all of it: good, bad, and ugly, I’m sure we can take it. Suggest new topics either in comments or by sending your ideas to jar@crmtipoftheday.com.

Don’t forget to subscribe to http://youtube.com/crmtipoftheday.

Tip #717: Multi-line text on quick view forms

I will not use salesforce thumbnailQuick View forms are awesome, they are peekaboo utility for your records and can be used when summary information is required. There are some restrictions in place to make these forms fast and efficient.

One of the restrictions is that all formatting options for controls are taken away. As usually the case, baby was thrown out with the bathwater – it’s now impossible to set control to display multiple lines for, you know, multi-line text field. (And before you start pointing out that there are quick forms for cases and some other entities that display description fields on multiple lines: create a new quick form and try adding the description field to it. See? Those are system forms, created by CRM gods, after all).

David “CRM Baker” Crook to the rescue with some xml-twisting tip.

  1. Create new or edit an existing quick form.
  2. Add multi-line text field to the form as you normally would.
  3. Complete the form, publish.
  4. Create new solution, add the entity but select only that quick form (to keep xml shorter and things simpler).
  5. Export the solution as unmanaged.
  6. Extract customizations.xml from the zip file.
  7. Using your favorite xml editor, find the row and the cell elements that contain the control.
  8. Add rowspan attribute to the cell element.
  9. Add appropriate number of <row /> elements so that total number of rows is correct.
  10. If your <form> element has maxwidth attribute, ditch it.
  11. Save the file, add it to the solution zip file replacing the existing one.
  12. Import solution, publish.

Your XML should look like the following:

<rows>
  <row>
    <cell id="guid" showlabel="false" locklevel="0" 
          rowspan="4">
      <labels>
        <label description="Description" 
               languagecode="1033" />
       </labels>
       <control disabled="false" id="description" 
          classid="guid" uniqueid="guid" 
          datafieldname="description" />
    </cell>
  </row>
  <row />
  <row />
  <row />
</rows>

I believe that this gymnastic is unsupported but like that ever stopped us before, right? Supported, people, supported, what Tanguy said.

Tip #716: Conditional values in Word templates

Flying pig thumbnailWord templates introduced in CRM Online and CRM 2016 are not the easiest contraptions to edit. One of the questions that popped up in a recent conversation was how to use conditional IF in the document generation.

tl;dr

To refer to the control values after the document has been generated, wrap content controls using bookmarks defined at the control container level.

Longer

CRM fields are defined as Content Controls and in theory we could have written some simple VBA using ContentControl object. Except that CRM does not play nice when generating the document and simply replaces all content controls with the record values.

The solution is to wrap the content controls using the bookmarks defined at the container level, i.e. cell, row, paragraph, etc. Then this bookmark can be used as a reference in a conditional expression of the IF field.

For example, to insert conditional text depending on the total invoice value:

  1. Extract the Invoice template that comes with the sample data and save it under a different name.
  2. Open the template, find total amount, select the entire table cell and click Insert > Bookmark.
  3. Type totalbookmark as a bookmark name, click Add.
    Insert bookmark
  4. Delete the words “Thank you for your business” and click Insert > Quick Part > Field.
  5. Select IF field and type the following field code:
    IF totalbookmark > 100 “Thank you for you business!” “Thanks for nothing!”
  6. Click OK. Hint: to see and edit field codes in the document, press Alt-F9.
  7. Save the file and upload to CRM as a new template.
  8. Create an invoice and generate the invoice document.
  9. Enable document for editing, press Ctrl-A to select the entire content and press F9 to refresh the field content
  10. Depending on the total value of the invoice, the document will say “Thank you for your business!” or “Thanks for nothing!”
    Conditional values in the template

It’s not a full automation that potentially could be improved with some VBA (I’m not 100% sure if it will work) but it’s a step in the right direction and a cheap way to add some pizazz to your documents.

Tip #715: Backup and restore CRM Online at will

Floppy backupDerek “clients call him ‘The Guru'” Hughes has been our follower for some time and today he returns the favor with some interest because his tip is hot.

We haven’t seen any announcements or heard anything in the official channels regarding backup and restore coming in any wave updates. Edit: official announcement and documentation are now available.

It took Derek and us by a very pleasant surprise when we could see the new option in CRM Online admin center:

Backup & restore CRM Online

Woot-woot!

Documentation is absent but here is what we’ve been able to establish so far after scooping our jaws off the floor:

  • You need to have a CRM administrator role in O365 to see the options
  • There is a daily system backup and it’s retained for three days
  • You can perform what seems to be an unlimited number of manual backups that will be retained for three days
  • Your manual backups will count against your storage limits
  • Restore can only be performed into a sandbox instance. If you need to restore production, you need to either set it to the sandbox mode, restore then flip it back to production
  • The instance remains available while being backed up but is unavailable during the restore

So far we can confirm that this option is available in US (crm), Europe (crm4), APAC (crm5) and Oceania (crm6) datacenters – most likely it’s been rolled out worldwide by now. Here is what the backup screen looks like:

CRM Online backup options

I have no idea what is implied by “Some backups may not be restorable”, let’s hope that all the manual ones can be.

Tip #714: Avoid solution bloat with the new solution component framework

Bloat fishAdam “you say gotcha, I say undocumented feature” Vero has the microphone.

The ability to add individual components to a Solution in 2016 is great, with or without the formal patch clone, update and rollup features.

You can add just the things that you are actually changing to deliver the requirements for a sprint, or a bug fix, or an individual user story and keep your solution lean and mean. This makes any unwanted interactions or overlap between solutions easier to predict and avoid, and makes it much clearer when looking at a Solution exactly what components it is changing.

That’s not the tip! (hopefully readers of CRM Tip of the Day already know most of that).

The tip is to avoid a gotcha that reduces the benefit of this new model. Say you create a new custom entity in your solution. Like most entities, to do useful things it needs relationships to other entities, often big things like Account, Contact, Opportunity, Case and so on. When you create a new relationship from an entity to any other entity that is not already in the solution, the system very “helpfully” adds the target entity (parent or child) to your solution just in case you want to work with it later. No prompt, no confirmation dialog box – it does not handle this like it does for offering to include dependency components. It just silently adds the whole of a huge OOB entity that you are not modifying in any way at all (or at least not yet), along with all of its subcomponents. As always, this might include untested or incomplete changes made by someone else which you then unwittingly ship with your Solution.

So how to stop this happening? Stay one step ahead. Before you create the relationship, add the target entity to your Solution and select only the components you will be modifying (if any). If you are creating a 1:N relationship, you might want one or more forms of the “child” entity so you can add the new lookup field to them, or even a Quick View form. Perhaps you need one or more views so you can add a column for this field too (especially lookup entities such as Country, Category…). If you are creating a N:1 relationship you might want the forms of the “parent” so you can add a sub-grid for the new child entity, or at least navigation pane links. But apart from the things that you are expecting to modify, don’t add anything now. If unsure, add nothing at all except the entity itself (not even metadata) – you can always add subcomponents later.
When you create your relationship, the system sees the target entity is already in the system and does nothing unhelpful to bloat your Solution.

If you have been caught out by this already, you can of course remove the entity from your Solution, then re-add it by hand and be more selective. In some cases you might not need to change anything about the target entity, in which you don’t need it in your Solution at all – subject to usual dependency checks of course, in other words you know it will already be in the target system you are deploying to.

Tip #713: Tipster guide to Dynamics CRM and Machine Learning – Part 1

I am robotIn the video, we look and some of the new Machine Learning options currently in Preview as part as Update 1 for 2016. In this first video we explore how to setup and configure the Text Analytics feature, and how to use it for Article Suggestions.

YouTube player

Give us your feedback, all of it: good, bad, and ugly, I’m sure we can take it. Suggest new topics either in comments or by sending your ideas to jar@crmtipoftheday.com.

Don’t forget to subscribe to http://youtube.com/crmtipoftheday.

Tip #712: How to add a spacer to CRM Business Process Flow

Tile spacersWith so many tips to share, Daryl “New MVP on the block” LaBar is on a fast track to become one of our resident tipsters. Here is another good one.

The CRM form designer has a spacer control allowing to achieve some finesse in the form layout. This feature is sorely missing in CRM Business Process Flows, but the good the news is that you can implement your own space with no coding required!

You can read the original illustrated guide, or this reader’s digest version:

  • Pick up an unused field. Created By (Delegate) is a good choice.
  • Add this field as a step in the Business Process Flow.
  • Add a business rule to unconditionally hide this field.