Tip #823: Custom Action editor wipes out parameter list

Love the tips sent to a jar@crmtipoftheday.com – always something new! Today, Elliott Hulburd unmasks a truly unpleasant bug in custom action a.k.a workflow editor that could literally cost you hours of trying to figure out why suddenly all your calls to a custom action fail.

When working with Custom Actions in CRM 2016 recently, I noticed a strange bug with the parameters. If you include speech marks in the description box for a parameter, and then save and close the process, when you open it up again, the parameter will have completely disappeared! No warning message or validation error or anything!
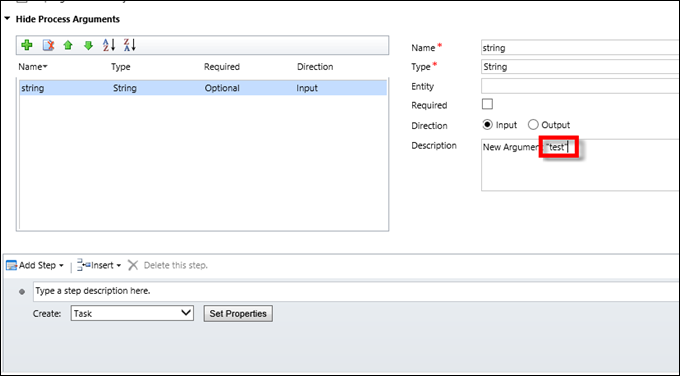
Custom action editor bug

I’ve only tried this in 2016, but also haven’t found anything about this anywhere online.

Tipp Jarr double tipp

Thanks Elliott for the heads up! I think I saw this behaviour but just didn’t pay attention to it as I should have. Confirmed that the bug is still present in Dynamics 365 and it’s not limited to double quotes. Looks like someone from the dev. team did a Spießrutenlaufen-worthy mistake and forgot to XML-encode the parameter description. As a result, saving custom action will wipe out your entire parameter list clean if any of the descriptions contains one of the following: "&'<>. Don’t be fooled by the presence of the parameters after you press the Save button – they are good as gone at this stage.

Tip #822: Getting Started with Connected Field Service

We are glad to report that video tipping service has been restored and eligible customers can apply for a refund.

In this video, we look at Dynamics 365’s new Connected Field Service IOT capabilities. We will walk you though how to install and configure the solution both in Dynamics 365 and Azure, how to configure the simulator, and how to working with and respond to alerts inside Dynamics 365.

YouTube player

Give us your feedback, all of it: good, bad, and ugly, I’m sure we can take it. Suggest new topics either in comments or by sending your ideas to jar@crmtipoftheday.com.

Don’t forget to subscribe to http://youtube.com/crmtipoftheday!

Tip #821: Troubleshoot Xrm.Tooling connection to Dynamics 365

We’ve long been recommending the use of CrmServiceClient in your applications that connect to Dynamics 365. But what to do when the client just wouldn’t connect?

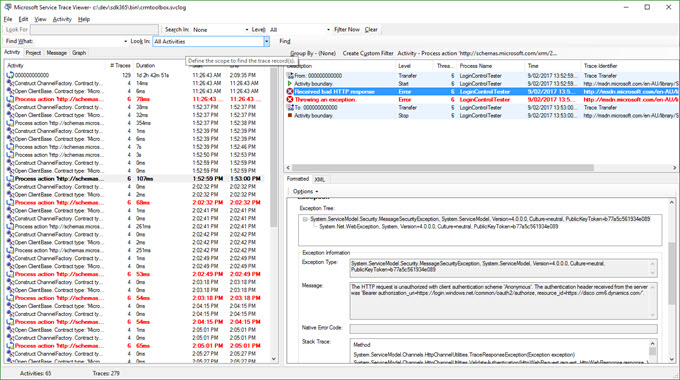
The easiest way to start troubleshooting connectivity to Dynamics 365 is to run LoginControlTester.exe that has long been part of the SDK and can be found in <SDK>\Bin folder. As the name suggest, when you run it, the standard Xrm Tooling login dialog is displayed and it gives you a short Aye or Nay. The difference is that in config file for this small app tracing levels are maxed out and, in addition, there are some listeners for IdentityModel, ServiceModel, and even ADAL.

After you run the tests, collect your output in the same folder in the form of LoginControlTesterLog.txt and CrmToolBox.svclog files. You can use notepad of your choice to mule over the .txt file content, .svclog file can be viewed by Service Trace Viewer that is part of .NET tooling. Chances are that you’ll be able just double-click .svclog file to get it open.

Service log viewer

Lots of troubleshooting goodness here, and if you’re dealing with the support to resolve the issue, these files are something they would definitely ask for (or they should).

Tip #820: Running multiple USD instances

If you ever tried to run Unified Service Desk more than once, you’d be very familiar with this message:

Multi USD error

Why would one want to run multiple instances? It’s handy during the development and testing to try various deployment scenarios, compare the look of a deployment after configuration changes, and connect to different organizations at the same time. As it turned out, it’s not that difficult at all:

  • Open USD installation folder which by default would be something like C:\Program Files\Microsoft Dynamics CRM USD\USD
  • Go level up, copy entire USD folder and paste it elsewhere, e.g. on a desktop
  • Inside you’ll find UnifiedServiceDesk.exe that you can run independetly of the installed copy

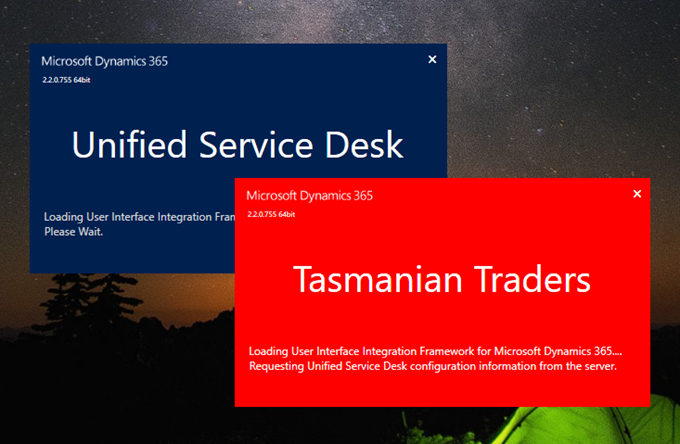
So now you can start customizing the copy, keeping the main installation as a reference point:

Multi USd splash screen

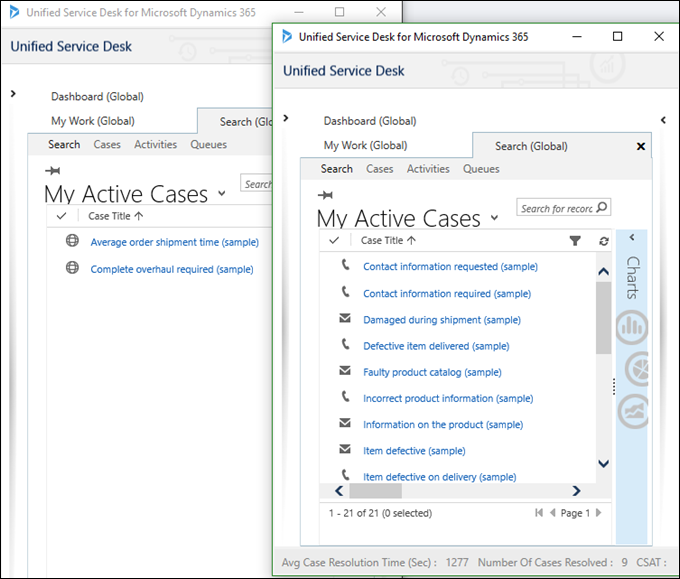
You can even connect as different users (licensed, of course):

Multi USD cases

(As you can see, some agents are busier than others).

Tip #819: Project Services Lead to Opportunity

Today’s tip is from Matt “Almost Resident” Johnson.

I recently came across this little conundrum when progressing a Lead through to Opportunity. Maybe this will save someone else a head scratching moment or two.

If you convert a Lead to Opportunity by pressing the Qualify button. It will work but the Opportunity it creates will use the “Opportunity” form which doesn’t have all the Project Service functionality on it, even if you’ve got the “Project Information” form set as your default. If you try and change the form to the “Project Information” form, it will just jump right back to the “Opportunity” form.

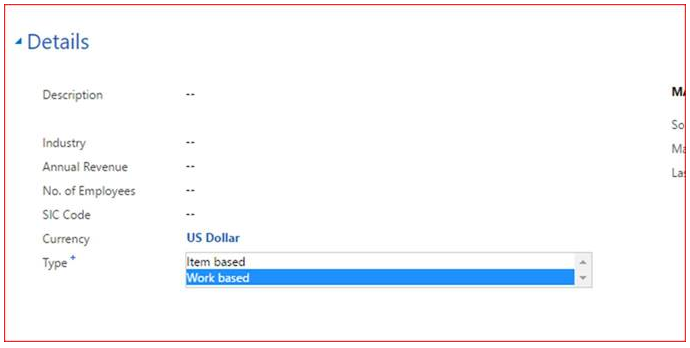
Turns out there’s a new field on near the bottom of the Lead form in Details section called Type. You need to change that to “Work based” and then when you Qualify the Lead it will use the correct “Project Information” form.

PSA lead to opportunity

Hope that helps someone.

It most certainly will! – t.j

Tip #818: Quick surveys using Microsoft Flow

Surveys are a tricky business. Make them too long and people won’t fill them in, make them too short and you won’t collect the information you are after. However, in customer service, surveys can be conditional. First, we ask customer if they are happy with the support received. If yes, there is nothing more to ask, if not, we can follow it up using perhaps another survey, or email, or even a phone call.

For the “binary” surveys we could use Voice of the Customer, or a custom web page, but Microsoft Flow provides a nice and easy way to solicit responses using Approval Emails.

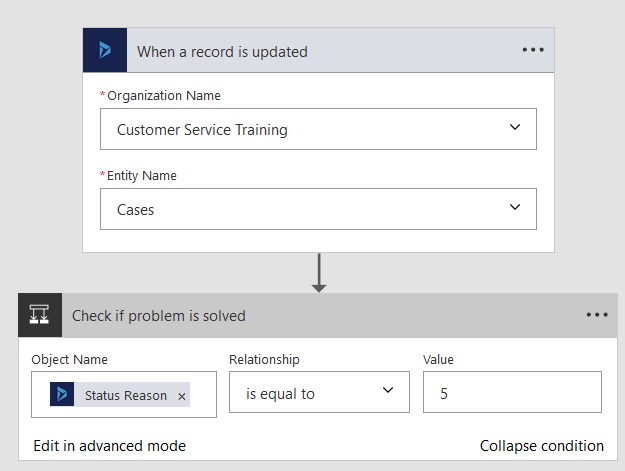
Let’s create a flow that waits for the cases to be resolved:

Flow - case resolved

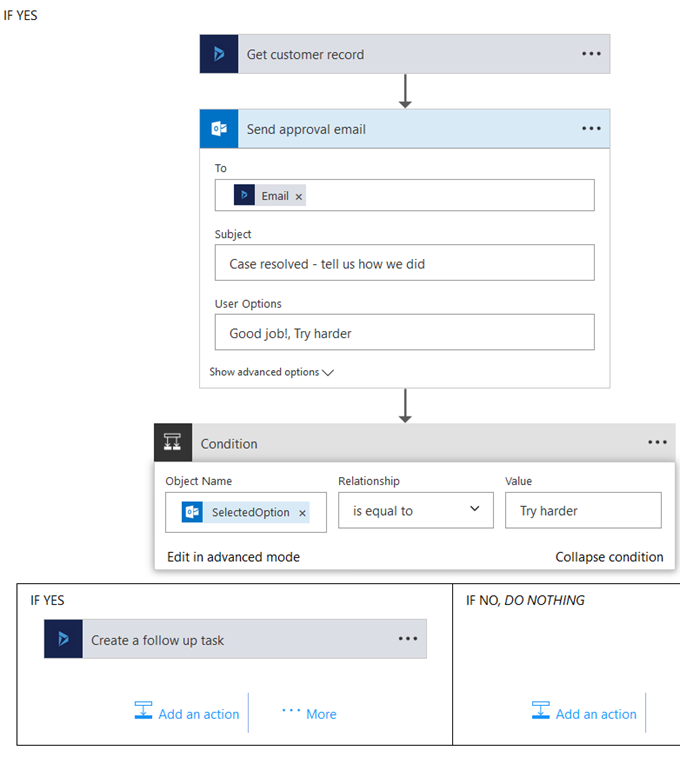
If case was resolved, figure out the email address by querying the contact record and send approval email asking customer how did we go.

Flow - send approval

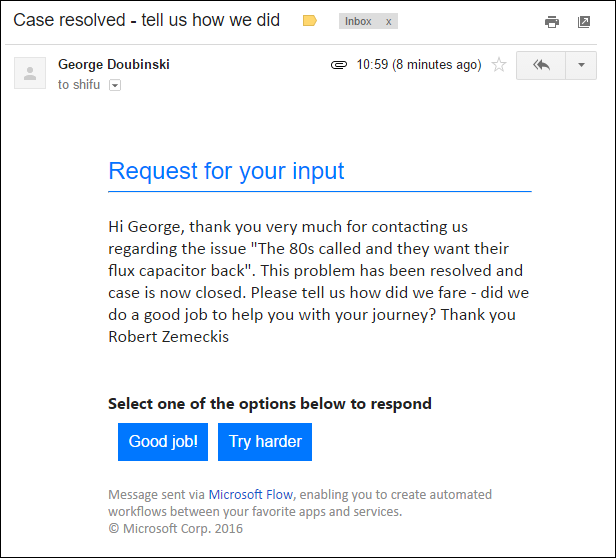
When Send approval email step is executed, the customer receives an email and the flow pauses waiting for a reply:

Flow - approval email

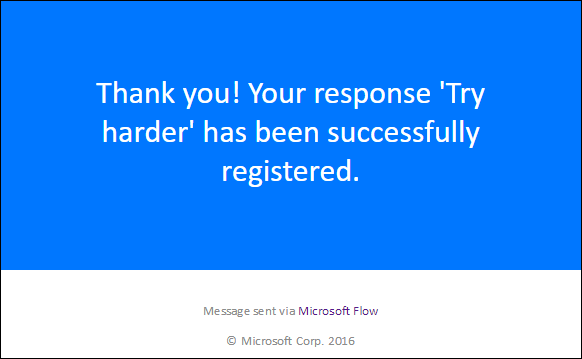
Clicking through will generate a message for the customer and the flow will continue its execution:

Flow - thank you

I wouldn’t push the envelope trying to solicit more choices from the customer but as a nice and easy binary response system it does the job surprisingly well. What’s still unclear is for how long flow will wait for a response (that may never come) – I didn’t find any easy way to introduce parallel wait. Perhaps some kind of twisted Do Until construct?

Tip #817: Display knowledge articles in the portals using custom templates

Dynamics 365 portals come with a specially crafted pages for browsing Knowledgebase Articles by category as well as for displaying the content. KB content page is based on a rewrite-style template and is not customizable.
It’s not difficult to put together an entity list and entity form to display the list of the articles and their content, however, the HTML content will be displayed:

HTML encoded

The reason is that entity forms in portals use textarea element to render the multi-line text content and the result, of course, is encoded.

There are two ways to solve the issue and get the content inline:

Do not define Details button for entity list that displays an overlay form. Instead, simply provide Web Page for details view. For that page use one of the liquid templates, e.g. Full Page Without Child Links and then insert the article by using liquid directly into the page content:

{% assign id = request.params['id'] %} 
{% assign kb = entities.knowledgearticle[id] %} 
{{ kb.content }} 

Knowledge article will be displayed in a separate page that portal will navigate to when you click the article number in the list.

If you insist on using overlay form, the solution is to replace <textarea> with a <div> element using javascript that you can define in the Custom JavaScript field:

$(document).ready(function() {
  var ctrl = $("textarea#content");
  var div = $("<div>").html(ctrl.text());
  ctrl.replaceWith(div);
});

Result:

HTML decoded

Tip #816: Dynamics 365 SSRS reports on iPad

A few years back while writing the CRM Mobile Survival Guide, I found that SSRS reports could not be run on mobile, even when viewing CRM via the tablet browser experience. Unless you took several extra unsupported steps such as tricking Safari into thinking it was a desktop browser.

In my tests of Dynamics 365 on mobile, I have found this to no longer be the case. If you open the Dynamics 365 app and click the “open in browser” button, the tablet browser experience now no longer hides the “Run Report” option. This means that you can now run your SSRS reports without having to jump through a bunch of unsupported steps.


Tip #815: Make your Dynamics 365 portal speak local language

Swedish ChefAs of the time of writing, Dynamics 365 supports 45 languages. But there is only one English, one Spanish, and one French (to name a few) which makes people in UK, Australia, entire South America, and Canada fairly disappointed, considering that the list of locales contains about 230 entries.

We learned to deal with the absence of the localised flavours in Dynamics 365 but, as it turned out, we do not have to when it comes to the portals. Portals for Dynamics 365 have been released in 43 languages (all supported sans Arabic and Hebrew), and the process of enabling content in another language is straightforward:

  1. Enable additional languages in Dynamics 365
  2. Navigate to Portals > Websites in Dynamics 365 and open the Website record. Add Website Language record under Supported Languages
  3. All applicable entities, e.g. web pages, web link sets and content snippets, will now have multi-lingual content available

But, wait, there is more! When you add a Website Language record, language lookup field comes from the Portal Languages entities.

  1. Navigate to Portals > Portal Languages
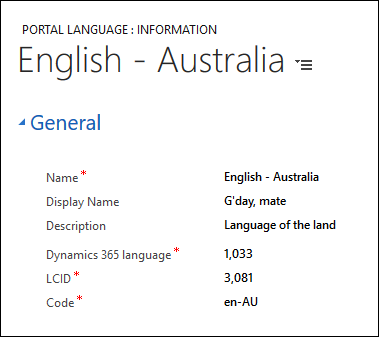
  2. Add new record and enter the data for the localized language.
    Language of Australia
  3. The fields are as following:
    • Name: whatever you feel like
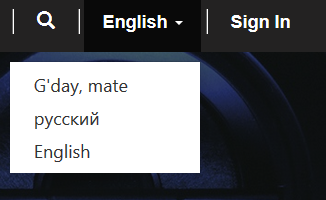
    • Display name: this part will be visible in the language selector
    • Description: meaningful one, of course (but nobody will ever see it)
    • Dynamics 365 language: this one is important. Must match one of the 43 supported languages
    • LCID: valid .NET language locale identifier (see the link to the list above)
    • Code: this will form part of the URL, as in
      https://contoso.com/en-AU/about-us
  4. Once language is there, follow the steps above to add it to the list of the supported portal languages.
  5. Deliver your content as required in the worlds of organisations, colours, and sebras.
    Portal language selector

Can’t wait for our Nordic friends to start delivering portals in sv-BORKBORK.

Tip #814: Setting Regarding field in Microsoft Flow

When you use Microsoft Flow to create a Dynamics 365 activity record, e.g. task, it’s a good practice to relate the activity to another record by setting up Regarding field.

Use dynamic values and drop the related record into the Regarding box, right? If you do just that, your flow may fail with the following error

Body
{
  "status": 400,
  "message": "Ambiguous binding is present. 
             Resolve by sending lookup_type property.",
  "source": "127.0.0.1"
}

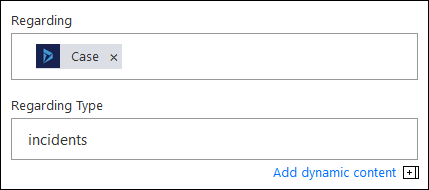
Aha! – you say, I noticed there is a Regarding Type field right next to Regarding so I just set that one and be done. But what do you need to set this field to? incident? 112 (entitytypecode value)?

Under the hood Microsoft Flow uses Web API to communicate with Dynamics CRM and, sadly, the decision was made to use plural names in Web API. So the correct value is incidents.

Set regarding field in Microsoft Flow

Task will be created, linked to the case, and they will live happily ever after.