Tip #1452: Compare dates in Power Automate

tl;dr

Always use formatDateTime(), substring(), convertFromUtc(), convertTimeZone() to drop the time part and ensure the dates are in the same timezone.

!tl;dr

The datetime isn’t of any special type in Power Automate; it’s just a string representation of a timestamp in an ISO format. Yes, the format is sortable, so in theory, you could compare just the values. However, if you have a date input parameter in your flow, it comes as a date without any time part, so you might miss that birthday when comparing it to utcNow()!

To further complicate matters, datetime values include both the time portion and a timezone indicator. What is today for you can be yesterday or tomorrow for other people. Time difference can be up to 25 hours (don’t get me started on that Samoa vs American Samoa trip again). And do you really want to compare seconds if you’re after just the date?

Life becomes much easier if you follow two rules:

  1. Bring timestamps into the same timezone.
  2. Extract and compare just the date portion.

The following functions come to the rescue (yes, I am aware there are actions doing the same thing).

  • formatDateTime(date, 'yyyy-MM-dd') – just the date portion
  • substring(datetime, 0, 10) – just the date portion
  • convertFromUtc(datetime, 'Samoa Standard Time‘, ‘yyyy-MM-dd’) – if your user in +13 timezone
  • convertTimeZone(datetime, 'UTC-11', 'Samoa Standard Time', 'yyyy-MM-dd') – convert American Samoa date prior to comparing to the date in Samoa (be very surprised)

Timezones always do my head in (would it be so hard to make them an enumeration?!). Here’s the current list: Default Time Zones | Microsoft Learn. Perhaps I should create a Code only Connector (CoC) for it, so I don’t have to remember the list?

Tip #1451: Aggregates in Power Automate

There is no easy way to calculate aggregates in Power Automate (except count, of course, which technically, is an aggregate). You do have a few options available to you: loop over the array and apply hideous formulas forgotten since the statistics/SQL course, use Graph API and bring magic of Excel formulas, use third-party connectors (which is not a bad option if you already paying for them). If your data coming from Dataverse you can use FetchXml. SharePoint data can be wrestled with CAML aggregations (yes, it’s a real thing). You can probably even cook some joujou with xml transforms.

Enter Code-Only Connectors (CoC). For a walkthrough watch Hour 16 “Mastering Custom Code in Power Platform Connectors” at Power Platform 24 Conference (double speed recommended, my speech patterns can be painfully slow after excessive travel). Here’s some magic we can do with just code by using Aggregate and CSV To JSON CoCs.

Aggregate array of numbers

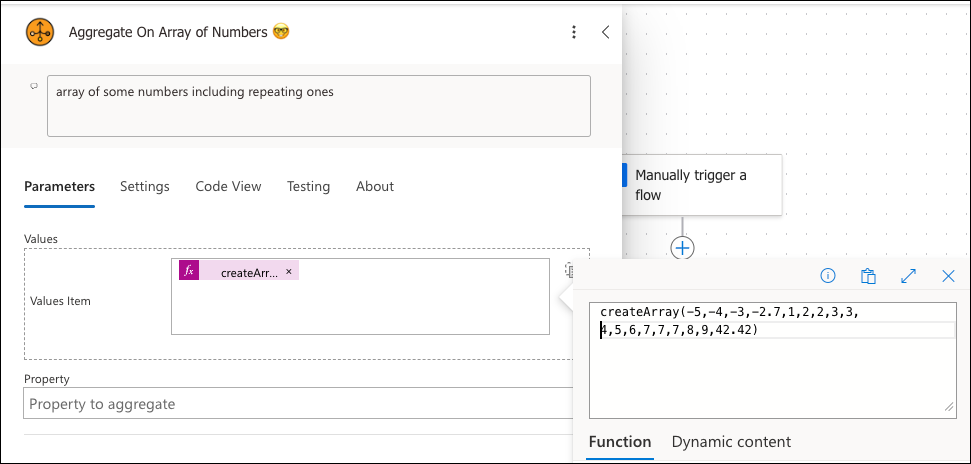
Input is an array of primitive values that can presumably be converted to numbers.

Screenshot of an Aggregate action configuration. Values property is set to a formula creating an array of random numbers. Property called "Property" is blank indicating that the input is an array of primitive values.

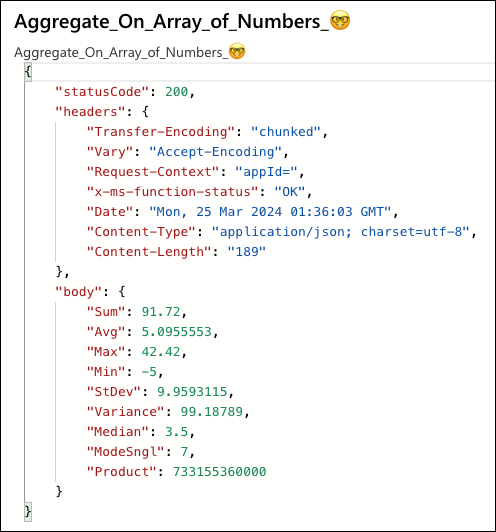
Output is a set of Excel-like aggregate functions: Sum, Avg, StDev, Median, Min, Max, Product and a bonus ModeSngl (the most frequent value in the sequence).

Runtime output of the Aggregate action. Standard aggregate values like Sum, Avg, Min, Max, etc are included as output properties.

Wait, there is more!

Aggregate array of objects

When you have an array of objects and need some aggregates on a property, it’s an extra effort to extract the array holding just those numeric values. Our connector can take an array of objects, all you need to do is to tell it which property to aggregate.

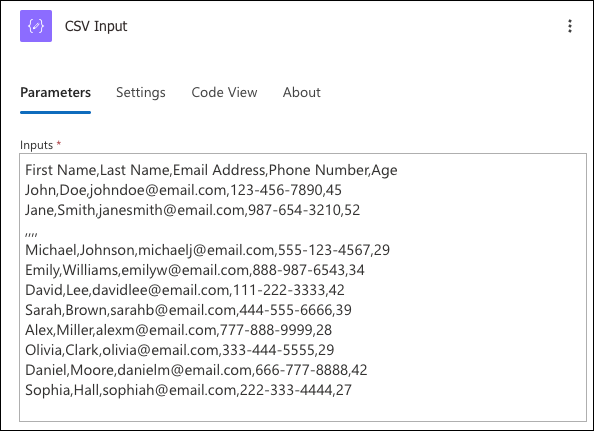
This example uses sample CSV data containing some contact information including the age. The first action is a simple CSV set.

The image is a screenshot depicting a segment of a Microsoft Power Automate flow. It consists of three sequential actions aligned vertically. The first action at the top is titled "CSV Input" and is marked by a purple icon resembling a file or document. The second action is titled "Csv To Json" and is represented by an orange icon with a gear, indicating a transformation or processing step. The third and final action displayed is titled "Aggregate on Array of Objects" accompanied by a smiley face emoji, suggesting an operation that handles a collection of data structures.
Screenshot of CSV sample data

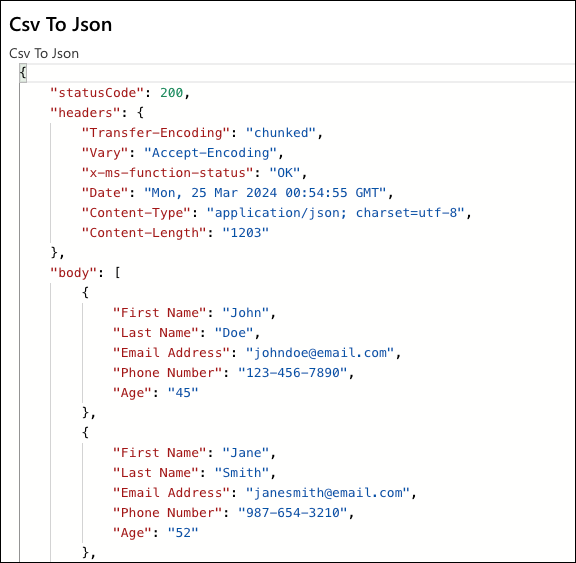
Second action takes that CSV and converts it to JSON:

Screenshot of a runtime output of the CSV to JSON action. Output contains a standard JSON object with properties corresponding to the input CSV columns

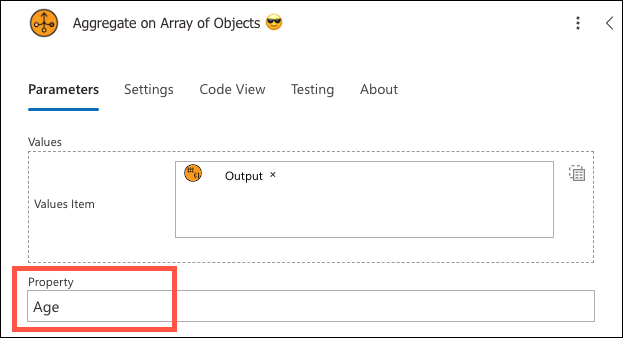
And the last step brings it home by taking the JSON object ‘as is’ and calculating aggregates on the ‘Age’ property.

The image is a screenshot of a Power Automate action titled "Aggregate on Array of Objects 😎". The input fields are Values and Property. Values is set to the output of the previous step which is a JSON object. Property set to the text "Age" indicating that this property should be used to calculate the aggregates.
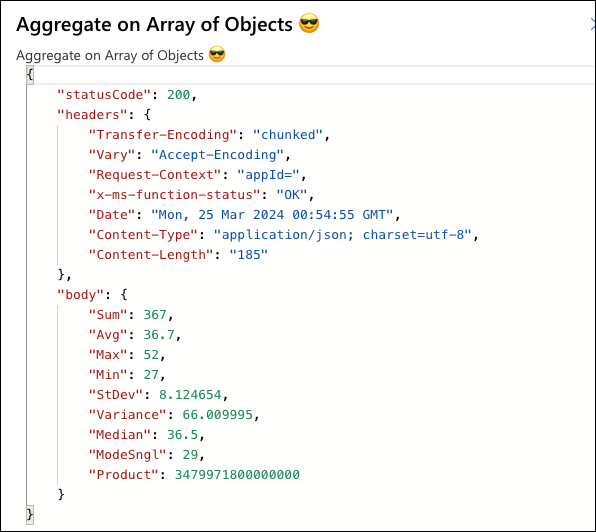
The image is a screenshot of an Power Automate action output titled "Aggregate on Array of Objects 😎". It displays a JSON response structure with various fields. The "statusCode" is 200, indicating success, and there's a "headers" object containing HTTP headers such as "Transfer-Encoding", "Vary", "Request-Context", and "Date".  Inside the "body" object, there are key-value pairs for aggregation results: "Sum" is 367, "Avg" (average) is 36.7, "Max" (maximum) is 52, "Min" (minimum) is 27, "StdDev" (standard deviation) is approximately 8.12, "Variance" is approximately 66.01, "Median" is 36.5, "ModeSngl" (single mode) is 29, and "Product" is a very large number, displayed in scientific notation as 3479971800000000.

There are plenty of plans to add other Code Only Connectors (CoCs). There are some decisions to be made: how to compose a single connector with all methods included, how to validate syntax, is it possible to create a test harness, shall we publish these as independent custom connectors or just leave it like that?

Want to get involved? Drop email to jar@crmtipoftheday.com and/or go straight to the source https://github.com/georged/code-connectors.

Tip #1450: Create Dataverse app users like a boss using pac cli

In another universe we did talk about Tip #545: Create non-interactive user like a boss. Since then, the product name has changed at least 27 times, Marketing Pilot and Parature came and went, Dataflex and CDS left their mark but, most importantly, we’ve got ourselves app users based on service principals.

It’s been quite a painful manual process creating those users: in Azure portal create an app registration, create a secret, add API permissions – NO, STOP DOING IT PEOPLE, IT’S NOT NEEDED, forget to copy the secret, go back 2 steps, generate new secret, switch to Dataverse admin, create an app user, assign appropriate roles (“appropriate” != “system administrator”). Switching between admin centers, tedious is the word to describe the experience.

But tedious it is no more and there is no PowerShell in sight! Behold, administrators!

pac admin create-service-principal \
   -n "LOLZ App" -r "Basic User" 

# -n name and -r role, respectively

The result:

@georged ➜ /workspaces $  -n "LOLZ App" -r "Basic User"
Connected as doug@aperturescience.click
Creating Entra ID Application 'LOLZ App'... Done
Creating Entra ID Service Principal... Done

Connected to... Candlestick Maker
Registering Application 'D4E4C8F1-9A3B-4D0A-8E7C-2E5A4F6D1B9D' with Dataverse... Done
Creating Dataverse system user and assigning role... Done

Application Name         LOLZ App
Tenant Id                3F2504E0-4F89-11D3-9A0C-0305E82C3301
Application Id           6B29FC40-CA47-1067-B31D-00DD010662DA
Service Principal Id     F47AC10B-58CC-4372-A567-0E02B2C3D479
Client Secret            pO~8Q~Really?~Z2sdwvDwgM_HowsThatWorkingOutForYou?_aT2
Client Secret Expiration 03/24/2025 09:17:05 +00:00
System User Id           0e68ef5a-bfe9-ee11-a204-dead4beeff1c

@georged ➜ /workspaces $ 

That’s it! Read Microsoft Power Platform CLI admin command group – Power Platform | Microsoft Learn as the official source of truth.

I got a bit excited and didn’t check the references before writing the above. Awesome Carl de Souza got their first. Creating Service Principals Really Easily Using Pac Cli. Unlike me, Carl has patience to produce screenshots and detailed instructions, go check it out.

Like a boss meme

Tip #1449: Formula columns love calculated columns

Formula columns are great, just read Work with Dataverse formula columns. But there are some limitations in the Power Fx functions you can use, as well as with the return types..

  • Need a formula column returning a whole number? Make it a decimal with 0 precision.
  • Need to produce currency? Make a formula to return a decimal, then convert it to currency using the good old calculated column where you can define the return data type instead of inferring.
  • Need a choice? Your choice can only be either yes or no. But the same trick applies. Do your magic in a formula column, then create a calculated column and go through the painful if-then-else process ad nauseam to cover all possible return values. To be honest, I’d rather eat a frog and write a plugin.
Witch Mountain meme with the following dialog:

two characters in a car having a technical discussion, which could be imagined as:

Character 1 (top panel, speaking seriously): “Our Dataverse telemetry indicates formula columns aren’t being leveraged for generating monetary returns.”

Character 2 (middle panel, with a questioning expression): “Maybe it’s because currency formula columns can’t be produced?”

Character 1 (bottom panel, looking puzzled or skeptical): [No text, just the character's reaction]

Personally, I think it’s all because, ironically, Power Fx in formula columns does not support Power function. Source: trust me, dude.

Tip #1448: Never delete columns in translation

Another day, another guest Q&A post. (Have a tip of your own? Send it to jar@crmtipoftheday.com)

Question

I saw the Easy Translator  · XrmToolBox was updated, so thought I would give it another try on our app which is in 14 languages. Tanguy, can i delete rows and tabs that do not require translation? Or will it cause problems?

Steve “The Pot Stirrer” Mordue

Answer

Never delete columns. But you are free to delete rows and tabs

Tanguy “The XRM Toolbox” Touzard

Tîpp Jäår $0.02 + GST

What Tanguy was referring to is Excel file that you get when you export customized table and column text for translation with Power Apps. Tabs contain types of tranlsations required, rows refer to individual strings requiring translations while columns contain languages. So, yes, Steve would have to look at all 14 columns.

Tip #1447: Use Parse JSON for settings

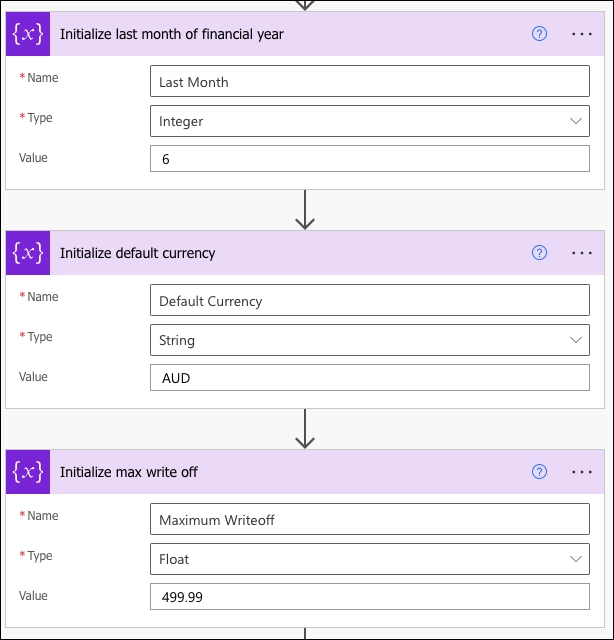
I often see makers declaring multiple settings in a Power Automate flow using a single variable per setting.

The screenshot shows a sequence of three configuration steps in a Power Automate flow, each labeled with the action "Initialize variable." The first step initializes an integer variable named "Last Month" with the value 6, indicating the last month of the financial year. The second step initializes a string variable named "Default Currency" with the value "AUD," setting the Australian Dollar as the default currency. The final step initializes a float variable named "Maximum Writeoff" with the value 499.99, which could represent a maximum allowable write-off amount in the given financial context. Each step is represented with a distinct color code, suggesting a logical progression in the flow.

For complex flows, it can quickly get out of hands as variables must be declared on the top level; they cannot be nested or even scoped. An environment variable per each setting, you say? Way to make friends with the deployment admins!

Instead, use Parse JSON action and keep your flows compact by combining all related settings in one neat JSON object.


The screenshot displays a dialog box from Power Automate for setting properties in a 'Parse JSON' action. The content section includes a JSON object with three properties: "LastMonth" with a value of 6, "DefaultCurrency" set to "AUD", and "MaxWriteoff" set at 999.99. Below the content box, the schema section is partially filled out with JSON schema definitions corresponding to the above properties, indicating "LastMonth" as an integer and "DefaultCurrency" as a string. There is also a button to "Generate from sample" to create the schema based on a sample JSON content.

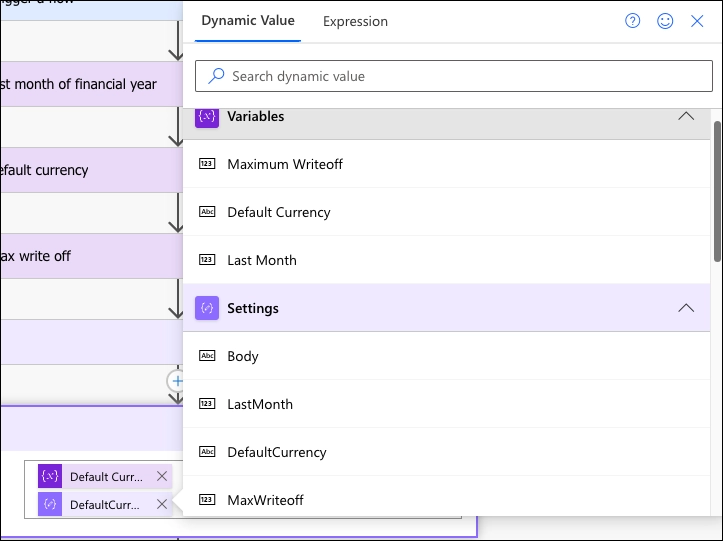
Accessing settings after that is intuitive and self-explanatory. And you get a Body as a bonus.

The image is a screenshot of a dynamic content selector within a Power Automate workflow. The panel shows a list of variables and settings from the workflow, indicating where they can be used as dynamic content in subsequent actions. Variables displayed include "Maximum Writeoff," "Default Currency," and "Last Month." Under the settings, items such as "Body," "LastMonth," "DefaultCurrency," and "MaxWriteoff" are available for selection. The interface elements such as search bar, information, and close icons, along with the expansion arrows for each section, suggest that the user can interact with this panel to insert these dynamic values into other parts of the workflow.

Tip #1445: Date picker in Power Pages revisited

The product has been renamed at least twice since we talked last time about how to restrict the date picker control in now Power Pages. But most importantly that code, according to some reports, no longer works. Fear not, here’s the revised version that works perfectly well in Power Pages (it did 5 minutes ago, anyway).

In this example we have two date controls. We want to restrict the first one to the future dates only and the second one to give us interval of no more than two weeks.

Add the following script to the page containing the form.

function getDatePicker(name) {
    // return the datepicker for the given column name
    return $('#' + name)
        .siblings('.datetimepicker')
        .data('DateTimePicker');
}

function initDates(from, to) {
    console.log('initDates', from, to);
    
    // default FROM is today
    var fromDate = from || moment().startOf('day');
    
    // default required is in 7 days
    var toDate = to || fromDate.clone().add(7, 'days');
    
    getDatePicker('enabler_datesubmitted').date(fromDate);
    getDatePicker('enabler_daterequired').date(toDate);
}

function dateonchange() {
    var pickerFrom = getDatePicker('enabler_datesubmitted');
    var pickerTo = getDatePicker('enabler_daterequired');
    var from = pickerFrom.date();

    // no past FROM date
    pickerFrom.minDate(moment().startOf('day'));
    
    // force TO date between the next day and 2 weeks
    if (from && from.isValid()) {
        var fromplusone = from.clone().add(1, 'days');
        var fromplus14 = from.clone().add(2, 'weeks');
        pickerTo
            .minDate(fromplusone)
            .maxDate(fromplus14);
    }
    else {
        pickerTo.minDate(null);
    }
}

$(document).ready(function () {
    $("#enabler_datesubmitted").next()
        .on("dp.change",
            function (e) { dateonchange(); })
    initDates();
});

And this CSS to fine-tune the accessibility:

 .day.disabled > button {
    text-decoration: line-through;
    cursor: not-allowed;
    color: lightgrey;
 }

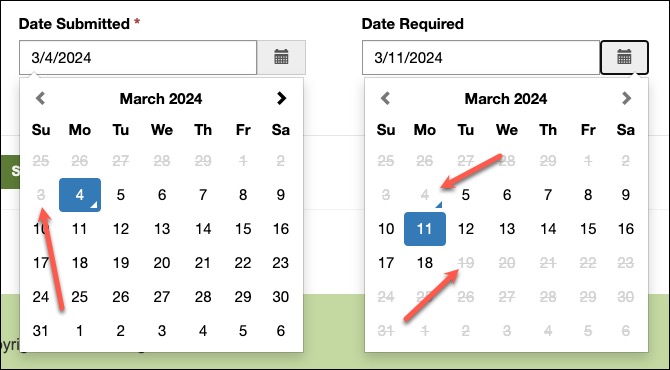
The end result: first control only allows selection from today onwards and the second one is restricted from tomorrow until two weeks from now.

The image shows two date picker calendars side by side. The left one is labeled "Date Submitted" with the date March 4, 2024, highlighted in red and pointed at with a red arrow, indicating selection. The right calendar is labeled "Date Required" with the date March 11, 2024, circled in red and also pointed at with a red arrow, indicating another selection. Both calendars display the month of March 2024, with days of the week labeled from Sunday to Saturday on the top. The "Date Required" calendar is slightly faded compared to the "Date Submitted" calendar, suggesting a sequential relationship or a restriction where the "Date Required" must be after the "Date Submitted".

Tip #1444: New Power Automate UI unearths hidden property

Today’s tip is from Matt Collins-Jones. (Have a tip of your own? Send it to jar@crmtipoftheday.com)

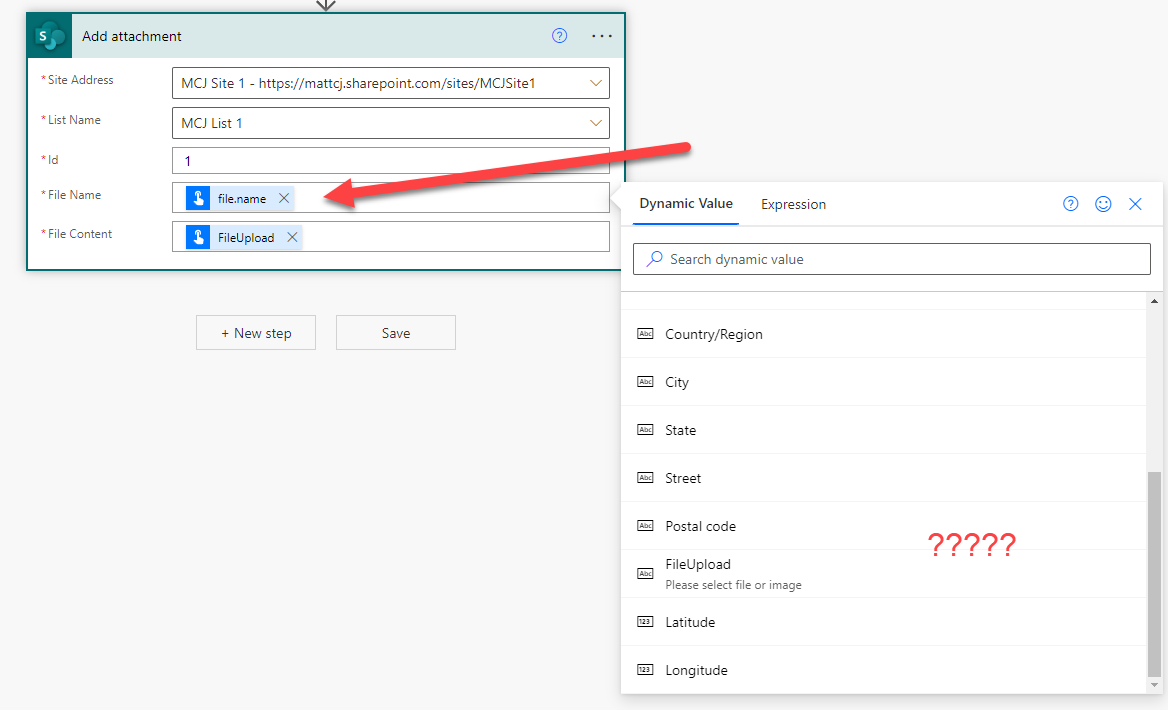
I (MCJ that is – t.j) was building a flow yesterday and I was using the manual flow trigger and wanted to upload a document/file. I was in the classic UI and I noticed I couldn’t get the name of the file via dynamic content. I thought this was a strange limitation, but I was only building something for demo purposes.

The image shows a screenshot of a Power Automate action configuration titled "Add attachment". It is part of a flow setup where fields for 'Site Address', 'List Name', 'Id', 'File Name', and 'File Content' are displayed with corresponding input fields. The 'File Name' and 'File Content' fields contain dynamic content represented by icons, labeled 'file.name' and 'FileUpload', respectively. There is a red arrow pointing to the 'File Name' field, suggesting attention is needed there. On the right side of the screenshot, there is a panel labeled "Dynamic Value" with a search bar, below which are listed other dynamic content options like 'Country/Region', 'City', 'State', 'Street', 'Postal code', and 'FileUpload'. At the bottom, the user has added multiple question marks, indicating confusion or the need for assistance regarding what dynamic content to select or enter for the 'File Name' and 'File Content' fields.

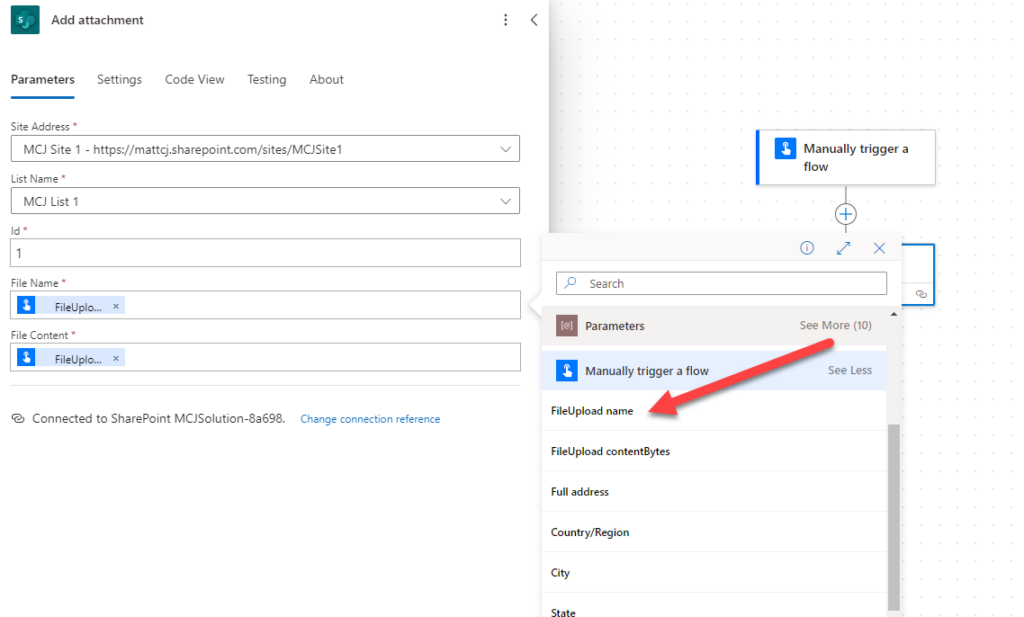
I came back to the flow and after having saved my flow, it had opened up in the new UI. When I went to look at the dynamic content, I noticed the name of the file content was different, so I opened the dynamic content pane and found a property not found in the classic UI.

The image is a screenshot of a Power Automate modern action setup interface for "Add attachment" within a flow. The interface is displaying fields for 'Site Address', 'List Name', 'Id', 'File Name', and 'File Content'. The 'File Name' and 'File Content' fields are both filled with a dynamic content token labeled 'FileUpload'. There is a red arrow pointing from the 'Manually trigger a flow' sidebar on the right, highlighting the dynamic content 'FileUpload name' as the likely input for the 'File Name' field. The sidebar also shows 'FileUpload contentBytes', suggesting this as the input for the 'File Content' field.

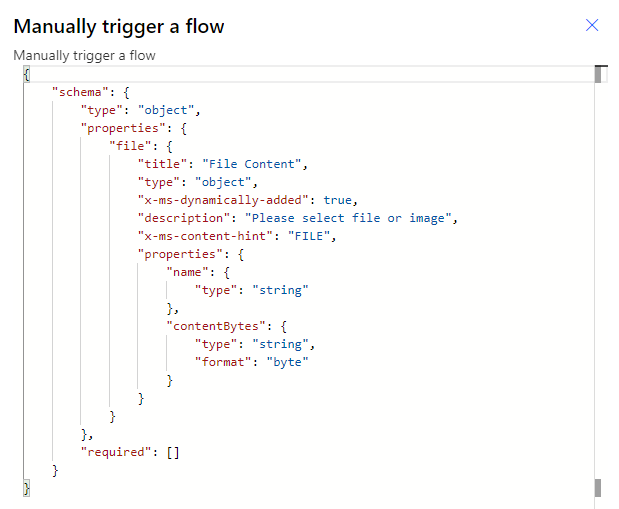
The property appears in the JSON for the trigger, but not in the classic UI, so maybe the new UI is just smarter at reading the JSON schema to produce its list of dynamic content than the old UI. We may find more previously hidden properties in the new UI.

The image displays a JSON schema code snippet used to manually trigger a flow in Power Automate. The schema defines an object type with properties for a file, which is itself an object. The file object includes properties such as "title" with the value "File Content", and a description prompting to "Please select file or image". There are hints indicating the content type expected is a file, with further nested properties for "name" as a string and "contentBytes" as a string with a format specified as "byte". The "required" field at the bottom of the schema is an empty array, suggesting there are no required properties for this trigger.

Tîpp Jäår $0.02 + GST

Name/contentBytes duo looks familiar for anyone who ever sent attachments in Power Automate. No longer having the property [accidentally?] hidden goes a long way to create a maker-friendly UI. A small plus for new UI (game is still on though!).

Cover image is a courtesy of a conversation with AI. First, it generated a dramatic image then the description to go with it. Level of drama is unbearable.

The image illustrates a stark contrast between two versions of the Power Automate maker interface. On the left side, ancient Egyptian hieroglyphs are carved into a stone wall, bathed in a warm, golden glow emanating from a sun-like source, representing an ancient user interface. On the right side, a futuristic and advanced user interface is depicted with vibrant neon circuitry, transparent screens, and augmented reality elements, all glowing against a dark background, symbolizing cutting-edge technology. The two sides are dramatically juxtaposed to highlight the evolutionary leap in technology from past to future.

The image illustrates a stark contrast between two versions of the Power Automate maker interface. On the left side, ancient Egyptian hieroglyphs are carved into a stone wall, bathed in a warm, golden glow emanating from a sun-like source, representing an ancient user interface. On the right side, a futuristic and advanced user interface is depicted with vibrant neon circuitry, transparent screens, and augmented reality elements, all glowing against a dark background, symbolizing cutting-edge technology. The two sides are dramatically juxtaposed to highlight the evolutionary leap in technology from past to future.

Tip #1443: Let SharePoint deal with rogue data

Using Power Automate to import data into an existing SharePoint list is fairly straightforward, except when the data isn’t very clean. For instance, if a number column contains blank values or some non-numerical garbage, SharePoint connector will flip out.

OpenApiOperationParameterTypeConversionFailed

The ‘inputs.parameters’ of workflow operation ‘Create_item’ of type ‘OpenApiConnection’ is not valid. Error details: Input parameter ‘item/Interest’ is required to be of type ‘Number/double’. The runtime value ‘””‘ to be converted doesn’t have the expected format ‘Number/double’.

OpenApiOperationParameterValidationFailed

The ‘inputs.parameters’ of workflow operation ‘Create_item’ of type ‘OpenApiConnection’ is not valid. Error details: The API operation ‘PostItem’ requires the property ‘item/Interest’ to be greater than or equal to ‘-1.7976931348623157E+308’ but is ‘NaN’.

— SharePoint Connector

The first instinct might be to wrap your data in if(empty()) construct or use clever error handling for invalid data. This approach works unless you’re dealing with a large number of columns of similar “quality”. A workaround is letting SharePoint handle the rogue data by changing the column type to a single line of text, importing the data, then changing it back to a number, which cleans out all invalid entries, leaving only valid numbers.

Cover image courtesy of AI. Ignoring “Denitent Cemmnieagl Datter”, not bad.