Tip #153: How much space does my organization use

There are 10 ways to keep you organization on a diet but only one way to find out what’s going on (more or less).

if you are a system administrator, click (or, as we say these days, tap) Settings > Administration > Resources In Use. Besides the storage figures (which are conveniently broken down by organization if you have more than one on the same subscription), you’ll see how many custom entities, workflows and dialogs have you used (all limited resources).

This tip is brought to you by Andre “I’ve got 88 in my handle” Margono.

Tip #152: Update Rollup strategy post SP1

With the release of Dynamics CRM 2013 SP1, there are now two different versions of CRM 2013:

  • 6.0.X (the original/RTM version)
  • 6.1.X (CRM 2013 SP1)

This means that there will now be two different update rollup streams. The next UR for 6.0 will be Update Rollup 3. The next UR for 6.1/SP1 will be Dynamics CRM 2013 SP1 Update Rollup 1.

Note, you can tell what build and UR you are on by clicking the settings gear in the upper right hand corner of the CRM web client and clicking “About.” The second digit indicates the service pack level, and the third digit indicates the update rollup level.

For example, the current build number is 6.1.0.584. This is the release version of SP1.

Tip #151: What happens if you don’t install the SP1 updates?

After your organization is updated to SP1/CRM Online Spring ’14 update, platform enhancements and bug fixes are enabled, but the new customer service features and the new service management area in the Settings menu are not enabled until you go to Settings–>Administration and click “install product updates.”

install update

So what if you don’t use Cases and Queues? Do you need to install the updates?

Without installing the updates, you will still get the platform benefits of the update (such as server-based SharePoint integration) and the bug fixes, such as the embedded reports fix. So you are not forced to install the product updates. However, I recommend that you still do it.

  • It is safe–these updates have no impact on non customer service related functionality.
  • You may find a non-customer service related use for the enhancements. For example, now that automatic case creation from emails is standard functionality, you may have a custom process you want to initiate from an email, and repurposing the case automation may be a good option.
  • Given you can’t predict how things will change in the future, enabling the new product updates gets CRM up to date for if you start using case management or queues in the future. If you don’t install the updates now, you may forget, and then start using cases later, without the updated functionality.
  • If you license an ISV add-on in the future, it may depend on the updated product features.

I recommend that you enable the new features in a non production environment, then push to your production environment.

Tip #150: Forms close after assigning records

After your organization is updated to SP1/Spring ’14 CRM Online update, you may notice a change in behavior when you assign records. Now, if you click the “assign” button on the form and assign to a different user or team, the form will close after you assign the record.

If you don’t want the form to close after assigning records, reassign the records via the “owner” lookup field instead of using the “assign” button.

Tip #149: If you are missing the “Service Management” link after upgrading to SP1

After your Dynamics CRM 2013 organization is upgraded to SP1/Spring ’14 update, and you install product updates in the Settings–>Administration area, you should see a new link called “Service Management” in the Settings area.

svcmgt

If you don’t see this link after you install the product updates, clear your browser cache or click CTRL+F5

If after that you still don’t see it, you can manually add the link to the settings area by exporting the sitemap and adding the following subarea to the settings area:

<SubArea Id="nav_servicemanagement"
 ResourceId="Homepage_ServiceManagement"
 DescriptionResourceId="ServiceManagement_SubArea_Description"
 Url="/tools/servicemanagement/servicemanagement.aspx"
 AvailableOffline="false" />

If you are missing other links that are new in CRM 2013, you can learn how to add these areas here.

Tip #148: Simplify the customer lookup

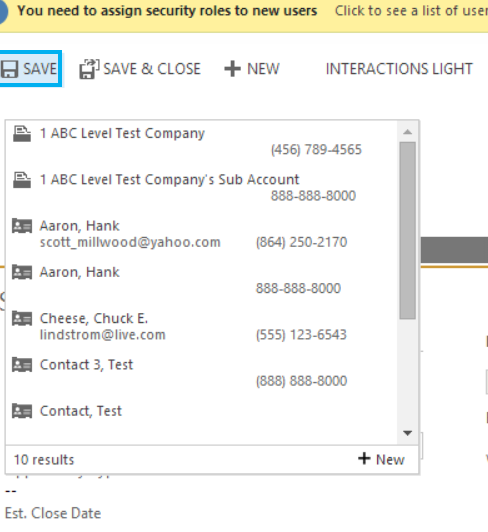
In Dynamics CRM 2013 when you create a record such as a contact or opportunity that include the “Customer” lookup field that can resolve to an Account or Contact, and you type a company name in the customer field, you may get more results than expected.

customer lookup

This is because when you type in the customer lookup field, it searches both accounts and contacts. Since the contacts related to the account includes the account name in the Parent Customer field. When you search by company name, you will get the company and all of the contacts related to the company.

If you don’t want this to happen, go to Settings–>Customization and open the entity customization for the Contact entity. Open the View definition for the Quick Find view and click “Add Find Columns.”

Uncheck the box for parentcustomerid,  hit OK, save and close the view, then publish the contact entity.

With this change, typing a company name in a “Customer” field will only return company records. Searching contacts by account name will no longer work, but most users don’t search for contacts by account name. You can easily see an account’s related contact by navigating to the account record.


Tip #147: If it’s something weird and it don’t look good

Technology is a temperamental mistress and, from time to time, things may not go quite as planned, and that includes CRM Online. Good news that even basic CRM Online subscription includes reasonable level of support. What is the quickest way to reach for help when you need it? To start with, download Microsoft Dynamics CRM Online: How to work with Microsoft Support – it’s a good and concise guide where to find support online. Here is abridged summary of some important numbers and URLs:

Thanks, Aaron!

Tip #146: Geo-restrictions for your CRM

One of our customers challenged us with a very specific requirement to limit access to their CRM to the users located in Australia. It’s always good to remember that CRM application server is a very sophisticated but a web site nevertheless and for a web site, we can use ipSecurity element in web.config that defines IP-based restrictions.

Step 1. Download list of IP addresses for your country (select web.config allow format)

Step 2. Find your CRM web.config file. By default it’s located in %ProgramFiles%\Microsoft Dynamics CRM\CRMWeb

Step 3. Insert <ipSecurity> element and add downloaded content so that part of your web.config looks like the following:

<configuration>
  ...
  <system.webServer>
    <security>
      <ipSecurity allowUnlisted="false">
        <clear />
        <add 
           ipAddress="1.0.0.0" 
           subnetMask="255.255.255.0" 
           allowed="true" />
        <add 
           ipAddress="1.0.4.0" 
           subnetMask="255.255.252.0" 
           allowed="true" />
        ...

Note 1. We found that free lists of IP country blocks are a bit stale; if being up-to-date is important for you, consider one of the data subscription services available.

Note 2. Country-level is a very superficial protection. For example, nothing stops persistent user from provisioning a VM in Aamazon EC2 in Sydney and accessing CRM from that VM. What will work much better, however, is granting access to the listed individual IP addresses.

Note 3. List of IP addresses even for Australia is about 6.5K entries. Performance impact of looking up this table on every request is probably negligible but it’d be a good idea to measure.

This is unsupported modification and the usual disclaimer applies: use at your own risk, do not swallow and keep away from the children. Not tested on hobbits.

Tip #145: Make tip 43 work again

If you have tried Tip # 43: Embed a pre-filtered report in an iframe lately, you may have found the results were not quite as advertised, at least in Internet Explorer.

This is because shortly after that post was published, an update to the CRM report viewer control for Internet Explorer broke the ability for reports to work in iframes. This issue only affected IE 9+. All other browsers were not affected.

This issue has been fixed in CRM 2011 Update Rollup 17 and CRM 2013 SP1/Spring ’14 update.

Happy iframing.

Tip #144: Restrict AD browsing when adding new users

If you are a hosting provider or a security-conscious administrator managing multiple CRM deployments then you’d like to avoid exposing entire Active Directory when user with appropriate permissions clicks New Multiple Users and then opts to browse all trusted domains and groups.

There are some unsupported methods as well as supported C# code to achieve the result. Considering that administrator’s language of choice is powershell, here is how to do it from the ps prompt:

Add-PSSnapin Microsoft.Crm.PowerShell
$ConfigurationEntityName = "Organization"
$SettingName = "UserRootPath"

$SettingValue = 
  "LDAP://contoso.local/OU=AlphineSkiHouse"+
  "OU=Customers;DC=contoso;DC=local"

# Easiest way to get ID is to run SQL
# select o.Id, FriendlyName from Organization o
#
# 9FF2BD5D-D741-E311-922F-02BF0A033E06	Alpine Ski House
#

$Id = New-Object `
   Guid("9FF2BD5D-D741-E311-922F-02BF0A033E06")

$setting = New-Object `
   "Microsoft.Xrm.Sdk.Deployment.ConfigurationEntity"
$setting.LogicalName = $ConfigurationEntityName
$setting.Id = $Id

$setting.Attributes = New-Object `
   "Microsoft.Xrm.Sdk.Deployment.AttributeCollection"

$kvo = 
"System.Collections.Generic.KeyValuePair[String, Object]"
$keypair = New-Object $kvo ($SettingName, $SettingValue)

$setting.Attributes.Add($keypair)

Set-CrmAdvancedSetting -Entity $setting

When new users are added in bulk to the Alphine Ski House organization, browsing will be restricted to the relevant OU only. CRM is smart enough to figure out who’s already in and displays only new users. Nice and clean.