Tip #319: Qualify Lead – CRM 2011 vs CRM 2015

It seems like the release of CRM 2015 as sparked a fire for a lot of companies using CRM 2011 to finally upgrade. There are many differences between the CRM 2011 and CRM 2015 feature set, hundreds of new features were added for CRM 2013 and hundreds more for 2015. However, there has also been changes in long standing features on how it operated from both a user standpoint and data record perspective.

One big change is in how the Lead Convert process works. In part of the process to reduce the windowing effect of using the product to make it simpler and tablet friendly, the entire Lead convert process has changed.

Take a look at the different scenarios for both 2011 and 2015 below to get a peek on how you may need to incorporate this as a to-do list item in your upgrade process to 2015.

CRM 2011 Qualify Lead

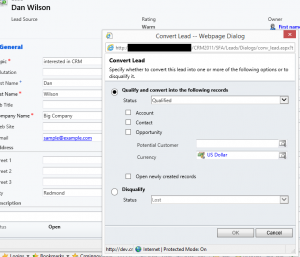
CRM 2011 Lead Convert

When you qualify a Lead in the current 2011 CRM a pop up appears and you are given a choice to convert the Lead into an Account, Contact and/or Opportunity.

  1. If you choose just an Account to be created:
    1. An Account is created from the info on the Lead.
  2. If you choose just a Contact to be created:
    1. A Contact is created from the info on the Lead.
  3. If you choose for just an Opportunity to be created:
    1. You must use the Potential Customer lookup to choose an existing Account/Contact
    2. An Opportunity is created with the chosen existing Account/Contact in the Account lookup field on the Opportunity.
  4. If you choose to create an Account and Contact:
    1. An Account is created with the created Contact in the Primary Contact lookup
    2. A Contact is created with the created Account in the Account Name lookup
  5. If you choose to create an Account and Opportunity
    1. An Account is created from info on the Lead
    2. An Opportunity is created with the created Account in the Account lookup
  6. If you choose to create a Contact and Opportunity
    1. A Contact is created from info on the Lead
    2. An Opportunity is created with the created Contact in the Account lookup
  7. If you choose to create an Account, Contact and Opportunity
    1. An Account is created with the created Contact in the Primary Contact lookup
    2. A Contact is created with the created Account in the Account Name lookup
    3. An Opportunity is created with the created Account in the Account lookup
  8. Currently there is no way to have the Lead Qualify create a new Contact and Opportunity but be able to choose an existing Account to tie the Contact to and use as the Account on the Opportunity

CRM 2015 Qualify Lead

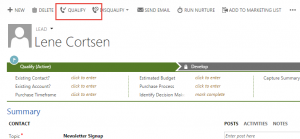
CRM 2015 Lead Convert

  1. When you qualify a Lead that has a First/Last Name and Company Name filled out a Contact, Account and Opportunity are created.
    1. The Contact has the Account in the Company Name lookup field
    2. The Account has the Contact in the Primary Contact lookup field
    3. The Opportunity has
      1. The Account in the Account lookup
      2. The Contact in the Contact lookup
      3. The Account in the Potential Customer lookup
  2. When you qualify a lead that has a First/Last Name but NO Company Name filled out a Contact and Opportunity are created.
    1. The Opportunity has
      1. The Contact in the Contact lookup
      2. The Contact in the Potential Customer lookup
  3. If you qualify a lead where the First/Last Name or Email matches a Contact already in the system a pop-up will appear with a duplicate warning and will allow you to lookup to an existing Contact instead of creating a new one. An Opportunity will then be created as per #2 above.
  4. If you qualify a lead where the Company Name matches an Account already in the system a pop-up will appear with a duplicate warning and will allow you to lookup to an existing Account instead of creating a new one. A Contact & Opportunity will then be created as per #1 above.

Tip #318: Don’t hack the button

In a comment for Tip #33, a reader asked why I recommend creating a new command bar button, rather than modifying the action of the standard ribbon button.

The reason I recommend creating a new button rather than modifying the standard button is for several reasons:

  1. The recommendation was technically unsupported, as the multi-action button is not documented in any official source. it is more unsupported if you modify the standard button behavior.
  2. A custom button is less likely to get overwritten by other solutions, such as ISV solutions that include the standard ribbon button.
  3. A custom button is less likely to break or get overwritten in an upgrade.
  4. I forget what I do and plans change. 5 years from now, we may have totally new people using the system. They take training and learn about the standard button, but wait, ours behaves differently. By going with a custom button, it is clear that our custom two feature button is different, so you can avoid embarrassing calls to support.

So that is why I would take the time to create a new button rather than modifying the existing one.

Tip #317: Once upon a time this rollup field was recalculated

Mitch “Snapshot” Milam is on a roll. This is just another way to say that his next tip is all about rollup fields.

Rollup fields are one of the best new features of Dynamics CRM 2015. Here are some facts to help you better understand how they work:

  1. They are automatically calculated asynchronously, once per hour.
  2. You may manually update the rollup field at any time by hovering over the field and clicking the refresh icon that is located on the right–side of the field.
  3. Hovering over the field will also show you the amount and the last update time for the field, as you can see below: Rollup field tooltip
 

Tipp Jarr’s Double Dipp

The default recalculation interval of one hour can be changed by editing appropriate job under Settings > System Jobs > View > Recurring System Jobs (filter the list by system job type Calculate Rollup Field) then looking for the required entity (there is only one Calculate Rollup Field job per entity).

Tip #316: Important links for all occasions

Shan “Smokin’ Portals” McArthur is the man not easily excited but even he couldn’t contain his enthusiasm:

The documentation and support teams have responded to some of our requests for important links to the implementation guide, product downloads, and update rollup information. They have published a new page that documents that information for all versions of CRM from version 4 to 2015. I hope the search engine optimization strategy works and it starts to rise to the top of search results soon. If you have existing blog articles on the subject, please update them to include this link:

http://support.microsoft.com/kb/3036179

Thanks so much to the teams for the effort in publishing this page!

Tip #315: Help! I can’t move my fields around the form

Mitch “Snapshot” Milam to the rescue once again:

There may be a time, when working in the Dynamics CRM form editor, that you notice that the form editor will not allow you to move a field from one section to another. Have you ever seen that?

It is not a problem with the form editor, it is a problem with the field.

Although it may not be clearly visible, some fields are actually configured to take up two columns, by default. If your destination section is only one column, then the form editor will not allow you to move the field into that section.

The solution is simple: Edit the properties for the field and change the formatting to one column (or whatever you need to, to match the section you are moving into).

Tip #314: CRM 2013 to CRM 2015 Upgrade Gotcha #2

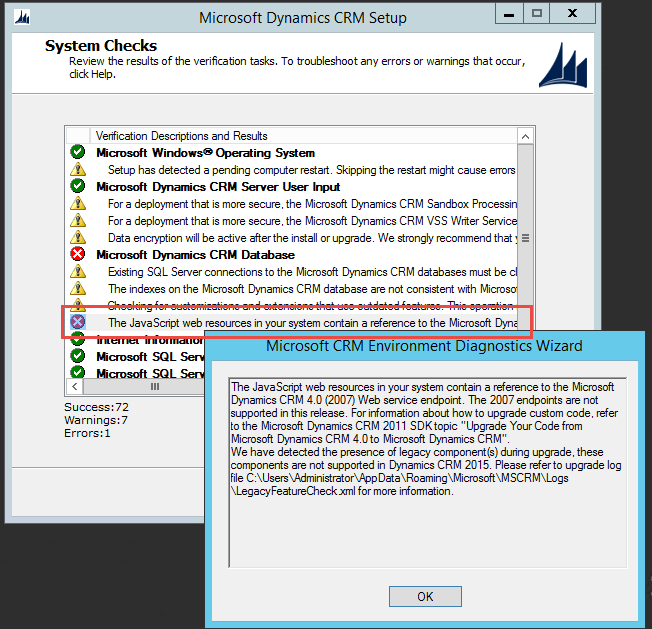
Got legacy code? You can’t sweep it under the rug anymore. It’s a blocker to upgrading. You will need the Custom Code tool created by the CRM team to root these issues out.

Learn more here http://blogs.msdn.com/b/crm/archive/2013/08/23/check-your-javascript-code-to-prepare-for-your-upgrade.aspx

Download the tool here http://www.microsoft.com/en-us/download/details.aspx?id=30151

Legacy Code won't work in CRM 2015

Legacy Code won’t work in CRM 2015

Tip #313: Change labels on composite controls

Dynamics CRM TipperMini truck stop, folks. That’s when someone asks a question and receives a very straightforward answer. No discussion, just business.

Today’s Roles

Inquisitive Interrogator: Feridun “Best Twitter Handle for CRM MVP” Kadir
Pantomath: Adam “Hip Is The Best Source For The Answers” Vero
Omniscient Narrator: Carsten “I Can Spell ‘Tipp’ ” Groth

The Dialog

I.I.: Does anyone know if there is a supported way to change the label shown for address items in composite controls?

Composite Address

For example, the pop-out for an address shows ZIP/Postal Code, can this be changed to Postal Code?

I’ve tried the usual method of changing Display Name in the entity (in this case Account) and the Address entity with no luck.

P. (guessing): Exporting and re-importing translations (for the same base language)? Just an idea, I have not actually checked – I would expect those labels to be translatable for other languages, so they ought to be there.

O.N. (knowing): Export translations and edit address1_postalcode label and re-import. Composite controls just take the data from their source attributes (address1_ or address2_)


So there you have it, localize away to please British pundits.

Tip #312: Quickest way to add multiple fields

Texans are quick to draw, I hear. Today’s tip from Mitch “Texas Baby Oil” Milam just proves that.

The absolute quickest method for adding multiple fields to a form is not dragging and dropping. It is double–clicking. Here’s how it works:

  1. Select the section within the form where the new fields will be placed.
  2. Using the Field Explorer, on the right–side of the Form Editor, navigate to the field or fields you wish to add.
  3. Just double–click on the field name and it will automatically be added to section you selected in step 1.

Once the fields are added to the section, you can use the arrow keys to move the fields around the section, or event between sections.

Tip #310: CRM 2013 to CRM 2015 Upgrade Gotcha #1

Thinking about doing an in place upgrade from CRM 2013 to CRM 2015?

If so it isn’t just a matter of running the SetupServer.exe file. That is even assuming that your underlying infrastructure supports CRM 2015.

One notification that you run into immediately is the pre-requisite to uninstall the CRM Connector for SQL Reporting Services. In this case we were updating an all in one server environment in our developer area.

SQL Server Reporting Services Connector Uninstall Warning

SQL Server Reporting Services Connector Uninstall Warning