Tip #749: If your server-side synchronization is unstable

Unstable rocks
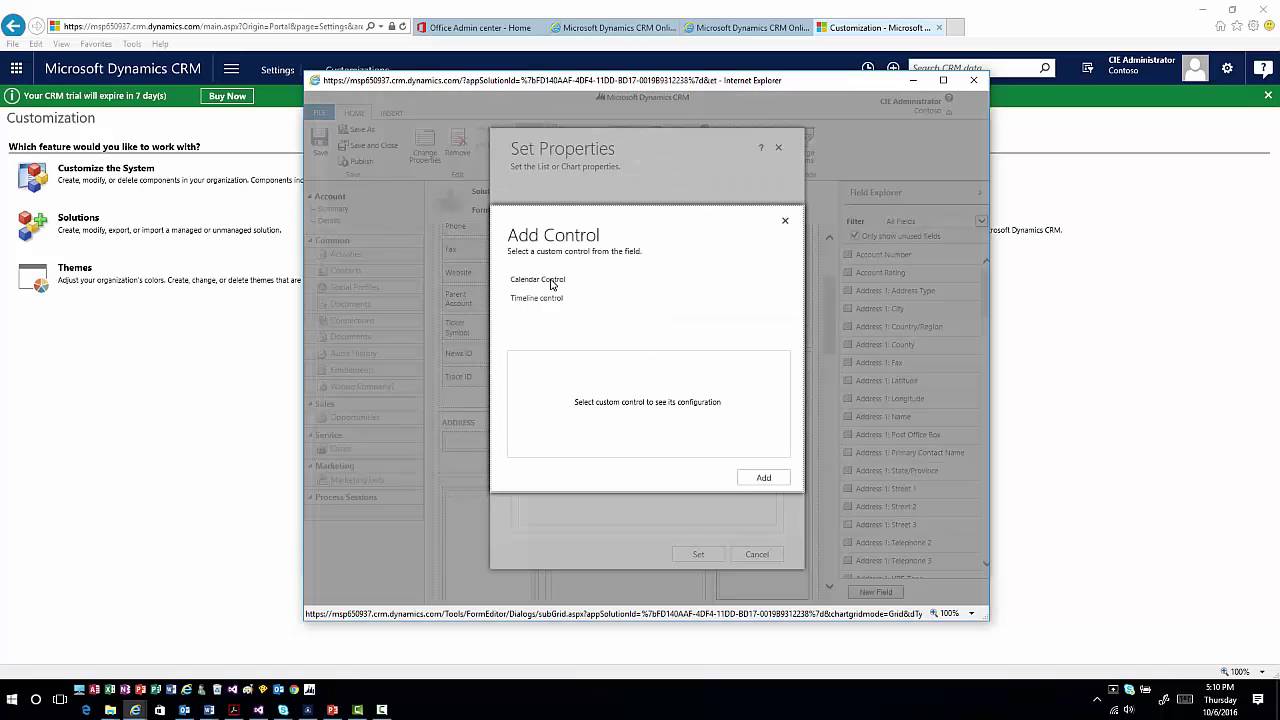
Last week at the Hitachi Solutions Customer Conference, I lead a session about Server-Side Synchronization. One attendee asked me about an issue he was seeing where mailboxes would not stay enabled.

The following process has helped improve stability in other environments I’ve worked in, and it might help you as well if you face a similar situation.

  1. Set all mailbox records to Outlook synchronization.
  2. Set a small number of mailboxes to server-side synchronization and test and enable them.
  3. Wait a day or two and make sure that the mailboxes you enabled are working correctly.
  4. Set a few more mailboxes to server-side synchronization, and test and enable them.
  5. Continue this process until all of the active user mailboxes are enabled and working.

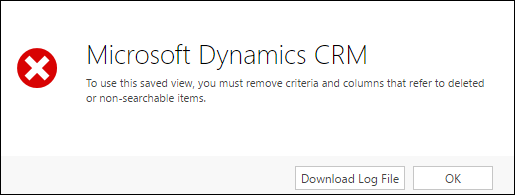
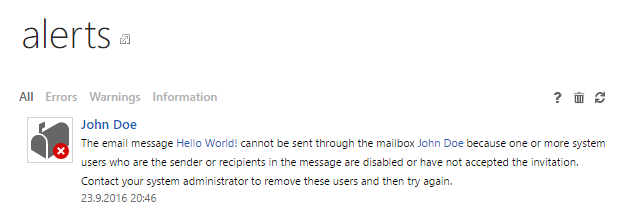
Be sure that all disabled users are not set to server-side synchronization. if there are any users who don’t need to be on server-side synchronization (such as users who are only ever working from the same computer, users who don’t need to track or sync, etc), either set them to Outlook synchronization or disable synchronization.

By following this process you can remove complexity from your sync deployment and improve performance by limiting server-side synchronization to only the mailboxes that need to synchronize.

Tip #748: Viewing Record Related News on MOCA

newsIn this video we look at the Company News Timeline feature that was release with Spring Update. This feature lets you stream news stories about CRM records on Mobile devices. In addition we show you how the Timeline Control works and is configured.

YouTube player

Give us your feedback, all of it: good, bad, and ugly, I’m sure we can take it. Suggest new topics either in comments or by sending your ideas to jar@crmtipoftheday.com.

Don’t forget to subscribe to http://youtube.com/crmtipoftheday.

Tip #747: If your view is broken

Closed binocularsIf you followed our yesterday’s tip and tried to set up a workflow automatically adding a user to a team, you may have seen the error message: “To use this saved view, you must remove criteria and columns that refer to deleted or non-searchable items.”

Broken view message

The fix is fairly straightforward: find the lookup view in customizations, remove the offending column and add back the proper one (Name).

Broken view

If you think that it will never happen to your views then wait until someone pulls out Xrmtoolbox and uses View Replicator to create a view referring to non-existing attributes.

Tip #746: Bring in the specialist

Bring in Mr WolfWashing car on weekend is something that everyone can do on their own. Probably. But if some serious cleanup is required, one’s better off calling Mr Wolf.

Same goes for complicated cases in customer service. If you run a secure shop that deals with the cases that include sensitive or personal identifiable information, then security roles and settings in your CRM system would be fairly tight. Now, what if you need to bring a specialist to a complicated case who otherwise wouldn’t have access to the record? Sharing, of course. And CRM has a mechanism just for that – auto-created access teams.

The only downside is that adding/removing user is a manual process. Wouldn’t that be nice if system could automatically bring a specialist to the complex cases requiring some extra care?

Now let’s assume that you can identify a specialist for the case. It could be as simple as a link from a case to a product (exists OOB) and from product to a user specialising in this product (you’d have to create this relationship). Or as complicated as a Azure machine learning analyzing past cases and figuring out who’d be the most efficient in resolving this or that case.

What is missing now is a workflow action to add/remove a user to/from the record access team. Good news is that this functionality is fairly simple to add. Some assembly is required.

public partial class MyActivity : CodeActivity
{
[RequiredArgument]
[Input("Select the user")]
[ReferenceTarget("systemuser")]
public InArgument<EntityReference> User
    { get; set; }

[RequiredArgument]
[Input("Select the team template")]
[ReferenceTarget("teamtemplate")]
public InArgument<EntityReference> Template
    { get; set; }

protected override void Execute(
	CodeActivityContext context)
{
    IOrganizationService svc = context
        .GetExtension<IOrganizationServiceFactory>()
        .CreateOrganizationService(null);
		
    svc.Execute(new AddUserToRecordTeamRequest()
    {
        SystemUserId = User.Get(context).Id,
        TeamTemplateId = Template.Get(context).Id
    });
}

With this custom activity you can now create a workflow that would automatically add a specialist to a case when required.

Workflow auto bringing the specialist

Tip #745: To Close The Unclosable Dialog

The first time you launch immersive Excel (also known as open in Excel Online) in a browser, you will get the following dialog:

analyzeyourdata

The problem is, in some browsers (like Edge on Windows 10), hitting the X does nothing.

To make this dialog go away, click the “Don’t show me this again” checkbox, then refresh your browser. The browser should then refresh to the same grid in Excel online, this time without the helpful dialog.

Tip #744: Manually accept invitations for disabled mailboxes

RSVPGuido “Trekkie not Star Wars fan” Preite with another tip on maintaining your mailboxes in hybrid environments:

In a CRM Online configured with an Hybrid Server Side Synchronization emails sent by a particular users moved to Failed state after few seconds (other users can send emails without issues). In the alert section of the mailbox the following message appeared:

“The email message Hello World! cannot be sent through the mailbox John Doe because one or more system users who are the sender or recipients in the message are disabled or have not accepted the invitation.”

Hybrid mailbox alert

The solution is to update the field “Invitation Status” inside the User form with the value “Invitation Accepted”.

Manually update invitation status

This field is normally read-only and inside a section called “Account Information” that is hidden by CRM, so it’s necessary to move this field out of this section and make the field not read-only.

Tip #743: Portal Configuration Overview

Portals ExtraterrestrialIs this video we look at some of the basic configuration elements in Dynamics CRM Portal Capabilities. In addition, we also explore how to surface CRM info in the portal using Entity forms and Lists.

YouTube player

Give us your feedback, all of it: good, bad, and ugly, I’m sure we can take it. Suggest new topics either in comments or by sending your ideas to jar@crmtipoftheday.com.

Don’t forget to subscribe to http://youtube.com/crmtipoftheday.

Tip #742: List component has 2 months to live

FlatlineRecently, SharePoint has announced the removal of code-based sandbox solutions in SharePoint Online. As a result, the CRM SharePoint list control will stop working on November 30, 2016.

Here are details from SharePoint’s blog post:

  • As part of the removal process, activation of new code-based sandbox solutions, as well as updates of existing solutions are no longer available.
  • In the coming weeks, running code-based sandbox solutions in SharePoint Online multi-tenant environments also will be disabled. Customers with these solutions should watch the Message Center and Service Health Dashboard (SHD) for details, timelines, and exception processes.

CRM Online customers using SharePoint Online should move to server-side SharePoint integration immediately.

See also: Tip #611: On Server-Side SharePoint and Subfolders

Tip #740: How to flush cache in portal

Repair computerIf you are still trying to refresh your portal metadata using cache invalidation handle https://nottherealportal.microsoftcrmportals.com/Cache.axd?Message=InvalidateAll, stop it. The caching invalidation mechanism significantly changed and the legacy methods are no longer appropriate or supported.

Instead, remember the advice you gave your auntie when her computer was slow? That’s right, turn it off and then back on.

Navigate to CRM Admin Portal > Applications > Portal Add-On > Manage then turn your portal off, Update, turn it on, Update.

Turn portals off and on

That will restart the application and refresh metadata (note: the first page load after that could be excruciatingly slow so, if it’s a production system, choose your time wisely).