Tip #1013: Include attributes that are not there

New Developer Guide, as it turned out, contains a lot of useful nuggets, little enhancements that make developer’s life much easier.

How many times did you need some field values for the use in javascript but didn’t really want to include the fields on the form? Something like lattitude and longitude, for example. Would it mean much to a user if I showed values -33.868820 and 151.209296? But I could definitely use those values to display a map with a pin indicating my current location.

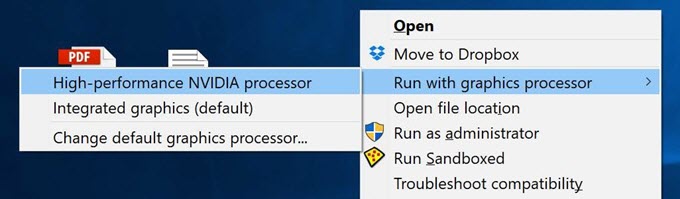
The workaround used to be to add fields to the form but then set them to be invisible. Starting from version 9.0 you no longer need to add attribute to the form, you can instead set the attribute as a dependency for the JavaScript web resource:

  • Attribute will be available within the client API attributes collection.
  • The controls collection of the attribute will be empty.


Tip #1012: Developer Guide of the Future says hello

According to the timestamp on the page, it is the future because, as of the time of writing, there is no place on Earth where 31st of October is a reality.

Developer guide is available

Developer Guide for Dynamics 365 Customer Engagement, version 9.0, the release formerly known as July 2017 Update for Dynamics 365 (online), is now available and I must say, it seems to be organized pretty well and overall first impression is good. Time will tell.

Tip #1011: Case subject/category code strategies

Whether you use the standard Dynamics 365 Case Subject tree, or you use an alternative method and hope that the subject tree dies, categorization of your cases is important if you want to report on them later and analyze your case history. By assigning subjects to cases, you can group cases by category, identify related issues, and spot trends that will be helpful in improving your products and services in the future. By analyzing your case history by subject, you can identify which products or categories have the most issues and perform root cause analysis on these issues.

But if you are starting from scratch, sometimes it is hard to know which subjects you should include, and how your structure should be organized.

My recommendation is start simple. Too often managers want to overload the subject tree with too many options. This can be counter-productive, as customer service agents will find navigation through the list to be cumbersome, and may pick the wrong subject. Start with a handful of subjects and add to it over time based on user feedback.

The subjects that you use will probably differ based on you type of business and how your customer service teams are organized.

Companies that sell products

If you have customer service and sales teams ordered by product line, then categorizing cases by product line usually makes sense with subcategory types that clarifies the question or issue.

  • Product A
    • Sales Question
    • Technical support question
    • Returns
  • Product B
    • Sales Question
    • Technical support question
    • Returns
  • Product C
    • Sales Question
    • Technical support question
    • Returns

A Software Company

The following example is for a software company that has teams separated by function and technical tier.

  • Bug
  • Feature Request
  • Sales Question
  • How To
  • Technical Issue
  • Cancellation

Corporate IT

If you are using CRM to support internal helpdesk tickets, you probably will want to categorize by IT area and team handling the request.

  • Desktop Hardware
  • Desktop Software
  • Server
  • Networking
  • New Employee
  • Office 365
  • CRM
  • Change Request

By Department

In some organizations where issues are strictly handled by each department, categorizing by department can make sense.

  • Software Development
  • Sales
  • Information Technology
  • Human Resources
  • Mail Room
  • Operations
  • Shipping

How did you arrive at your case subject/category structure? Let us know in the comments..

Tip #1010: Use synchronization filters

I have a customer who is running Dyn 2016 8.0 On-prem and Server Side Sync. One of the accounts has 12000+ appointments and when/if we do a “Test and Approve” of the mailbox it seems that the resync of the mailbox with the Exchange Server (ver 2010) takes a very long time, often over 12 hours.

(That was Gustaf “Surströmming” Westerlund asking for help, if you must know)

Joel to the rescue

Update said user’s sync filter for appointments to start date on or after 1-Sep-2017 or something like that. NO reason to sync old/completed appointments.

Tîpp Jäår

Be smart, be like Joel, and start using synchronization filters to exclude old or irrelevant data. That can definitely speed up both initial and ongoing synchronizations.

Another common scenario is when a user account is used to perform initial data import or integration, and that user ends up owning bazillions of contacts. Default synchronization filter is My Contacts which will attempt to drag all those records across into the user’s address book. Smart move would be to adjust the filter and exclude contacts from the initial synchronisation altogether and then, over the time, start bringing the relevant records in (once you figured out what does “relevant” mean to that poor user). You can use last contact date, for example.

Tip #1009: Turn your Dynamics 365 into a rocketship

Every once in a while, when I am doing an event or a class, a student will show me something that totally changes how I do or show stuff. This week it happened to both myself and George as we were doing an event together. I would like to credit Scott “Go Fish” Meddings, a TSP in Australia, for showing us this one.

We all know that Dynamics 365 is reasonably fast most of the time but here is a simple trick that can be done on your machine to add an extra boost to Dynamics 365 client. It came up in the context of dealing with screens loading when doing demos, and preloading content. Both George and I have used this several times this week, and Dynamics 365 runs like a rocketship.

Run with graphic processor

Right-mouse click a shortcut to a browser of choice (as long as it’s not Edge), then select Run with graphics processor, then select the processor if there is more than one. The second I did it, I noticed a huge difference. Things that normally took forever to load were loading almost right away.

YMMV, of course, but give this one a try, whether it’s for a demo or just daily routine work, and again thanks Scott for the tip.

Tip #1008: Learn PowerApps

If you are a long time “CRM Person” like me, you may be interested in PowerApps, but if you try out PowerApps, you see that the process of building a PowerApp is significantly different than customizing Dynamics 365 forms. So I asked PowerApps MVP Daniel Laskewitz

What are the best training materials for “CRM people” to learn how to create PowerApps?

Have you built any PowerApps yet? Share your experiences and lessons learned in the comments below.

Tip #1007: What is the Common Data Service (CDS) today?

Much digital ink has been spilled about the Common Data Service (CDS) and the vision of what it will be in the future as the glue that connects Dynamics applications and model driven apps.

But what is the CDS today?

The Common Data Service is a service that provides one or more databases that include many of the common entities and fields that are in Dynamics 365 Customer Engagement (CRM) and Operations (AX). Administrators can add additional entities, fields, and relationships,  but cannot delete or modify the system created components. CDS provides pre-defined templates for integration with AX and CRM common processes.

CDS is also a back-end database for PowerApps. Users creating PowerApps can define their data model in CDS and build an app that stores data in the CDS database.

How do you get to the CDS?

You manage the CDS through the PowerApps website. If you don’t have access to PowerApps, you cannot access CDS.

  • Go to powerapps.com and log in.
  • Click the Common Data Service tab in menu to access CDS.
  • The first time you do this, you will be prompted to create your database. This will create your first database, which includes the common tables and fields such as accounts, contacts, orders, products, etc.
  • To add new entities, select “Entities” under CDS

  • To add new fields, open the desired entity and add a new field.
  • To add a new relationship, go to the child entity (where the lookup field should be), click the relationship tab, then add the relationship.

  • If you want to add a picklist field, you must first go to “Picklists” in the menu, define the picklist, then you can add the picklist field to entities.

How does integration with CDS and Dynamics 365 work?

To configure integration with Dynamics 365 and CDS:

  • Go to the PowerApps admin center.

  • Click “Data Integration” on menu
  • Create a connection set if one doesn’t already exist. This defines the CDS instance, CRM instance, and AX instance to use for integration.

  • Click Projects, then “New Project”
  • Give your project a name. You will need to select one of the pre-created integration templates, then click next. The integration templates are designed around the most common integration scenarios between Customer Engagement and Operations, such as synchronizing companies, contacts, products, and orders.
  • Select connections, organization, then confirm your selection.

Is CDS just one big database to use for Dynamics integration and PowerApps?

CDS can have one or more databases. In the Environments area of the PowerApps Admin Center you can define multiple PowerApps environments, each of which has its own CDS database. The number of CDS databases you can have differs based on licensing.

So a best practice may be to separate your instances based on usage. If you are synchronizing CRM data to CDS and building Power Apps that don’t use the Dynamics tables (or need those tables for other unrelated purposes), I would recommend creating additional environments and CDS databases so your usage doesn’t conflict. This can also be helpful for dev/prod scenarios.

What about security?

From the Environments area of the PowerApps Admin Center you can define permission sets, which are groups of CRUD permissions by entities.

You can then create roles and associate one or more permission sets to the roles, then grant roles to users.

Some important things to note:

  • There is no idea of owner or business unit security
  • CDS security does not mirror Dynamics security
  • If you have a user accessing Dynamics 365 data from a PowerApp and wish for it to mirror their security in Dynamics 365, you probably will want to use the Dynamics 365 connector for Power Apps rather than data synchronized to the CDS database.

Why would I use CDS for an integration between CRM and AX instead of a direct ETL integration?

One of the reasons why you may use CDS instead of a direct integration is because while AX and CRM have similar data and related processes, they do things in different ways. One example is currencies–both provide multiple currency support, but the way that currencies on transactions are stored is different in both applications. The CDS is designed to provide a common shared integration database that stores this data in a common way, simplifying process integration between the two (such as in quote to cash scenarios).

In some cases, however, a custom ETL integration (using tools like KingswaySoft) will be a better fit. Especially in highly customized deployments or where significant changes to standard field mapping is required.

And the answer may be both. If the standard templates work for you, but you need some additional integration support, it may be valid to use the CDS integration and supplement with some additional ETL based integrations.

__________________________________________________________________________________________________________

Any other questions or comments? Put them in the comments


Tip #1006: Case management vs. ticket management in Dynamics 365

Dynamics 365 customer service functionality includes case management, which is used for a wide variety of purposes. Many companies use Dynamics 365 for management of incidents (cases), which can be everything from a service issue, a customer complaint, or a request. Dynamics 365 cases have rich functionality, just a few examples:

  • Hierarchical parent/child cases
  • Queues
  • Rules-based routing
  • Automatic creation from email and other sources
  • SLA enforcement and escalation
  • Support for complex branching processes
  • Entitlement management to enforce service contract allowances

Dynamics 365 can handle very complex case management scenarios. But what about more simple scenarios, such as ticket management.

Note–different industries and standards organizations like ITIL have precise definitions around terms like incident, ticket, request. The definition used for case and ticket in this post are based on common usage, not any specific industry definition.

While “ticket” and “case” are frequently used interchangeably, they generally describe slightly different things. Tickets are frequently closed quickly, have fewer details than a case, and are email (or other message) centric. A common workflow for a ticket is:

  1. Request received from customer
  2. Ticket created
  3. Ticket assigned
  4. Agent resolves issue
  5. Agent responds to request
  6. Ticket is closed

Common systems used for ticket management include ServiceNow and ZenDesk.

Simple cases may follow a similar workflow as tickets, but for more complex issues, a case can be open for a much longer time, include more people, and have more steps. Dynamics 365 is built to handle very complex case scenarios.

But is CRM a good fit for more simple ticket management? The answer is yes, it can be, if you configure it correctly. The standard case configuration may seem cumbersome if you mainly manage simple tickets, but with a little bit of configuration, it can be a great fit for ticket management

The following are some tips for how to simplify the CRM Case entity for simple ticket management. Special thanks to Leon Tribe for his input on this tip:

  • Remove the stuff you don’t need. Doing tickets for internal helpdesk and don’t need entitlements? Turn it off and remove it from the form.
  • If most of your tickets are closed in one step, turn off business process flow for cases.
  • One complaint about CRM cases in email-centric ticketing processes is that the original email can get lost in the noise of the activity pane on the case form. Especially if you have processes sending emails to clients when cases are created or updated, if the agent wants to easily respond to the original email from the client, it can be hard to find it among all of the other case activity history. To make it easier for the agent to respond to the client’s email, add a subgrid of email records with a view filtered to exclude emails sent from the account that sends the case notification emails. This makes it very easy to locate the original email and respond to it. When you do so, the response email will be automatically linked to the case.
  • If most tickets are closed in one step, add case resolution fields to the case form, and have a workflow close the case when these fields are populated. While this only saves a few seconds per case, in a busy helpdesk, this can be a significant timesaver.
  • Want auto-text that the agent can insert to an email response and make some quick edits to send to client? Knowlege base articles or email templates can provide this functionality.

Do you have any other recommendations on how to simplify Dynamics 365 cases to better fit simple ticket management scenarios? Leave them in the comments.


Tip #1005: Keep your portals warm and cuddly

This week I had a privilege to sit among Australian Technical Solution Professionals (TSPs) absorbing some of the best selling techniques delivered by none other than our resident video tipster Derik Bormann.

One of challenges of the pre-sales demos is that they need to flow as smooth as butter – there is no room for mistakes and any hiccup is nearly fatal. “You had your chance” seems to be the motto.

When demoing Microsoft Portals, the performance needs to be especially flawless – expectations are high and there is no room for an hourglass cursor. Instead of frantically refreshing the pages 5 minutes before the demo, why not to keep your portal ready to go by hitting the pages you’re about to demo every minute or so, starting 15 minutes before your demo.

If you already use external monitoring services like https://pingdom.com, https://nodeping.com, or any other, go ahead and add your portal pages there – done. If you don’t have any of those (and why would you if you work in pre-sales), here’s how you can create a quick and dirty warmer-upper using existing Azure subscription (I assume you do have one of those if you demo Dynamics 365 and Portals, right?)

  1. In your https://portal.azure.com click + New, search for Scheduler, then click Create.
    Azure Scheduler
  2. Give it a good name
  3. Pick up an existing job collection or create a new one. Note: you’d want a collection in standard tier or higher – free one has only hourly runs.
  4. Click Action settings, select Https Action, enter Url of your page, leave the rest as is and hit OK
    Scheduler action
  5. Click Schedule and enter the details: start date/time (say 15 minutes before the demo), end date/time (15 minutes after), frequency of 1 minute. (And no, I don’t demo at 4:30 AM, it’s UTC speak for 3:30 PM in Sydney)
    Start stop
  6. Rinse, repeat for the pages you’re going to use in your demo.

You are all set now. Whatever problem you encounter during the demo, portal performance ain’t gonna be it.