Tip #283: Create a limited customizer role

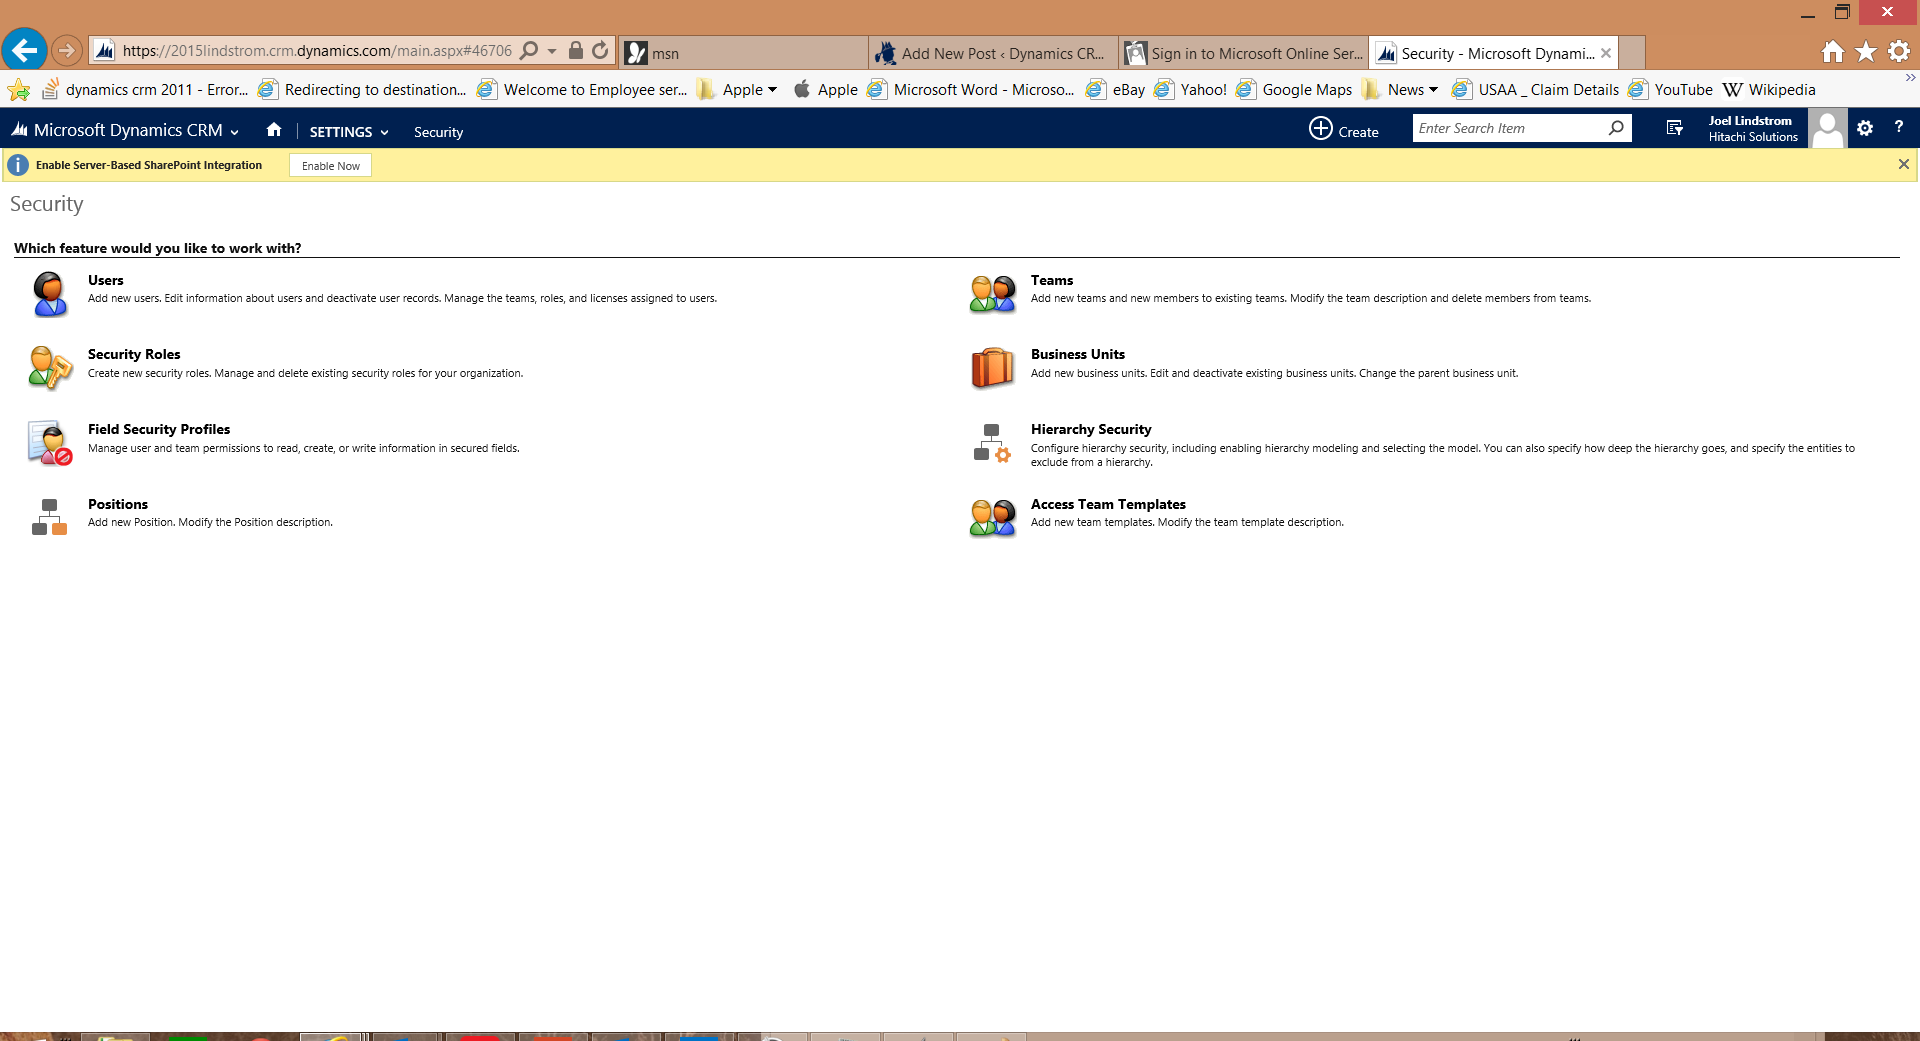
In most deployments, users who need to manage customizations in an environment are granted the System Administrator or System Customizer role. This gives them the ability to create or edit entities, relationships, fields, views, charts, dashboards, the whole enchilada.

But what if you want a nibble of the enchilada?

Not all customizations carry the same severity. For example, adding fields, customizing forms, or removing relationships are major customizations that can seriously impact the success of your deployment. But something like creating new system charts is not such a major thing. Sure you might get a lot of charts in the system, but everybody will live.

So what if you want to have a chart administrator that can edit or create new system charts, but you do not want him to be able to change other customization?

This recently came up for me in a deployment using CRM for Tablets, as shared personal views and charts are not available from the tablet app (which I talk about in my book “The CRM Mobile Survival Guide.” Use “FriendofJoel” at checkout for a discount on the paper version.). Since the chart admin was not a system administrator, and the personal charts that he shared with other users weren’t available from the tablet, we wanted to grant him the ability to create system charts but not touch other customizations.

1. Create a role called “Chart Admin.” I recommend making this a small role to be used along with the users main base role, rather than trying to add every other permission that he will need to this role. Just create an empty role.

2. On the customization tab of the security role definition, give the user the following permissions: Read for solutions and create, read, and write for charts.

3. Give the user the new role.

Screenshot 2014-12-03 08.31.30

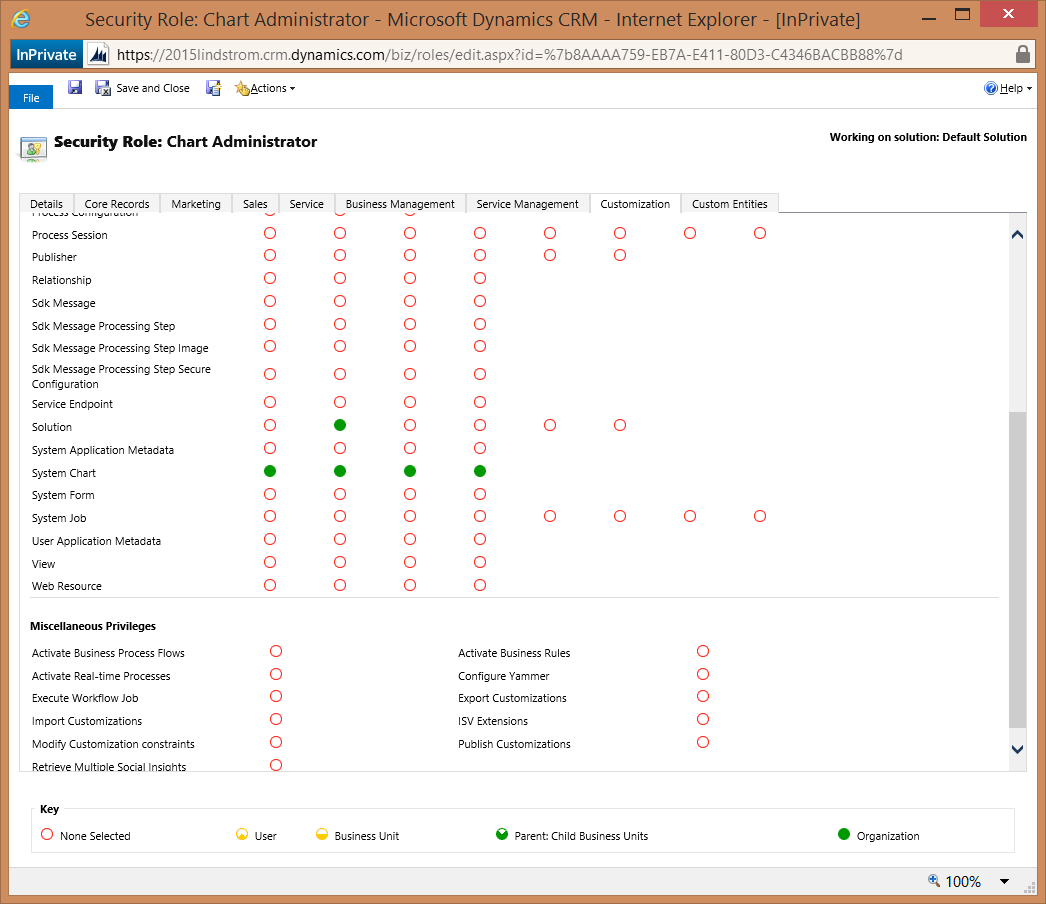
The user will now be able to create new system charts without being able to modify other customization components. The read privilege is required for the “customize the system” link to be available. You could do the same thing for views by granting the users permission to the “View” entity.

Note that system charts and views do not require that customization be published before they become available to users. This means that the user won’t require the publish customization permission, and won’t be disrupting users by publishing customization while they are updating charts.


Tip #282: Why aren’t users in the sandbox?

You use CRM Online. you add a user in Office 365 and assign a CRM license to her. The user shows up in your CRM production organization users, but does not show up in your sandbox organization. What’s up?

Most likely the problem is that your sandbox organization has a security group associated with it, and the user you added is not part of that security group. Associating a security group with a CRM Online organization is a great way to restrict a certain organization to specific users.But it is also the cause of many frustrated O365 admins who aren’t aware that the security group is applied to the organization wondering why users aren’t there.

In the Office 365 Admin portal, go to the CRM tab, select your organization, then click “edit.” In the instance properties, look at the “Security Group” field at the bottom of the page. If there is a group selected, only the members of the group will be added to the organization. If you want to have all CRM licensed O365 users in the CRM organization, you can remove the security group from the organization by clearing the field, or add the users that you want to be in the organization to the selected security group.

Securitygroup

Tip #281: It all has to be SP1

If you upgrade from CRM 2013 to 2015, your CRM environment needs to be on 2013 SP1. ALL OF IT.

So if you check your CRM server version and it is 6.1.X, you should be good, but what about the other components? What about the SSRS data connector? What about the email router? These items are very easy to forget about, and can add additional downtime and potential server reboots to your CRM 2015 upgrade.

For example, if you try to install the 2015 email router on a server running the 6.0.X email router, this is what you will see.

Screenshot 2014-12-01 15.54.15

Tip #280: Partial Opportunity Products

truckstop

Welcome back to the Tipping Truckstop.

This is where fellow tipping truckies get together to discuss topic du jour and add some collective wisdom to complex and often contentious but always fascinating world of Dynamics CRM. Grab a cup of coffee.

Today’s topic is opportunity products in the situations when, uhm, not all your dreams come true. Dynamics CRM 2015 makes some big improvements with products, such as child product hierarchies, product properties, and product relationships. These features are fantastic and remove many of the hurdles to using the product catalog in Dynamics CRM. However, one thing I still trip over with using the standard Opportunity Products relationship is how to best handle win/loss analysis when not all products on the opportunity are purchased simultaneously. What if I have an opportunity that contains 5 widgets, 3 whatnots, and 4 add-ons? The customer decides to purchase the 5 widgets now, buy the 3 whatnots next month, and not buy the 4 add-ons at all (maybe they found a cheaper price at a competitor). If I remove the add-ons for the opportunity, my won/loss analysis for that product is now incomplete (as it doesn’t reflect the items being “lost,” just the “won” items. Also, if I wait to close the opportunity until next month when the widgets and whatnots are sold, the widgets sale won’t accurately be reflected in my opportunity history.

Let’s see what the trucking tipsters recommend:

Feridun “The Fifth Beatle” Kadir: It depends on how the company wants to track and report on the items. For this scenario, I would separate them into multiple opportunities. If they need to be combined, create a self-referential opportunity relationship for parent/child opportunities and link them.

Gustaf “Swedish Elvis” Westerlund: Some organizations also use Quotes and orders within an Opp that just contain a subset of the products of the opp. When the order is created from the quote, the opp isn’t closed, and hence several orders are created from the same opp. When the final order of the opp is placed the opp is closed to the sum value of all orders. This can be used in frame agreements or similar. However, if you would like the tracking on opp-level, I am inclined to agree with Feridun.

Joel Lindstrom: I think the quotes and orders solution can work well if you are going all the way to orders in CRM; however, many large deployments don’t use orders in CRM, they do order entry in the ERP–they may interface the order data back into CRM, but they aren’t manually creating orders in CRM. In that case, having to do quotes on top of opportunities  is very cumbersome to users.

Larry “Tex” Lentz: You could also add the close dates to the opportunity or order products.

Gustaf: Another option is to create a new opp for each win/loss, use the “Get Products” to get the products from the original opp, and then remove products from each of the opps according to requirements.

George “$0.02 + GST” Doubinski: While in the past we have implemented complex opportunities by splitting them at the invoice level (similar approach to using multiple orders above), in CRM 2015 I would definitely consider adding a hierarchical relationship and split the opportunity itself (and its children, if needed). Not only the users will get access to the visualization tools, it’d be easy to add new rollup fields that would automatically calculate correct combined opportunity value.

Joel: Thanks guys–you’ve helped me focus my thinking on this topic. There are multiple approaches that we could take, and not a one size fits all solution. It really depends on what you want to track and how you want to report on it.

Tip #279: Don’t reuse AD accounts

Jon Lagavulin has left and Jim Laphroaig has joined the company. Same role, same position, even the same salary. In fact, Jim is supposed to take over all the leads, customers and opportunities left behind by Jim.

It’s very tempting to rename Jon’s account in Active Directory – select the user object, press F2, type the new name, press ENTER and, presto:
Rename user in AD

Complete all the fields including user logon name and save. Then switch to CRM and edit User Name field to match the new account:

Rename user in CRM

Right? In theory, yes. In practice, CRM does not seem to complete the account changeover if SID of the user remains the same and Jim, in all likelihood, will face 404 page immediately after the login. In my experience, it is always better to create new user in Active Directory, change account in CRM to point to the new user and then disable the old user account. Not only CRM will continue to work as advertised, Jim will be also spared of all the mailing list spam Jon has managed to subscribe to during his short stint with the company.

Some things just don’t mix.

Tip #278: Where did the users go?

So you set up a shiny new CRM 2015 environment, the first thing you want to do is add additional users.

But where did the “Users” go? They have always lived in the Settings–>Administration area. Did they move?

The answer is that Microsoft has moved users and user related entities (like security roles, teams, and the new hierarchical security settings) to a new Settings area called “Security.”

Screenshot 2014-11-28 07.56.42


Tip #277: Disabling user prompts

In Dynamics CRM, many of the system user prompts can be turned off in System Settings (Settings–>Administration–>System Settings)

  • Get CRM for Outlook. On the Outlook tab of System settings, set “Users see ‘Get CRM for Outlook’ option displayed in the message bar” to “No.”

outlook message

  • Prompt to use CRM app when running CRM in tablet browser. On the General tab of System Settings, set “Users see app download message” to “No.”

tablet

navtour message

Thanks to Andre Margono for suggesting this tip. Got any burning tips? Send them to jar@crmtipoftheday.com

Tip #276: When nobody is an O365 Global Administrator

With CRM Online, adding users and managing organizations is performed via the Office 365 Administrator Portal. This has some great advantages, as you can perform organization maintenance on all of your organizations from a central location.

This also means that managing CRM Online organization settings in Office 365 Admin Portal requires Global Administrator privileges.

But what do you do if no CRM users are Office 365 Global Administrators? If you work in a high security environment, there is a good chance that CRM administrators will not be given Office 365 Global Admin permissions, especially if other systems like Exchange Online or SharePoint Online are in use.

Without Global Admin permission, no CRM user will see notifications, alerts, be able to monitor the health of the service, or be able to schedule upgrades.

Suggestions:

  • Designate a Global Administrator to work with the CRM team. When users have trouble accessing the system, they will need someone to call who can check the status of the service. When there is an upgrade to schedule, the CRM team will need to work with a Global Administrator to schedule the upgrade.
  • Have at least one Global Administrator trained in the process or copying and refreshing sandbox organizations, so the dev/uat/qa environment can be refreshed occasionally.
  • Create a Global Administrator user account, then set up a rule to forward all mail sent to that user’s mailbox to a distribution list that includes CRM admins. That way alerts that come up will get sent to the members of that group. It’s not perfect, because you won’t get every notice (such as licensing conflicts, which don’t generate emails), but it is better than nobody on the CRM team being notified.

Thanks to my friends at Palmetto Technology Group for advising me on this tip. If you need someone to help you manage the sometimes confusing world of Office 365, they really know their stuff.

Tip #275: Uninstalling the MDM Connector

If you implement Microsoft Dynamics Marketing, Microsoft documents the process of installing the MDM connector. However, should you ever need to remove the connector, the instructions are not as clear.

At a high level, the process of uninstalling the connector is:

  •  Be sure the connector queues are drained. Verify in Azure management portal that there are no message in the Queue. Either don’t make any updates in CRM / MDM or disable the CRM service bus endpoint, if your CRM environment is life.
  • In MDM Service Settings, clean the configuration via the trash can button.
  • Disable the connector in MDM
  • Remove the Solution in CRM
  • Remove the Service Bus components in Azure

Be aware that after you remove the solution in CRM, there will be some additional artifacts that you will want to be sure you remove. This includes the service endpoint and 19 SDK Message Processing steps that you will want to delete either through the Customization menu or via the Plugin Registration tool. This will prevent system jobs from firing messages to Azure that won’t be received.

img 4


Tip #274: Lookup fields in CRM for tablets

I recently wrote the book The CRM Mobile Survival Guide. In Chapter 5 I discuss how to configure Dynamics CRM to give users a good user experience when using CRM via the CRM for Tablets app.

One thing I found while researching the book is that lookup field behavior in the tablet app is not consistent with other CRM user interfaces, like browser. if you configure field properties to filter a lookup field in form customization, the field will be filtered when using CRM in browser, but the filter will not apply when using CRM via tablet app.

To filter lookup fields in the tablet app, use a JavaScript Xrm.Page.getControl.addPreSearch function.

For example, say I have a custom Account lookup field called “Vendor” (new_vendorid), and I want to filter the lookup to Accounts where relationship type contains “Vendor.”

First, do an advanced find for accounts with the desired filter. The columns displayed in the advanced find don’t matter.

IMG1

Click the “Download Fetch XML” button to download the fetch query. Copy the contents of the Fetch XML between the <filter> tags.

IMG2

Paste the copied filter to the XML editor of your choice, and replace all double quotes with single quotes.

IMG3

Then add the filter to an addPreSearch function on load. This will override the filter of the lookup field with your new filter.

Xrm.Page.getControl(‘new_vendorid’).addPreSearch(function () {

Xrm.Page.getControl(‘new_vendorid’).addCustomFilter(“<filter><conditionattribute=’customertypecodename’operator=’like’value=’%Vendor%’ /></filter>”);

});

Now when you click on the lookup field in the tablet app, the results will be filtered based on the custom filter in your PreSearch function.

Bonus double dip

Since writing the Mobile book, I have discovered another inconsistency with lookup fields on the tablet app–they only search against the primary field. If you have other fields defined as find fields, from browser you can type in the field find the record using another search attribute. From the tablet app, the lookup field will only search the primary (name) field of the lookup entity.