Tip #392: SLAs for dummies, Part 3: FAQ

¡Yo, amigos! Our semi-permanent resident by now Pablo “CRMGamified” Peralta wraps up SLA thingabob he started in la primera parte and continued in la segunda parte.

¿How do we set our Business Hours?

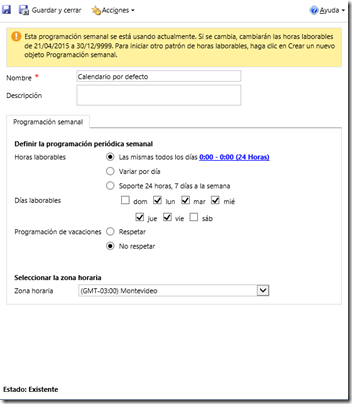
We can set our business schedule at Configuration > Service Management > Customer Service Schedule. Once there, click on “+New”, select your calendar name (i.e. “Default Business Hours”), works days and hours, and whether your business hours apply during holidays.
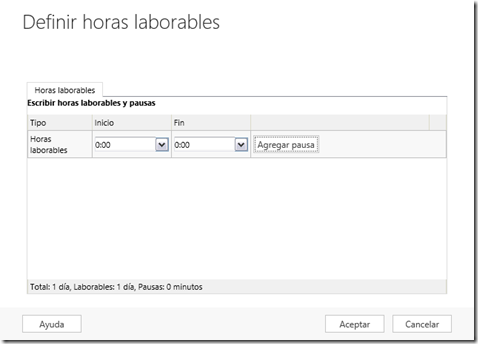
Here’s an example for a bank that needs to properly count days (where 2 days need to be counted as 2 days) and not weekends:
Business Hours Sample

Business Hours Sample

¿I can only set a 3-day maximum to my SLA Item. Can I enter a larger number?

Good news: YES, you can 🙂 Even though the system suggests several options, you can also enter your own.

¿I’m not using Entitlements, then can I have several Default SLAs?

The answer (unfortunately) is NO. You can only have one Default SLA at any given time.

This means that if we’re not using Entitlements, our SLA configuration will be based on the SLA Item configuration we are using in just 1 SLA (our Default SLA).
Each SLA is associated to certain Business Hours (optional) and is Applicable From a set date. Therefore, all of our settings will be based on the same Business Hours and same Applicable From dates.

Plus, remember (as I mentioned before :)), SLA Item records are not customizable and, therefore, can’t be adjusted – not even the Name field’s length. Therefore, it will be important to set a standard to name each SLA Item if we’ll be creating many of them (just imagine a bank’s subject tree, which is precisely what I’m working on right now :)).

¿How do I deactivate an SLA Item?

The answer is: you CAN’T. You can only remove an Item and, of course, re-set it later. Plus, in order to remove an Item you first need to deactivate the entire SLA.
If you wish to support me with your vote to make the SLA Items customizable and have their own status to deactivate them, here’s the link to
my petition on Connect.

¿Ok, so, how do I completely deactivate my SLAs?

If we only have one SLA -or several and need to individually deactivate them- all we need to do is open it and click on “Deactivate”.

If we wish to completely deactivate the SLA feature, we can do so in the “Service” tab found in System Settings, where we can select “Yes” to the Deactivate SLA option.

This is especially useful during maintenance times and when we’re importing cases from other systems and don’t want any SLAs to run just yet.

¿I’ve deactivated my SLA by the Timer’s still running. How can I make it stop?

Bad news: even if we deactivate everything, the Timer controls depend on all date fields (the Applicable From and Applicable When fields for the SLA and all KPIs) and therefore “ignore” that the SLA has been deactivated. So it just keeps on running.

Here’s a workaround: set one Success Criteria in the SLA and make all our cases fulfill the condition successfully so it’ll stop counting.

¿My Timer says “NaNh NaN NaNs” or huge numbers. What did I do wrong?

Well, everyone makes mistakes but you’ve probably encountered a “known issue” (bug) which I’ve faced and has driven me insane in the past.

This happens on CRM ever since CRM 2013 SP1 UR1 (and it still remains in 2015) when the CRM’s App Pool’s identity has a different regional setting than en-US, something that usually happens when working in Spanish or different language than English.

The good news: there is one workaround we can apply that, at least in my case, works perfectly! You basically need to change the regional settings of that identity to en-US. There is an explanation to this “known issue” and a workaround.

The second good news is that this problem is set to be solved in the next release (CRM 2015 Update 1 “Carina” – only available online) and I gather that we’ll be able to get on-premises fix via Microsoft support.

¿My SLA Item is running but doesn’t trigger any actions. How do I see all action errors within my SLA Item?

You’ll need to access the systems jobs – SLA Items are triggered as workflows and it’s there that you can see all errors.

¿I have set everything but the SLA does not run. Why is this?

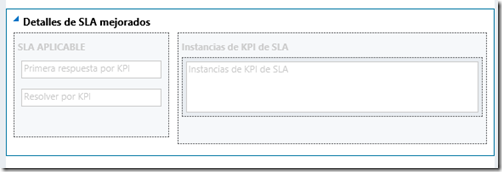
Let’s start by seeing how we can easily check whether the SLA is running or not. In the default Case form we can access the Enhanced SLA Details section:
SLA Troubleshooting Step 1
This is where we’ll find the “famous” timer and KPI status tracker.
When an SLA Item is triggered because its “Applicable when” conditions have been met, we should see something like this:
SLA Troubleshooting Step 2
So, what happens if we don’t see this?

  • First we must verify we’ve activated our SLA. Check the “Activate” button:
    SLA Troubleshooting Step 3
  • Watch out: this isn’t enough! We must also set it as our Default SLA to really activate it, unless we are using the new Entitlements feature where each entitlement is associated with an SLA. If we are not using Entitlements, then we need to set our SLA as our default.
    SLA Troubleshooting Step 4
  • If we ever deactivate our SLA we need to remember to set it back as our Default SLA once we reactivate it.
  • Tipp Jarr’s Double Dipp

    ¡Muchas gracias, amigo!

Tip #391: Mandatory fields in dialogs

Dynamics CRM TipperMini truck stop.

Straight after visiting the CRM facebook group.

Ankit Shah: CRM 2013 SP1 – is there a way that we can set the dialogue fields as required?

Joel Lindström: Not exactly, but you can trick it with conditional logic. Have a check condition that checks if the field is populated, and if it is not have a page that tells them they must populate it or loop to the page again via a child dialog.

Tip #390: SLAs for dummies, Part 2: SLA

¡Hola, amigos! Our good friend Pablo “CRMGamified” Peralta continues about all SLA things he started in la primera parte.

¿How is the SLA applied?

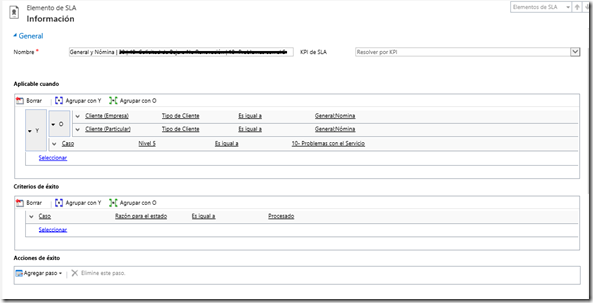
We will see an “SLA Details” section where we can set SLA Items, each of their conditions, associated KPIs, and Alert or Failure actions to take whether set service levels are met or not. For instance:
SLA Definition
SLA Conditions
This item is set to apply a 10-day tolerance SLA with a warning sent 3 days after certain conditions are met. An email will be sent when a deadline (failure or warning).

Take the following into account:

  • The first SLA Item that fulfills the specified conditions for a KPI in “Applicable when” will be the only one set off for that KPI from all the SLA Items within the “SLA Details” section. No other SLA Item will be set triggered, even if it could also potentially fulfill all conditions.
  • Therefore: pay close attention to the order in which you create / place SLA Items, making sure you clearly specify the conditions to trigger the correct Item. For instance, verify client type (VIP client, Premium client, standard client, etc.) as the first condition:
    SLA Details
  • Avoid including fields that significantly vary in the conditions, since this would force the system to constantly re-evaluate them, potentially impacting performance.
  • Situations where one (or other) SLA Item applies to the same case more than once can emerge, unless we control them. This could happen, for instance, when changing a case’s priority, triggering the system to re-evaluate the “Applicable when” conditions. If conditions are met, the specified actions will be executed again. In order to prevent these kinds of situations, we need to flag some fields to avoid multiple processing.
  • You can’t change the length of the field ‘Name’. You’ll wonder why I highlight this :). Well, we are going to need to clearly differentiate each SLA Item from the next, especially if this turns out to be our default SLA (see next section) – and SLA Items lists can grow to be extremely long. It might be useful to establish a name/code standard.
  • An SLA Item’s KPI can’t be edited after the record is created. Therefore, pay close attention to the selected KPI. You’ll find two by default: “Resolve by KPI” and “First Response By KPI”. The former measures case resolution while the latter measures first responses to a case. In upcoming posts I’ll share how to create new personalized KPIs to track as well.
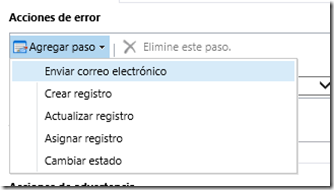
  • Even though the list of available actions for each situation (Success Actions, Warning Actions and Failure Actions) is very similar to the one on Workflows, NOT ALL actions are available: you can only Send Email, Create Record, Update Record, Assign Record and Change Status.
    SLA Workflow
  • Actions will be triggered as asynchronous workflows, so they might not happen at the right time. If the Async Service is down, they will not be set off automatically.
  • At the moment, there is no supported way to set SLAs by using SDK. Hopefully this situation can be improved very soon.

Tip #389: Disable email profiles when copying organizations

Earlier this week we noticed that users were receiving some strange emails from our CRM online. These emails were from a workflow notification that we have sent out when a case is created, but the link included in the email was not a valid record in our CRM environment.

In tracing where the problem started, I determined that it corresponded with when we had done our most recent refresh of our sandbox organization. We did the full copy option in the office 365 administrator console. What I forgot was that when you restore or copy an organization, the email server profiles that you have in your production environment will be active in the copied organization.

What this means is that after you restore the organization, the server synchronization will kick in on the copied organization. This can lead to many different issues.

So the lesson learned is be sure you disable your email server profiles in CRM before copying and organization.

Tip #388: Shape the future of Dynamics CRM

Are you a Microsoft Dynamics CRM, Microsoft Dynamics Marketing, Microsoft Social Engagement, or Parature customer? Your mission is to contribute to the future of these products.

To accomplish the challenge, please stop reading this blog for 20 minutes, and answer the call from CRM team.

If you are both a customer and a partner, say you are a customer otherwise you will receive an immediate “thanks but no, thanks” page.

You have until May 18, 2015 to complete the mission. Good luck.

Tip #387: SLAs for dummies, Part 1: Fields

¡Como estas amigos! Our good friend Pablo “CRMGamified” Peralta takes the podium again with another pepita de oro!

What does each field in my SLA configuration mean?

(To create new SLA: Configuration > Service > Management > Service Level Agreements: +New)
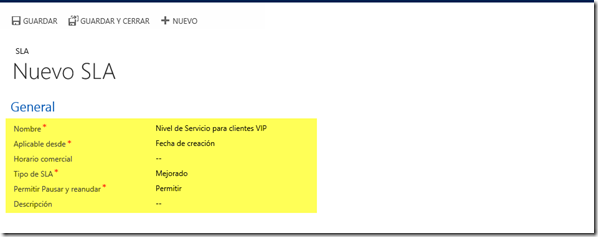
Nuevo SLA

  • Name: Basically, a descriptive name for our SLA, i.e. “Service Level for VIP Clients”. You can edit this field later on.
  • Applicable from: This field sets the starting point for calculations. Typically, you would want to track a case since its creation, but you can choose dates and/or hours. It is important you know this information at this point since this field can’t be modified after creating your SLA.
  • Business Hours: Select your business work days -and hours- needed to track SLA fulfillment. Keep the following in mind:
    1. If left blank, the system will consider your business hours to be 24×7
    2. So if a VIP client’s case needs to be resolved in 2 days tops, and we receive the case on a Friday afternoon, we would need to resolve the case by Sunday afternoon. Depending on the type of business, this is generally NOT the desired outcome. The system doesn’t consider holidays either.
    3. Therefore, it’s important to set the correct business schedule to properly reflect our organization’s work days and hours.
    4. We still need to be careful when selecting work hours (and not just days) because we can get unexpected results. In order to track the SLA’s fulfillment, the system calculates 24 hours over total work hours per day. Therefore, if my business hours are typically set at 8 per day and my SLA service needs to be resolved in 2 days (as in the last example), my Dynamic CRM will set my deadline at 6 days. Why? Because the system uses the following formula: (24 hours / x daily work hours * n SLA tolerance days) + Date Created (assuming you selected “Created On” as your starting point). So, (24 / 8 * 2) + Date Created = 6 days to close a case after opening it.
    5. You can find a very good explanation for this here.
    6. Conclusion: if measuring minutes and seconds is not mandatory, I would recommend basing your schedule on work days, making each day 24 hours long. I explain how to set a business schedule in the next part.
    7. Good news: you don’t necessarily need to set a business schedule when creating the SLA. You can edit Business Hours later.
  • SLA Type: We need to opt for an “Enhanced” SLA unless we have no other choice, or need it to be compatible with the “Standard” SLAs introduced in previous versions. Not only do enhanced SLAs allow pausing, success actions and individual KPI tracking, Standard SLAs are to be discontinued and will become obsolete.
  • Allow Pause and Resume: This lets us select if we will allow our SLA to be paused or not. This feature is useful if our case enters a waiting period that depends on the client, or for when a client isn’t reachable. We can set different scenarios that will automatically pause our SLA in Configuration > Administration > System Settings.

Tip #386: The fastest way to provision new organization

For people who complain that they provision CRM organizations daily, hourly, weekly and cannot relax for 5 minutes while new organization is being created, here the quickest way to provision new CRM on-premises organizations:

One-off preparations

  1. Go through the pain one last time and watch the paint dry while creating a new organization (name it, say, template).
  2. Delete the organization.
  3. In SQL Server Manager, optionally shrink the database template_mscrm, then detach it.
  4. Find .ldf file, delete it. Find .mdf file, set it aside

Create new organization

  1. Copy the template_mscrm.mdf into your SQL Server data directory, rename it.
  2. Attach the database. Remove missing .ldf file, system will recreate it for you.
  3. Adjust mdf and log file sizes as per David’s advice above.
  4. In CRM Deployment Manager start the import and use that database.
  5. 5 seconds later you’ll have your new organization.

Don’t forget to repeat preparations after applying update rollup to the deployment.

If you do, indeed, provision organizations frequently, consider automating the process using Adxstudio ALM Toolkit.

Tip #385: Why aren’t my workflows running?

I recently received a frantic email from a friend testing an upgrade from CRM 4 to 2015. He was testing workflows, and they did not appear to be working, as the completed workflows did not appear in the workflow history for the record.

It turns out that they were working, but when we had upgraded the environment, we changed some of the workflows to be real time. When you do this, the workflow no longer appears in the system jobs or workflow history. The workflows were actually running.

To test the success of the workflow, check for the desired outcome. Also, a real time workflow that runs on create of a record will typically throw an error when saving the record.

Tip #384: Billable emails

Would you like to make your emails billable? Of course, you would. Add the field(s) dealing with the billing information and you’re all set, right? Not so fast. The problem is that tracked emails “arrive” into CRM as activities already closed so editing won’t be possible.

Enter the realm of Adam “I’ll leave nuggets everywhere I go” Vero. He casually dropped the solution for this problem in one of his comments. We thought it’s so useful that it deserves a tip entry of its own.

What I (Adam Vero, that is – t.j.) have also observed and taken advantage of a few times is that if you have a field on an activity that is configured to be Business Required, but this field is not filled in, then even after the record is closed, you can enter this data – including users just using the regular form. But this is a one-time thing – once it is filled in, it cannot be changed again.

Scenarios

Custom field on an activity record that is created by tracking in from Outlook, such as a category picklist used for billable/non-billable time. Especially useful on emails, which are closed by definition once they are sent or received, so the user does not get an opportunity to fill in the additional fields (you can’t “view in CRM” until the email is copied to CRM, by which time it is too late).

New custom field that did not exist on previously closed activity records can now be filled in by revisiting those records (eg to use Bulk Edit).

Tipp Jarr’s $0.02

As it turns out, this technique works well only for emails but not any other activities. I suppose that’s because emails are special in the sense that they can be tracked in CRM automatically, leaving a user without any opportunity to have a say.