Tip #193: Check your duplicate detection rules after solution imports

Today’s tip was submitted to the tip jar by Jef Smets. Got a tip that you want to share? Send it to jar@crmtipoftheday.com.

For quite some time now our duplicate detection rules seemed to be un-publishing themselves from time to time… Nobody had any idea why until I discovered today that duplicate detection rules are unpublished when you import a solution (!). So, every time you import a solution you need to check your duplicate detection rules.

Also, if you have add-ons installed with an auto update functionality you want to check your duplicate detection rules after each auto-update. We have the ClickDimensions solution installed and this solution has such an auto update mechanism. After each auto-update the duplicate detection rules are unpublished and I need to publish them again.  The good news is that ClickDimensions sends me an email after each update and that the unpublish action is record in the modified on and modified by (SYSTEM) field so you can easily filter the rules to need to be published.

Tipp Jarr’s notethe same applies to audit settings. It’s a known challenge for ISVs, hopefully it will be addressed soon.

Tip #192: Defensive script writing

(Today’s tip is actually two-in-one but we’ll get to that.)

Over the years as a CRM jackofalltrades I learned that to create truly reusable, bug-free and resilient systems is very important to write your scripts as if the next team member, who comes after you, dedicated their entire career to destroying your life’s work.

Consider the task: add a new Age attribute to the contact record and set it’s value based on birthdate attribute. Easy, right?

function setAge() {
  Xrm.Page.getAttribute("foo_age").setValue(
    calculateAge(
      Xrm.Page.getAttribute("birthdate").getValue()
    )
  );
}

function BirthdateOnChange() {
  setAge();
}

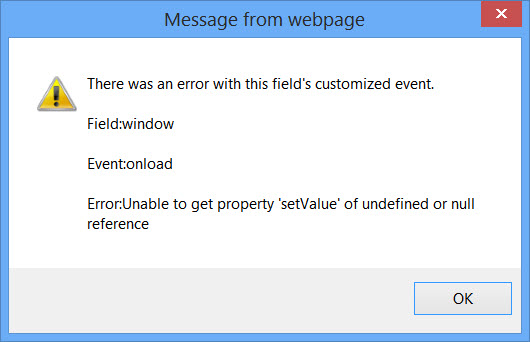
Some time later users report the following message being displayed every time they enter birthdate field:
Script error message

As it turns out, one of the junior customizers was given a task to create a new form which is a simplified version of the existing one. After opening the form and using Save As function, they’ve got the exact replica including form scripts and events. Then they proceeded to cleanup the layout as specified by the business and that included removing Age attribute. And they did not test because the existing form they copied works perfectly.

How this fragment could have been written so it does not crumble when a user sneezes? One of the options:

function setAge() {
  var ageAttr = Xrm.Page.getAttribute("foo_age");
  var bdAttr = Xrm.Page.getAttribute("birthdate");
  if(ageAttr != null && bdAttr != null) {
    ageAttr.setValue(
      calculateAge(bdAttr.getValue()));
    )
  );
}

function BirthdateOnChange() {
  setAge();
}

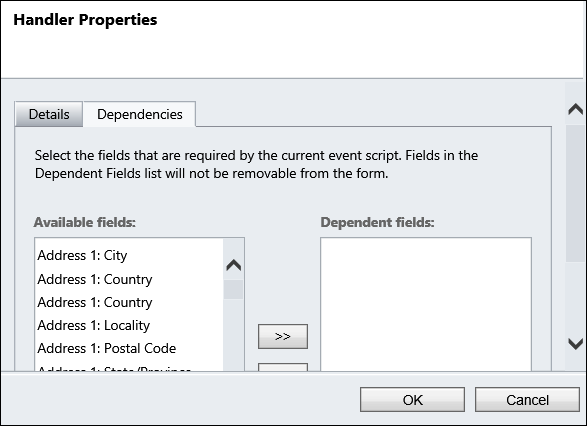
That way, code at least does not bring the form down when one of the attributes is removed. It’s also considered a good practice to explicitly add dependencies for the specific event handler (BirthdateOnChange in our example):
Event Handler Dependencies

One may argue that the example is trivial and bug should have been picked up by testing. Indeed, it’s a simplification but the best practice has always been to program defensively as if the next in line is malicious, ignorant or both.

As for the bonus tip, here is how to calculate age in javascript:

function calculateAge(bd) {
    if (!bd)
        return null;

    var today = new Date();

    var bmonth = bd.getMonth();
    var bday = bd.getDate();
    var nowmonth = today.getMonth();
    var nowday = today.getDate();

    var age = today.getFullYear() - bd.getFullYear();
    // take into account if this year birthday 
    // is later in the year
    if (bmonth > nowmonth 
      || (bmonth == nowmonth && bday > nowday)) {
        age = age - 1;
    }

    return age;
}

Tip #191: Update system view filters the quick way

Dynamics CRM 2013 includes a very quick way to update filters of system views.

  1. Navigate to the view you wish to update
  2. Click the filter button in the upper right hand corner and filter the view as desired.

filter.

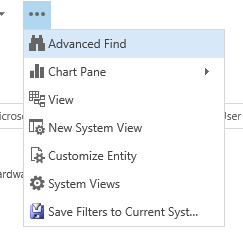
3. Click the more options (…) button

4. Click “Save Filters to Current System View”

savefilter

After you save the filter, the system view will retain whatever filter you selected in step 2. This makes updating a view filter very easy, but it should be used with caution–it is very easy to overwrite a view filter, so be sure you use it carefully. With great power comes great responsibility.

Tip #190: IFD and Dynamic Excel Export

If you are facing the login window appearing in the Excel sheet after creating a dynamic Excel export from an IFD-enabled CRM organization, then there’s still a way to get the data into the Excel sheet:

  • Export the Dynamic Worksheets (or Pivot Tables) from Microsoft Dynamics CRM.
  • Open the Dynamic Worksheets with Excel.
  • Excel will display the ADFS sign in page or a Script is disabled error in the worksheet.
  • Click on Data tab.
  • Click on Connections.
  • Within Workbook Connections click on Properties.
  • Within Connection Properties click on tab Definition.
  • Click on button Edit Query.
  • This will redirect to ADFS login, enter in the user’s credentials and click on Sign In.
  • YOU WILL GET AN ERROR, THIS IS OK! So, click on OK.
  • Within Edit Web Query, click on Cancel.
  • Within Connection Properties, click on Cancel.
  • Within Workbook Connections, click on Close.
  • Within Excel go to the Data tab
  • Click on Refresh All.

Cheers!

This tip is brought to you by Ronald “I’ll be back” Lemmen.

Tipp Jarr’s Double Dipp

To my astonishment, these instructions do work! The painful part is the need to repeat the process every time worksheet is opened but this is infinitely better than no exported data at all!

Tip #189: What does “reparent” mean?

CRM 1:N relationships that are “Configurable cascading” type allow you to customize several cascading behaviors. For example, in the system parental relationship between Accounts and Contacts, you can change the relationship type to “Configurable Cascading” and then set the “Share” permission cascading to “Cascade None” so that sharing an Account with George will not also share the related contacts.

The most misunderstood cascading permission is “reparent.” My experience is that if you ask five CRM configurators what “reparent” means, at least two will probably think that is reassigning the account.

Reparenting is changing the parent in the relationship. For example, if I have contact where the parent customer is Fabrikam and I change the parent customer lookup to Contoso, with the default reparent cascading, the owner of Contoso will now have access to the contact.

By setting the cascading setting for “reparent” to “Cascade None,” the owner of the new parent will not be granted access to the record when the parent is changed.

Tip #188: How to Display Entity Image on CRM Form

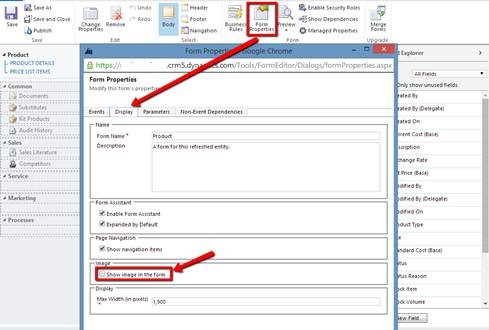
Entity Image is introduced Dynamics CRM 2013. This is a really useful feature where we could have better presentation to quickly glance on the record. As the adage says: “A picture is worth a thousand words”. It seems quite common requirements for customizing the form, but it is not automatically enabled on the form. To get the entity image to be displayed on the form: Navigate to the entity form customization > Form Properties > Display tab > check the “Show image in the form” option > Click OK > Save and publish the customization.
Display Entity Image

This tip is brought to you by Andre “I’ve got 88 in my handle” Margono.

Tip #187: Slow batch processing

Sometimes you need to perform checks or calculations against each record in a particular entity. If you have a sizable on premises deployment, it could be that the marketing department just came out with a new algorithm to rank the customers and some voodoo needs to be done for every account record. If you are an ISV, it could be some bulk data preparation that you need to perform (e.g. in our solution we had to analyze every phone number for every contact and account record in the system).

Whatever is your scenario, quite often these batch processes include hundreds of thousands or even millions of records, they are time-consuming and can span hours and days. Frequently, there are additional requirements of not running these during the business hours. So how do you keep track of which records have been processed already and which ones are still to be done?

Surely, we can create and fire up a small workflow for each record but having millions of workflows not going to win you any new friends among system administrators. We could add a simple boolean attribute to the target entity and update it after we process each record to indicate that we are done with this record. That’s better but not a very good choice for ISVs as it immediately drags the target entity into your managed solution thus introducing new dependencies without a good reason. In addition, changing this attribute would run unnecessary update on the target record, modifying timestamp and potentially introducing inconsistencies in the data.

That’s where native N:N relationship can help. Note: some steps below do require coding, we deliberately skip technical details to concentrate on the essence of the approach.

  1. Add a new entity called, say, Batch.
  2. Add a native N:N relationship between the target entity (e.h. contact) and batch.
  3. Create new batch record.
  4. Associate all target records with the batch record.
  5. Use either FetchXml or QueryExpression to find records associated with the batch record. Use pagination as required.
  6. Process records retrieved (one page at a time). Once record is processed, disassociate it from the batch.
  7. Rinse, repeat until all records are processed, i.e. the batch record has no associated entities.
  8. Delete batch entity (it’ll delete the relationship as well).

This approach has the following advantages:

  • It’s non-intrusive. Adding an entity and N:N relationship to another entity has no impact, introduces no dependencies and adds no customizations for the latter. Nada, zip, bupkis. Visually, there will be additional link in the navigation bar but it’ll be gone once batch entity is removed.
  • It’s durable and survives suspension of processing, system restarts, etc, etc.
  • It can be expressed and used by a programmer. Note that we have a step of associating all records to be processed first. In theory, we could have gone the opposite way, i.e. associate processed records with the batch. However, that would have required NOT IN expression which is slowly making its way through but is not yet available in CRM.
  • It’s simple to master and execute.

The final observation. If your target entity is contact, account or lead, marketing lists can be used instead of a custom batch entity but personally I prefer to keep unrelated functionality separate and would still recommend using a custom entity approach.

Tip #186: Bring back the “Add Exisiting” contact button

NOTE–this post has been updated as the original solution was insufficient to bring the button back. In the author’s defense, he tried several things to fix it and misidentified the real solution. Thanks to commenter Matt for pointing out the error of our ways.

In CRM 2013 SP1, the Associate View subgrid of contacts no longer displays the “Add Existing” button. This is fine if you don’t use it, but what if you wish to link existing contacts to an account?

To make it show up, create a solution that just includes the Contact entity

Open the solution in the Ribbon Workbench.

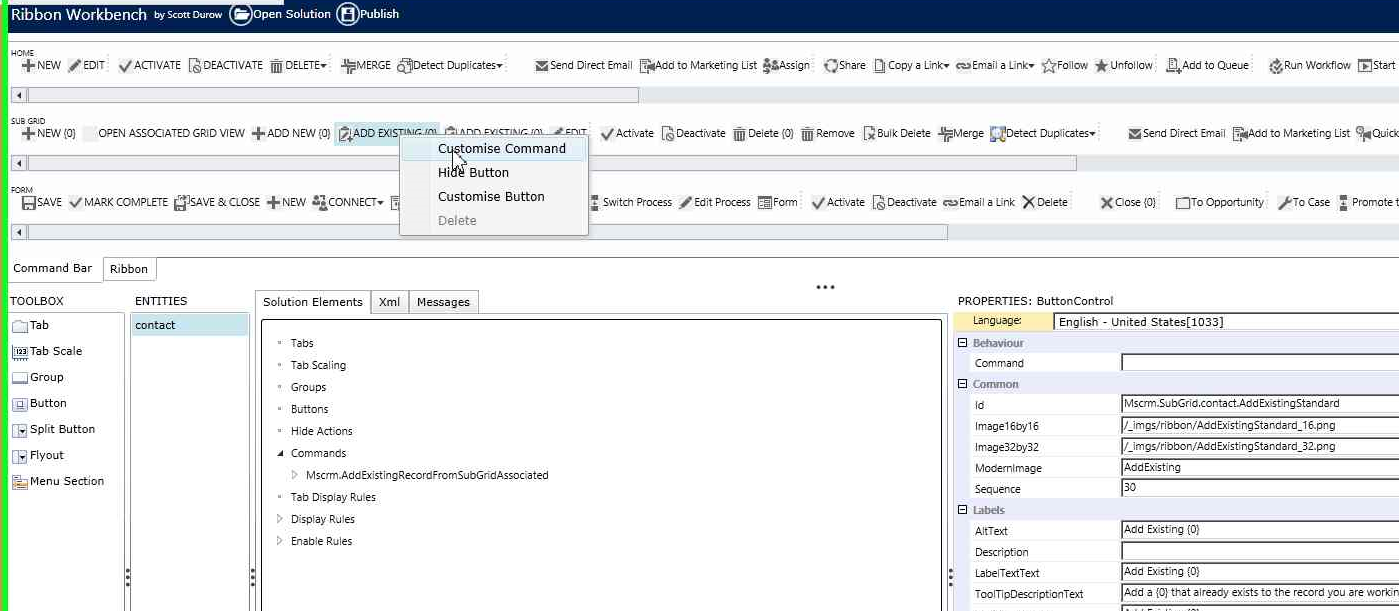
On the contact subgrid, you will see two buttons that say “Add existing.” Right click on the first one and select “Customize Command.”

addexisting1

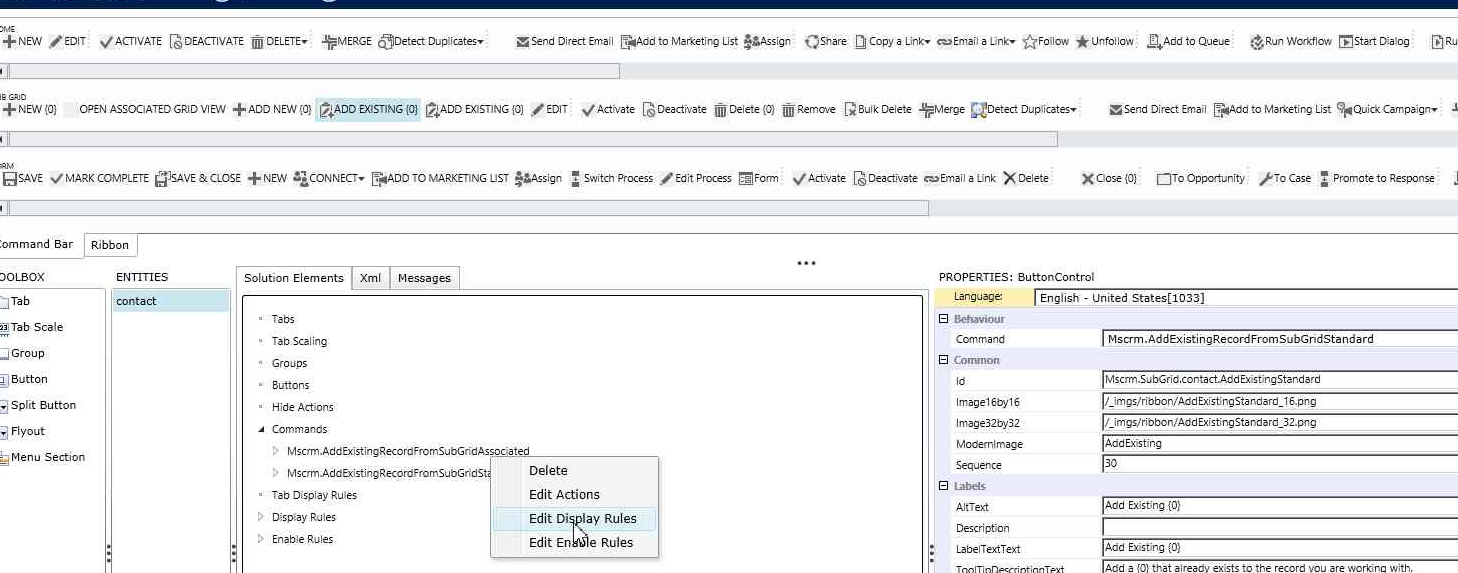
Right click on the command for MSCRM.AddExistingRecordFromSubGridStandard and select “Edit Display Rules.”

addexisting2

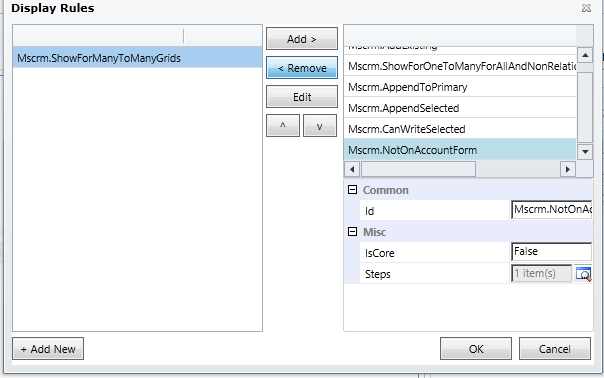
On the right pane of the display rules selector, select the rule called “MSCRM.NotOnAccountForm.” and click “Remove”

addexisting4


Publish your changes and reset your browser temporary files, and you should now see the “Add Existing” button on the contacts subgrid from an account. Note this will not display additional buttons on the inline subgrid, but if you pop the subgrid out using the grid button or access contacts from the “Contacts” link on the navigation menu, you should once again see the “Add Existing” button.

Tip #185: Dude, where is my alert?

If you’ve been paying attention to the most recent advances in server-side CRM entertainment, you are by now should be familiar with alerts. They are system messages that tells you when something is wrong (error), suspicious (warning), or neither (information). Open any server profile or mailbox record, click Alerts link on the left to find out what they look like.

My main gripe with alerts is that they are passive: administrator needs to login and navigate to Sales > Alerts to see if anything’s wrong with the system. (And if your system has been upgraded from 2011 you may be even missing this navigation area but this is totally different subject). Add the fact that alerts are not customizable and here you have it.

To start with, there is no entity called alert. Good news is that there is an entity called trace which seems to be the right one. The second piece of good news is that, while this entity is completely out of reach for customizations, it is possible to build a workflow that will proactively send notifications when bad things happen.

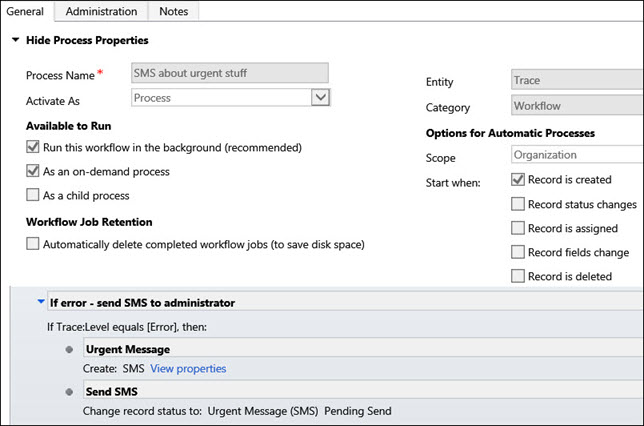
Workflow to send SMS about alert
This simple workflow sending SMS messages to administrator when new alert is raised has been running on our system for the last few days with great results. I no longer have to login to verify that one of our mailboxes has been disabled for inbound processing, I get SMS about that. (And disabled mailboxes is a totally different subject).

Tip #184: Use CRM forms in Outlook

From the “Great features that have been in the application for a long time but many users don’t know about” file

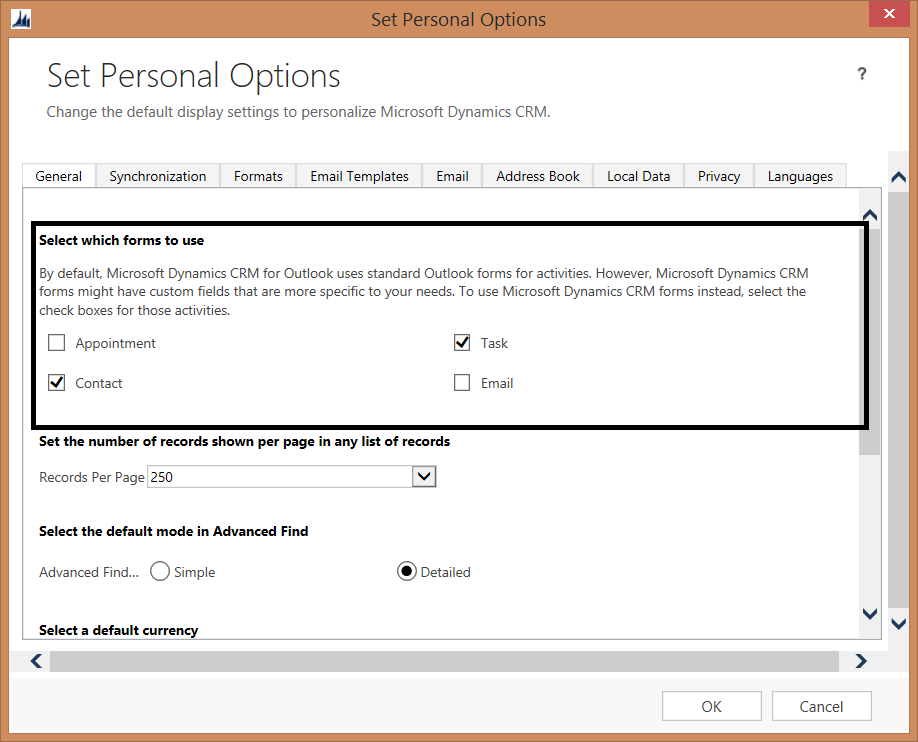
In CRM for Outlook user settings, you will see checkboxes for various activity types and contacts.

selectwhichfomr

If these checkboxes are checked, when a user hits the new [appointment/task/Email/Contact] button in Outlook, that user will get the CRM form rather than the standard Outlook form.

This has several nice benefits

  • It ensures that each contact or activity added will be tracked
  • It gives access to custom fields or required fields not included in the standard Outlook form.
  • It is less clicky than creating a contact, saving it, and then tracking it.

Note that there are some limitations to this tip. Checking these boxes does not force the CRM form from all locations in Outlook. If I check the box and go to the CRM tab and click “new contact,” the CRM form will appear. However, if I go to the People list in Outlook 2013 and click the new button, it will still use the standard Outlook form.

So it is not perfect, but with proper user training, it can be helpful.

Alternatively, you can also access CRM fields from the standard Outlook form by clicking the “CRM fields” button on the activity or contact ribbon after the record is tracked.