Tip #1153: When Upgrading, Consider the Whole Ecosystem

It is that time of year when people turn their thoughts to upgrading; the October 18 release has been announced and for those on Dynamics 365 Online v8, the clock has started. I was recently with a client who had a pretty typical setup. They had Dynamics 365 Online, NAV 2016, and an online shopping system. They asked me about the looming upgrade of Dynamics 365 and if they should be concerned about anything.

I raised the usual recommendations regarding upgrading Dynamics (backing up, doing it in a non-production environment first etc.) but then we got talking about the rest of the setup. Firstly, they were using the NAV 16 Connector to talk to Dynamics but it was not working 100%. They had custom fields in NAV which never made it to Dynamics and this compromised the reporting in Dynamics, limiting its usefulness to the sales team. Knowing the NAV 16 Connector was not an on-going concern for Microsoft (and that it never handled custom fields well), the obvious choice was to move to Azure ASAP.

So we should upgrade NAV 2016 before the end of the year, right? Well there was another problem. NAV 2016 was connected to the online shopping system via a proprietary integration piece. If NAV 2016 got upgraded this would break and the online shopping system would need to be upgraded. The problem? the estimated cost to upgrade the online shopping system was six figures. Coming up with that in the next few months would be tricky.

The end solution? Dynamics 365 would go first. This was relatively low risk given the limited customisations and should not affect the other components. Next, rather than upgrade NAV 2016, I recommended they get either a custom NAV 2016 Azure Connector developed to meet their needs or, if this was too difficult, develop a custom integration piece. Initially this could cover the custom fields missing from Dynamics 365 and then, once it proved successful, expand to cover the entities and fields of the incumbent Connector if they wanted to manage it in one place. I warned them if a custom integration piece was developed it would likely be thrown away in the future as they move to using more Azure components but it was a reasonable short term measure until they upgrade the shopping site and NAV 2016.

The moral of the story? Consider the full ecosystem when looking to upgrade and the consequences it might have. Also, while there may be an obvious solution such as getting off of the NAV 16 Connector, consideration of the bigger picture may sometimes require short term compromise, rather than perfection.

Tip #1152: Attachments to Dynamics 365 Notes

Flow is great but can be frustrating at times, as Jerry “Once tipster – forever tipster” Weinstock has discovered when trying to add attachment to a note in Dynamics 365.

This is his story

File uploads to OneDrive etc work great. Files attach to emails with no issue. A super slick Flow feature! I am trying to get a photo to be an attachment to a Dynamics 365 Note. (Note creation works perfectly)

clip_image002

I have tried both the Dynamics 365 Create Record action and the new CDS Create Note (annotation) action. Both essentially return the same failure file type message when I try to open the photo.

clip_image004

I have tried wrapping it in in an expression, no positive results. Am I trying to do something that can’t be done currently or just not doing it right?

Help is on its way

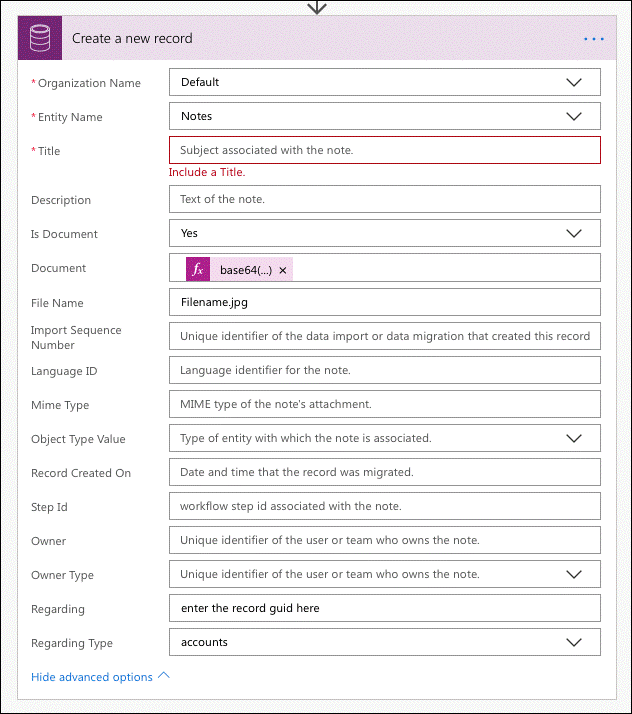
Turns out, Create Note (annotation) action is not the right one to use in Flow, Dynamics 365 Create Record is the way to go. According to Stephen Siciliano (Principal Group PM Manager at Microsoft, in case you were wondering):

Specifically, you will need to base64() encode the data that you’re passing to the Document property. To associate it with a given record populate the Regarding field:

clip_image002

Tîpp Jäår $0.02

So, in short, create note attachment in one sweet action and use base64 to make sure that the content is right.

(Facebook and Twitter cover photo by DiEGO MüLLER on Unsplash)

Tip #1151: Name that web client

With so many upcoming and constantly changing features in the world of Dynamics 365/CRM, it’s no wonder that even the best of us are getting confused when it comes to naming things.

Regardless of what interface is chosen, it all looks like a web client Mark “Globetrotting Kiwi” Smith:

Currently what I hear used is Unified Interface or UCI is for the new interface and the old interface is the Web Client.  This seems strange to me as both interface still run in a web client or am I missing something?

Ask and you shall receive. Clarification came from Shilpa Sinha, Principal PM at Microsoft:

Unified Interface is the external name for the new interface and we are referring to the old interface as Classic UI.

So here you go, folks, they are both web clients but if anyone asks, it’s a new, exciting, and highly performant Unified Interface vs fully-featured but at some point becoming thing of the past Classic UI. As we know, classic stuff is perpetually in vogue with some people and, as with any antiques, it will get very expensive with time.

(Facebook and Twitter cover photo by Adrian Korte on Unsplash)

Tip #1150: Does your CRM pass the WIFY test?

When deploying Dynamics 365, and important question to as is What’s In it For You (WIFY). For each role — salesperson, csr, marketing, technician, what is the “why” for that user that will drive their adoption of the system.

If you cannot clearly answer that question, there is a strong chance that the adoption of the system will be limited. Or if your answer is “we want them to…” it is a clear sign that the system is driven more by what management wants than what users need. Will the value that users receive from the system be greater than the amount of work they need to invest in it? In many traditional CRM deployments, that answer has been no — say we want our users to put all of their contacts in the system and track their activities — people will not see value from the system until they invest a fair amount of time to populating their data in the system.

Fortunately, Microsoft has added many intelligent features to Dynamics 365 Online that reduce the time to value for users and makes the application a system that users want to use. Some examples:

  • Insights powered by Inside View
  • LinkedIn Sales Navigator
  • Relationship Assistant
  • Email insights
  • Coming soon — Who knows Whom powered by office graph
  • Coming soon — Text analysis and recommendations from notes
  • Coming soon — AI based talking points that summarize important details from activity history

By giving users an intelligent system that provides value without requiring a major investment of effort by users, you will provide an application that makes user’s lives easier and in return gives management what they want.

(Facebook and Twitter cover photo by Riccardo Annandale on Unsplash)

Tip #1149: Create custom schedule for your flows

Today’s tip is from Marius “flow like a river” Lind. (And you can also become a tipster by sending your tip to jar@crmtipoftheday.com)

A great man once asked,

can I set a custom schedule for when to run my flows?

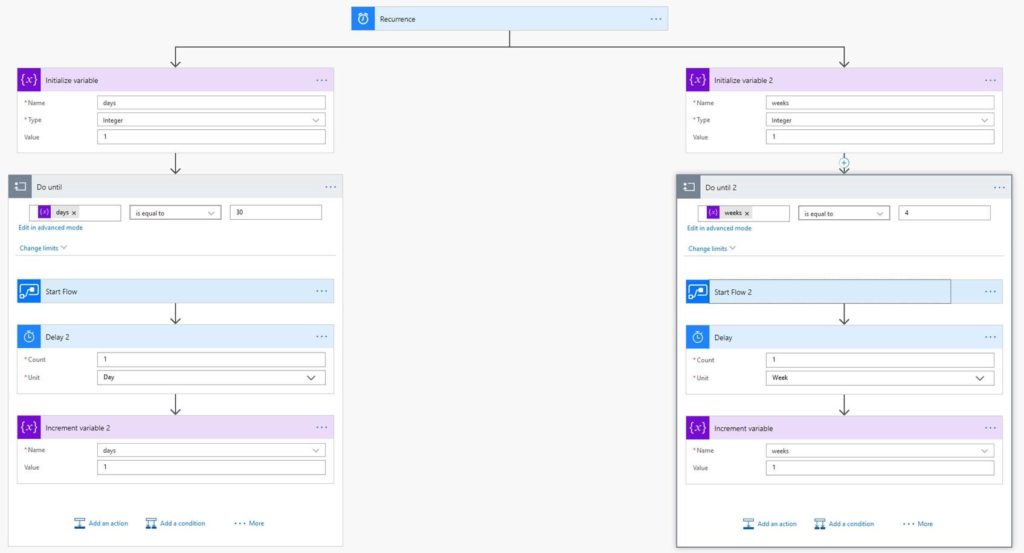
The answer is yes, and like so many other solutions it involves nesting flows.

  1. First, create a flow which has a timer trigger, I created one which triggers once per month.
  2. Next, I create parallel branches inside this flow, for each branch you initialize a new variable.
  3. Now add a “do until” loop which says loop until variable equals whatever you need.
  4. Next you add a/multiple start flow action(s) which triggers the flow(s) in question.
  5. Add a delay action which delays for the time period you need.
  6. Finally add a variable incrementor.

Timed flow
Now you’ve got a flow scheduler which can start your flows in whatever fashion you need. Happy pillaging!

Tip #1148: Use visual controls + calculated fields to create an in-form dashboard

Want to add some sizzle to you form configuration? Phil Dudovicz recommends using visual controls with calculated fields to create a nice looking dashboard in your Dynamics 365 Unified Interface form. The following is an example of an investor form that visually displays relevant investor data.

Let’s take a closer look at how this is built:

  1. Current Year return

  • Calculated Field
  • Data Type: Decimal Number
  • Field Type: Calculated
  • ((new_investmentvalue – new_investmentvaluejan1) / new_investmentvalue) * 100
  • Control: Arc Knob
  • Value: hsl_currentyearreturn
  • Min: .1
  • Max: 15
  • Step: .1

2. Return vs. Goal

  • Data Type: Decimal Number
  • Field Type: Calculated
  • (new_investmentvalue / new_investmentgoal) * 100
  • Control: Arc Knob
  • Value: hsl_goalprogress
  • Min: 0
  • Max: 100
  • Step: 1

By combining visual controls with calculated fields you can easily add visual context to a record and give your users a richer user experience.

Thanks for the tip, Phil. Do you have a tip for us? Send it to jar@crmtipoftheday.com.

(Facebook and Twitter cover photo by Paula May on Unsplash)

Tip #1147: Revisiting Queues and Teams

Almost two years ago I wrote on the merits of using Teams vs Queues for managing Cases. While I stand behind what I wrote (Teams are simpler but Queues are more powerful) another element raised its head recently which is worthy of consideration if you are going down the path of setting up Case management.

Teams are a great, simple way of managing Cases. You set the ownership and set up some dashboards to view the Cases and you are away. However, unlike Queues, Teams have another important purpose in Dynamics: security. A common security pattern in Dynamics is to have separate Business Units, each with a ‘sharing Team’ so that Users in one Business Unit can hide their records from the other Business Units or allow specific individuals to see them via the sharing Team. I described this model in Tip 1067. So what happens when these two ideas collide?

For the most part using Teams for security and Case management still works ok. However, if you have a list showing “All Cases Owned By My Teams” make sure the list of Cases are the ones you expect. Similarly if you have a “All Cases Owned By User in My Teams”, make sure these are the Users you are expecting. In short, as you are using Teams as both a grouping for Cases and a grouping for Security, if the groupings are not aligned, there may be confusion and unexpected results.

Tip #1146: Exporting product list items

A reader asks:

I’m sitting there trying to export pricelist items. I was thinking about getting the data as the other tables in excel and then use the import tool to import them in a cloud env. But I I’m not allowed to change the views either. Advanced find doesn’t show the Price List Items table either.

To export price list items:

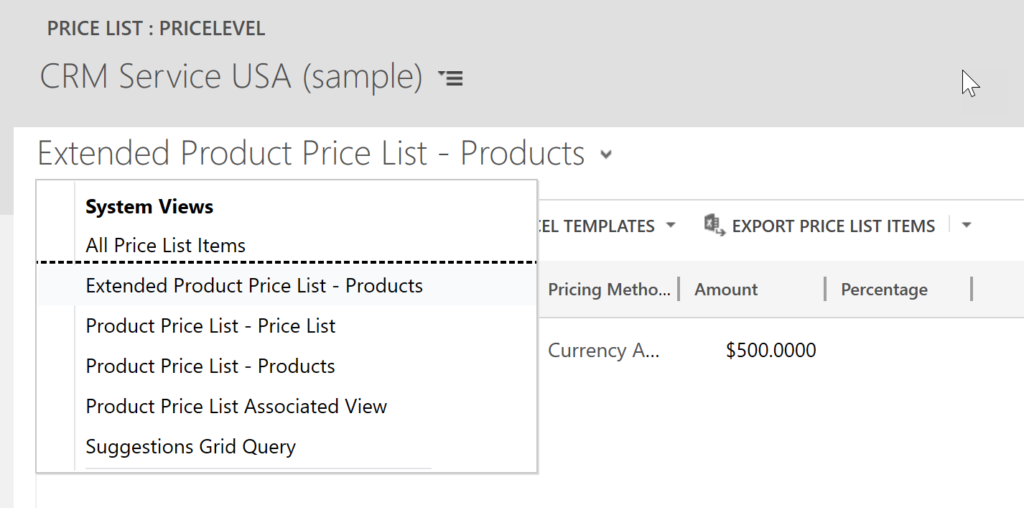
  1. Go to a price list and navigate to the price list items view. In 2013+, this is a subgrid, so you need to click the grid button on the subgrid to expand the view.
  2. Change the view to “Extended Product Price List – Products.” This view includes what you need to import, including the price list name.
  3. Export to excel using the standard export to Excel button.

If you are starting to build your price lists from scratch and you want an easy way to import them, one of the options for data import templates is price list items. You can go to Settings > Data Management > Templates For Data Import and select the Price List Items template to create an Excel template that you can populate with your prist list items for import.


Tip #1145: Tracing in Azure Functions MkIII

This never ends. Shortly after I finished writing about tracing in Azure Functions, I found Daryl “Always Raising” LaBar explaining how to use ExtendedOrganizationService wrapper to easily capture everything in your plugin:

The primary purpose of the tracing wrapper in Azure Functions is to reuse existing functionality you might already have implemented in a separate assemblies. If the existing code uses Trace then my wrapper works nicely redirecting the output to ILogger supplied by the function. But Daryl’s point is that the existing code, if it comes from plugins / workflows would have used ITracingService provided by the execution context. So we need our logger to understand ITracingService as well. Fear not, let me raise the LaBar by standing on his shoulders. We’ll take an extra parameter and implement the interface:

using Microsoft.Extensions.Logging;
using Microsoft.Xrm.Sdk;
using System.Diagnostics;

namespace YourNamespace
{
  // Log writter for working with Azure Functions 
  public class TraceWriterListener : 
               TraceListener, ITracingService
  {
    private ILogger _log;
    private ITracingService _tracer;

    public TraceWriterListener(string name, 
          ILogger logger,
          ITracingService tracer = null) : base(name)
    {
      _log = logger;
      _tracer = tracer;
    }

    public TraceWriterListener(ILogger logger,
          ITracingService tracer = null) : base()
    {
      _log = logger;
      _tracer = tracer;
    }

    // this is the one we have to overwrite to get 
    // the logging level right
    public override void TraceEvent(
          TraceEventCache eventCache, 
          string source, TraceEventType eventType, 
          int id, string message)
    {
      switch(eventType)
      {
        case TraceEventType.Verbose: 
          _log?.LogDebug(message); 
          break;
        case TraceEventType.Information: 
          _log?.LogInformation(message);
          break;
        case TraceEventType.Warning: 
          _log?.LogWarning(message); 
          break;
        case TraceEventType.Error: 
          _log?.LogError(message); 
          break;
        case TraceEventType.Critical: 
          _log?.LogCritical(message); 
          break;
        default:break;
      }
    }

    public override void Write(string message)
    {
      _log?.LogTrace(message);
      _trace?.Trace(message);
    }

    public override void WriteLine(string message)
    {
      _log?.LogTrace(message);
      _trace?.Trace(message);
    }

    // ITracingService implementation
    public void Trace(string fmt, params object[] args)
    {
      _log?.LogTrace(ftm, args);
      _trace?.Trace(fmt, args);
    }
  }
}

Now, you can call your existing AwesomeMethod and pass the wrapper in. That way it will get logged as part of the Functions logging as well as go into the trace output of the Dynamics infrastructure.

public static void Run(
  [TimerTrigger("0 0 0 1 1 *")]TimerInfo myTimer, 
  ILogger log)
{
   // get your tracing service here 
   var tracingService = ...;
   var logger = new TraceWriterListener(
      log, tracingService);
    
   Trace.Listeners.Add(logger);
   Trace.TraceInformation($"Information");
   Trace.TraceWarning($"Warning");
   Trace.TraceError($"Error");
   Trace.WriteLine($"Level comes from ILogger");

   YourSuperDuperExistingClass
     .AwesomeMethod(whatever, logger);
}

(Facebook and Twitter cover photo by Caterina Beleffi on Unsplash)

Tip #1144: How to add business days

Over six months ago I got a tip from Sergio “Behind The Wall” Macías, part of the the driving force behind Spanish-speaking Dynamics 365 community, on how to create a custom workflow activity that adds business days to a specific date in Dynamics 365. In the essence, the calculations are something like this:

while(businessDaysToAdd > 0)
{
  starDate = starDate.AddDays(1);
  if(IsBusinessDay(startDate))
   businessDaysToAdd--;
}

The heart of calculations is, of course, the IsBusinessDay method that would skip obvious Saturdays and Sundays and then go through a holiday calendar to work out if the employees eat turkey instead of helping customers or if it’s business as usual (e.g. help customers eat turkey). (“Go through a holiday calendar” sounds much easier than it actually, is, trust me). I filed the tip with the intention to come back to it until the opportunity presents itself, i.e. until I have a chance to test-drive it using customer’s money, which happened just recently. Because of the vast Dynamics 365 community resources, regardless what the challenge is, I rarely feel the need to either create custom code from scratch or repurpose the existing code. On this occasion, I found two independent open source workflow libraries that would solve my challenge.

Andrii’s Ultimate Workflow Toolkit and Jason’s CRM DateTime Workflow Utilities both have Add Business Days methods though the approach and the parameters are slightly different. Both take existing date and number of days to add as an input, and have the result as an output but that’s where the similarities end.

CRM DateTime Workflow Utilities

The AddBusinessDays activity takes Holiday/Closure Calendar parameter that you can point to a holiday calendar specific for your organization / department / business unit. This is the same calendar that can be used in service scheduling to define availability of the resources. The only downside of the activity implementation is hard-coded Saturdays and Sundays as non-business days. It works in 99% of the cases but on odd occasion business needs to include some of the weekends.

Ultimate Workflow Toolkit

The AddBusinessDays activity in this toolkit does not use holiday calendar but instead takes extra two parameters: weekend days (as a string of numbers from 0 to 6 (Sun to Mon) delimited by ‘|’) and a Fetchxml expression that would return days to skip (holidays). This “developer-friendly” approach works well if your organization does not use calendars but instead keeps holidays in a custom entity.

Waiting

If you adding business days only with the purpose of waiting until the certain number of days passes e.g. remind customer of an unpaid invoice after 5 business days then you might want to consider codeless approach using SLAs.

Thanks to Andrii “Granny’s Moonshine” Butenko and Jason “I can make a kettle talk to CRM” Lattimer for their awesome contributions – I use their toolkits on a daily basis.

(Facebook and Twitter cover photo by Curtis MacNewton on Unsplash)