Tip #363: Select target version for CRM Online update

CRM Online 2015 Update 1 will be released shortly. if your organization is upgraded to 2015 after Update 1 is released, will you get 2015 or 2015 U1?

It depends on what updates you approve. When Update 1 becomes available, you can go directly to 2015 Update 1 without approving the 2015 update. This article from Microsoft describes the process in the “Approach 1” section. In a nutshell, you can approve the 2015 update for your non production update, then go to U1 in the sandbox organization to test, then just approve the Update 1 for production and go directly to U1 in Prod.

This approach allows you to only update production one time, rather than going through two updates.

Tip #362: Script errors when testing updates

Sometimes when testing updates to customization, users will get script errors that don’t show up when you were developing them. If this happens, don’t freak out. The following steps frequently will make the errors go away.

  1. Clear the user’s browser cache and restart the browser. Frequently users of CRM have cached pages in Internet Explorer, and clearing the cache will make things work correctly.
  2. If the errors still persist, verify if any other users with the same role/business unit assignments are getting the error. If they are, verify that the user’s security role has adequate permissions for the entity creating the issue.
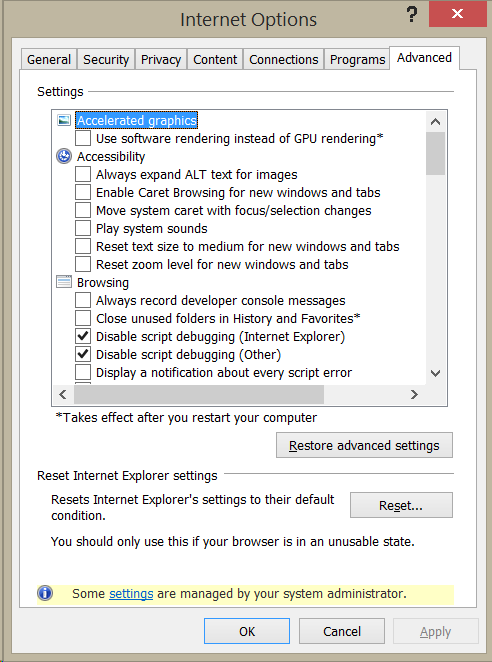
  3. If the user is the only one experiencing the issue and clearing the browser cache didn’t work, reset the browser to default settings. In Internet Explorer, go Internet Options and click the Advanced tab. Click the reset button.

Screenshot 2015-04-08 14.17.40

And if the user is using CRM 2015 on IE 8 or 9, remember that these browsers are no longer supported. This doesn’t mean that they won’t work, but there is a good chance that users of these browsers will see more error messages than a supported modern browser. Also, all versions of IE before IE 11 (including IE 10) will be out of Microsoft support in January.


Tip #361: Use an Exchange Distribution List for CRM email notifications

When it comes to workflow design, one of my least favorite things to see in a workflow is a notification set to go to a specific person. Sure you need it sometimes, but there are some definite downsides. If someone gets promoted or leaves the company, you have to update you customization to change the notification email to send to the replacement. Also, if additional people need to see the notification, you have to add them to the workflow.

One alternate approach that works well is to use an Exchange email distribution list. Create a DL and then add a contact (or some other email enabled entity record) to CRM with the email address of the DL. Then specify the contact in the “To” like of the workflow send email step. Benefits of this approach:

  • You can have the notification go to multiple people.
  • You can have someone who is not a CRM System Administrator manage the notification recipients.
  • You can change the recipients of the notification without having to modify your customization

Tip #360: Workflows on change of process flow stage

In CRM 2013 or 2015, if you have a workflow that runs on change of the process flow stage, such as a notification email, you may occasionally see the workflow fire multiple times.

The reason for this is because the way that the stage is moved by hitting the next/previous buttons makes it very easy for users to click the arrow too many times, and they may accidentally go forward/back too many stages, causing the workflow to double/triple fire. Also, each time the stage is moved, it saves, so if the user advances the stage 4 times, the workflow will run 4 times.

There are several approaches that you can use to guard against this. The following approach uses out of the box tools.

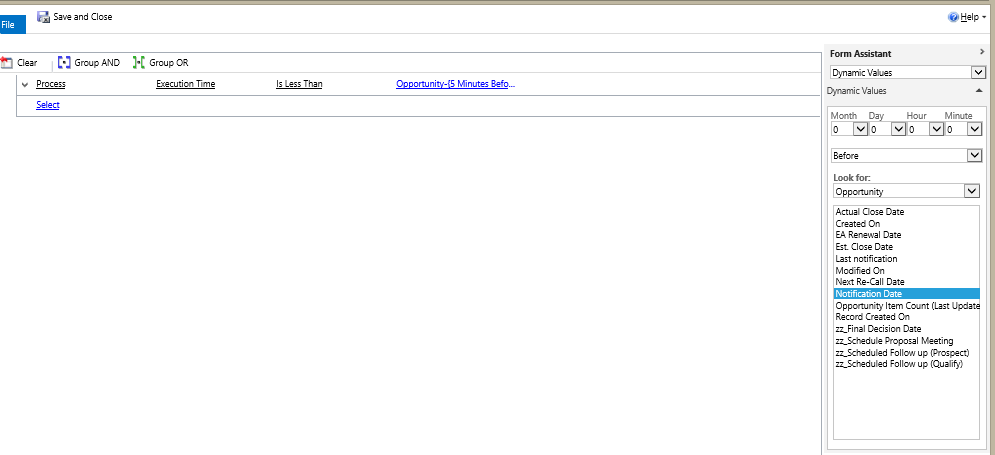
  1. Create a field called notification date.
  2. Add a step at the end of the workflow to update the notification date field with the execution time of the workflow.
  3. Add a check condition step at the beginning of the workflow to check and see if the execution date is less than 5 minutes after notification date. If it is, stop the workflow.

Screenshot 2015-04-06 17.05.33

Tip #359: Why don’t I see any records in CRM Online

A recent post in the Facebook Microsoft Dynamics CRM group asked why, after adding a CRM Online trial to an Office 365 subscription, a system administrator could only see the service and settings sitemap areas.

Abhishek Pattanaik's photo.

The reason is that the user in question had Administrative user access mode. In Office 365, all Global Administrators are granted System Admin in CRM Online, but if they don’t have a CRM Online license associated with their user, they will be limited to Administrative user access mode. This gives them access to administrative functions, like user management, but not to any front-end entities or records.

To grant the user full read/write access, apply a CRM Online license to the user in Office 365.

Tip #358: How to delete deleted report

No, it’s not a typo – I am going to talk about deleting the deleted.
– “What?!”
Let me explain.

We all have that Rupert/Vernona/Joe/Jill on our team who think they know best and, for some inexplicable reason, management agreed and granted them privileges sufficient to deliver some real damage.

Like going into SQL Server Reporting Services manager and manually renaming CRM report from there because “what is this nonsensical report {numbers-numbers-letters-numbers}, let me fix that for the business users and give them a nice and clear name they can understand”. Or, better yet, simply deleting the report because “with the name like this, the report is obviously a mistake or system generated and can be deleted”.

When that happens, every time you try to change anything in CRM for this report or even simply delete it, you will receive one of the following messages:

Reporting Error
Error occurred while setting property values for the report. {0}

Reporting Error
Error occurred while deleting item from the Report server.

That’s because CRM reports find their SSRS counterparts by those {numbers-numbers-letters-numbers} otherwise known as GUIDs.

Fix is very straightforward:

  1. Find GUID of your report by simply opening it for editing. URL will contain the GUID.
    report1
  2. Go to your SSRS reports in the browser
  3. If report was simply renamed, find it and change its name to the GUID above – and it’s as good as new.
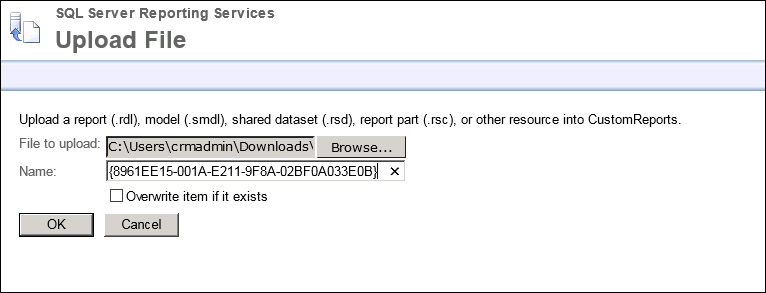
  4. If report was deleted then download definition of one of the existing reports (does not matter which one), then click Upload File, pick the report definition you just saved but set the name to the original GUID
    Import renamed report
  5. Once done, simply delete that report in CRM.

After the cleanup is complete, go and physically swap J,K,N, and M keys on their keyboard. And glue the DEL key shut for the full measure.

Tip #357: Multiple entity search in Outlook

¡Ay, caramba! Do we have a guest or what! Pablo “CRMGamified” Peralta takes the stage today with his awesome tip translated from the fuente española

Looking for ways to have the Search options always visible in Outlook as it happens in web interface, I found a way that while is far from ideal, is close to what I was looking for and our users found it is very useful.

The way is:

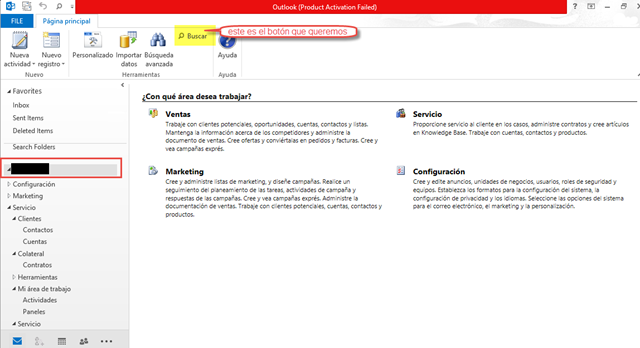
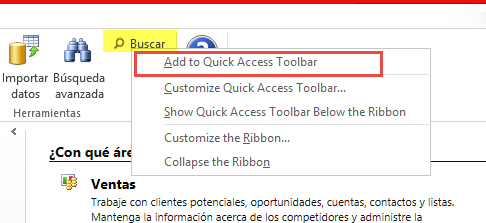
  1. From Outlook, let’s go to any  CRM option where the Search icon is displayed. example:
    Search icon
  2. There we click the right mouse button and select the “Add to Quick Access Toolbar” option:
    Quick Access Toolbar
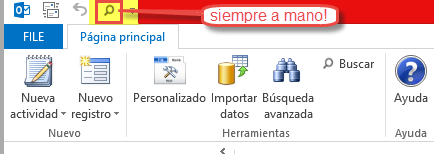
  3. Now, we have our way to search by multiple entities always visible here:
    Multi entity search

Now, why did I told you that this was not ideal? Well, because at least in my case, I found that  the search bar disappears once I closed Outlook. So, every time I open Outlook I must do the same steps.

They’re just a couple of clicks that will save me of doing many more clicks, but it would be ideal if the configuration is conserved.

Hope you like it and find it useful. Greetings!

Tip #356: When Publish All Fails

So you imported a large solution, perhaps an upgraded solution in a CRM upgrade, and when you publish the entire solution, you get a generic SQL error. What should you do?

  1. Go to Settings–>Customization–>Customize the System.
  2. Select Entities
  3. When the entity list appears, select 5-10 entities at a time and click “Publish.”
  4. Continue until you work through all updated entities.
  5. If you hit the error, publish each entity in the selected group individually to identify which entity has the issue.
  6. If you get to the end and don’t hit the error, it was most likely a SQL timeout. You should then be able to Publish All successfully.

Tip #354: No code contextual sequential auto-number

When you add a child entity, it is best practice to populate the name field, but sometimes it can be difficult to come up with a name that makes sense. Say you have an entity that is the child of an account/company record. If you leave the name field blank, if any record looks up to that record, the lookup field will be blank. Plus, say you want to ask the account manager about the record, without a distinct name, it will be difficult to let them know to which record you are referring (sure you can email a link, but follow along).

One approach is to auto number the records with the name of the parent to provide a distinct record name (Acme-1, Acme-2, Acme-2). However, there is no standard way to auto-number records. Sure you could write a plugin, but if you don’t have those skills or you don’t want to take the time, there are additional approaches that do not require custom code.

So in the scenario where you want to auto number records with a combination of the parent record and a sequential number, the following is a no-code approach that I have used.

  1. Add a whole number field to the parent entity called “Counter.” Using a system business rule, default the value to 0.
  2. Add a workflow that runs on create of the child entity.
  3. Add a step to the workflow that increments the counter field on the parent record by 1.
  4. Add a step to the workflow that updates the child entity record and sets the name field to a combination of account name – counter field value.

The result will be a dependable synchronous automatic number that should work for basic requirements. Note that it will not re-use numbers should one of the child records get deleted. If more complex auto-numbering is required, a plugin is the recommended approach.