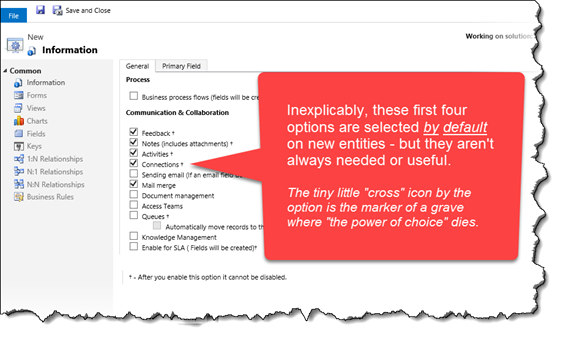
Wherein we learn to disable the Notes, Activities, Connections, Feedback, Queues, And/Or change the “Ownership” model option on a Custom Entity.
Why do I Care?
Recently I received a solution file where EVERY custom entity had been created with ALL the default options enabled. Even entitles that serve only as simple “lookup” lists had Notes/Activities/Connections/Feedback enabled on them – before putting those entities into production, I needed to ‘unselect’ these options – this tip explains shares how I accomplished this.
 My perspective on why to /not/ enable these options by default is that the more places people can create records, the more places someone would have to go look in order to find those records and more importantly, when they go to create a new Note/Activity/Connection, etc. the list of potential targets is large and harder to quickly spot the “Big 4” – Accounts, Contacts, Opportunities, Cases.
It wasn’t long ago that a certain beautiful, slick-headed man named George presented an excellent roadmap to The Land of No Return – wherein if the entity creator either set the security model to ‘organization’ or forgets to disable any of the irreversible default options when creating a new entity, CRM does not offer the opportunity to change these options.
Avoiding the Land of No Return
It’s important to point out that the easiest way to avoid this, is to just uncheck the options before creating the custom entity. – If you *just now* accidentally created a new entity and you haven’t really started configuring it – or if it’s a really simple entity, just delete it and re-create it. (I have heard of sr. architects just assigning the task to a junior consultant as a way to give them experience – or help them learn from their mistakes – which is also far more human-resources department friendly than Spießrutenlaufen.)
In my situation, the entity had already been created by the vendor – with all the forms, fields, views, charts etc. – I didn’t want to go through the process of re-creating all of that by hand, so I leveraged CRM 2016’s “Solution Segmentation” feature to move the entity’s components without those options. The advantages of the vastly improved solution segmentation in CRM 2016 and later makes this possible in a way that was never possible in a supported manner before.
Prerequisites for the Solution
1) This requires CRM 2016 and later – Earlier versions of CRM had significantly less flexibility when it came to configuring solutions.
2) This is absolutely easiest if you don’t already have production data in the entity. (If there is already production data in the entity, you’ll need backups all around because at one point you’ll need to delete and recreate this entity – and then repopulate it if needed. – If this entity has custom 1:N relationships and many of those are already populated, please carefully weigh the effort of backing up and restoring this data, specially in related ‘child’ entities – vs. the challenge of just learning to live with the entity as-is.)
3) You’ll need a temporary location to publish this entity to – if the target entity has lots of relationships to other custom entities, those will need to exist in the temporary location as well. – In my case the entities I wanted to re-create all pointed to either Accounts or Contacts or each other.
4) This solution is designed with only unmanaged custom entities in mind.
5) Since you’ll need to be able to delete and re-create this entity, you will temporarily remove it from any sub-grids and also note where it is listed in the Sitemap.
The Solution
1) For each entity you want to clear of these options, manually create a new entity in the TEMP environment with the EXACT same schema name (including prefix) as the existing entity – and be absolutely sure to clear all the unwanted checkboxes and set the ownership appropriately before hitting ‘save’.
2) Create a new solution in the SOURCE environment and include the entity (or entities) you wish to modify-
3) UNcheck the option to include “all assets” and “entity metadata”

4) Check and select all the Forms, Views, Charts, Keys, Business Rules and Hierarchy Settings on those tabs.
5) On the ‘Fields’ tab and the three relationships tabs (1:N, N:1, NN) – change the filter to “Custom” and select all.
6) Save and Export the solution as Unmanaged and then Import it into the TEMP environment.
7) TEST TEST TEST in the new environment and make adjustments as needed.
8) Delete the entity in your SOURCE environment (you backed up all needed data right?)
9) Create a new, unmanaged, solution in the TEMP environment and export WITH the all assets and entity metadata options checked.
10) Import the new solution back into the SOURCE environment, configure the entity’s custom icons if needed, add it back to any subgrids if needed, and publish (and then re-import data if applicable.)
See, that wasn’t so bad, but it’s still easier to remember to uncheck those boxes to begin with, amiright?
 of the